JamesTXSD
Active member
- Joined
- Mar 1, 2005
- Messages
- 7,494
- Reaction score
- 1
- C Dory Year
- 2007
- C Dory Model
- 25 Cruiser
- Hull Identification Number
- TBA
- Vessel Name
- "Wild Blue" (sold 9/14)
On the Wild Blue Cruising thread, there was a discussion regarding the image of our boat decorated with Christmas lights; certainly more of an advanced Photoshop use. I’ve had a few private requests for a more basic discussion, so... as promised, here are a few simple things you can do with Photoshop to make your images look better quickly, and sizing for web use.
I previously discussed the role of the photofinisher in the days of film - it was to get the best image possible from your negative. No custom work, just minor alterations with centering, density, and color. And that’s what we’ll learn about Photoshop with this discussion. Many other imaging software programs have similar adjustments, so hopefully you can apply this information with your choice of software. We use Macs in our home and on our boat... Photoshop for Mac and PC will look quite similar, but your screen image may differ a bit from what you see here; the premise will be similar.
After downloading your images, you first will want to view them to make selections on which images to work with. Photoshop offers a “browse” feature, but the thumbnails are a bit small. I prefer to do a “once over” with an xf-viewer program. Most cameras come with some basic viewing software. Macs come with iPhoto, and PCs have their media viewer equivalence.
We’ve picked our favorite shot and now want to make an image for posting on the web and making a print (2 different uses). I generally like to start with the highest resolution use first.
Open your file in Photoshop.
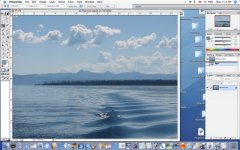
Most current cameras are 6-10 mg files, so this will come into PS as a 18-30 mg file (6-10 mg in each of the three color channels); a much bigger file than is necessary for making a snapshot size print or web use. The first thing to do is crop and/or resize. In this case, I want a 4x6. Go to the crop tool, set the width to 6, height to 4, and resolution to 300 (250 or 300 is the optomum resolution for making a print; 72 will be the best for web use - we’ll discuss this in more detail later). Now, anywhere you drag your crop tool will result in a 4x6 file.
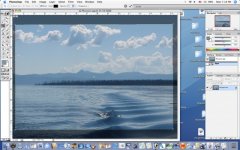
Cropping is a matter of taste. Keep in mind that the more you crop in, the fewer pixels you will have to work with. Some folks will tell you that a camera with more pixels will allow you more cropping... true to a point. I prefer to crop in the camera to use all the pixels available.
This is the time to correct a horizon line that isn’t level or “zoom in”. With the image cropped, you now have a file size of about 6 mg. More manageable, faster to work with, and good resolution for a 4x6 print (though still too big for web use).
The next step is to make an adjustment for levels; this allows you to correct contrast/light/dark. You can make changes in shadows, highlights, and midtones. The image above is somewhat “flat”; by bringing the shadows down and the highlights up, we can make the clouds pop out more, the water richer, and the shadows of the trees deeper. This is done by going to Image>Adjustments>Level.
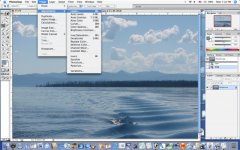
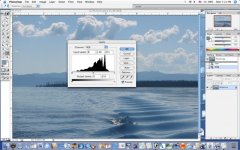
Go to the left side of the bottom of the histogram and move the slider to the right. Usually to where it starts to come into the “bell curve”. Do the same with the slider at the right side, moving it to the left. You can adjust the midrange of the image by moving the middle arrow left or right, as necessary. With “preview” checked, you will see the results immediately.
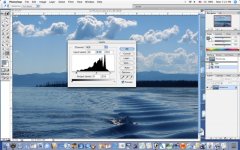
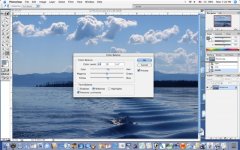
Next step is color adjustment. Again, somewhat subjective. Here, I’ve made a small correction to the overall color by gong to Image>Adjustments>Color Balance.
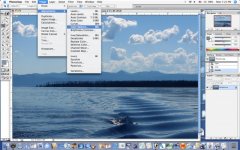
You can play with the sliders to see what color you like best. Some images won’t need any balance, some will.
And that’s it for most images. The above steps will generally take just a few seconds once you get familiar with the process. And your images will be better as a result.
Be sure to “Save As” and rename the file. Now, you can send it to your printer or put it on a flash drive to take to your local photofinisher.
And the next step: making the image a decent size for web use. If your file size is too large, it will take a LONG time to download. Screen resolution on your monitor is 72, so anything beyond that is simply wasted file size. To resize for posting on the web, simply to to Image>Image Size
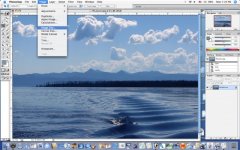
and set the resolution to 72.
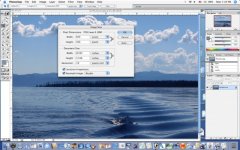
Then determine the size you want. On the C-Brats, I will use 600 pixels or less for the largest dimension (height or width). Plug in that number, the other will take care of itself. Now “Save As” once again. For my purpose, I usually use the same file name with an “e” added at the end. Save the file where you can easily retrieve it (I usually put it on the desktop or into a new “e” folder).
Here’s how the final image will look on the C-Brats...
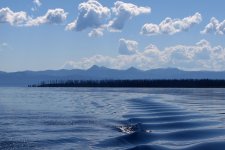
Your new smaller file will upload and download faster.
You now have 3 similar files. Time to clean house. If you will be using the files again, you can keep them in whatever file system you use; if not, toss ‘em (not the original!!).
These few steps will make your images look better and load faster. Now, if you haven’t done so before, it’s time to share some images with us!
Hope you find this useful,
Jim B.
From the Wild Blue thread: http://www.c-brats.com/viewtopic.php?t= ... &start=660
(There have been several discussions on how to put the images in your photo folder here, and how to post as part of your text if desired. Do a search to review those topics.)
I previously discussed the role of the photofinisher in the days of film - it was to get the best image possible from your negative. No custom work, just minor alterations with centering, density, and color. And that’s what we’ll learn about Photoshop with this discussion. Many other imaging software programs have similar adjustments, so hopefully you can apply this information with your choice of software. We use Macs in our home and on our boat... Photoshop for Mac and PC will look quite similar, but your screen image may differ a bit from what you see here; the premise will be similar.
After downloading your images, you first will want to view them to make selections on which images to work with. Photoshop offers a “browse” feature, but the thumbnails are a bit small. I prefer to do a “once over” with an xf-viewer program. Most cameras come with some basic viewing software. Macs come with iPhoto, and PCs have their media viewer equivalence.
We’ve picked our favorite shot and now want to make an image for posting on the web and making a print (2 different uses). I generally like to start with the highest resolution use first.
Open your file in Photoshop.

Most current cameras are 6-10 mg files, so this will come into PS as a 18-30 mg file (6-10 mg in each of the three color channels); a much bigger file than is necessary for making a snapshot size print or web use. The first thing to do is crop and/or resize. In this case, I want a 4x6. Go to the crop tool, set the width to 6, height to 4, and resolution to 300 (250 or 300 is the optomum resolution for making a print; 72 will be the best for web use - we’ll discuss this in more detail later). Now, anywhere you drag your crop tool will result in a 4x6 file.

Cropping is a matter of taste. Keep in mind that the more you crop in, the fewer pixels you will have to work with. Some folks will tell you that a camera with more pixels will allow you more cropping... true to a point. I prefer to crop in the camera to use all the pixels available.
This is the time to correct a horizon line that isn’t level or “zoom in”. With the image cropped, you now have a file size of about 6 mg. More manageable, faster to work with, and good resolution for a 4x6 print (though still too big for web use).
The next step is to make an adjustment for levels; this allows you to correct contrast/light/dark. You can make changes in shadows, highlights, and midtones. The image above is somewhat “flat”; by bringing the shadows down and the highlights up, we can make the clouds pop out more, the water richer, and the shadows of the trees deeper. This is done by going to Image>Adjustments>Level.


Go to the left side of the bottom of the histogram and move the slider to the right. Usually to where it starts to come into the “bell curve”. Do the same with the slider at the right side, moving it to the left. You can adjust the midrange of the image by moving the middle arrow left or right, as necessary. With “preview” checked, you will see the results immediately.

Next step is color adjustment. Again, somewhat subjective. Here, I’ve made a small correction to the overall color by gong to Image>Adjustments>Color Balance.

You can play with the sliders to see what color you like best. Some images won’t need any balance, some will.

And that’s it for most images. The above steps will generally take just a few seconds once you get familiar with the process. And your images will be better as a result.
Be sure to “Save As” and rename the file. Now, you can send it to your printer or put it on a flash drive to take to your local photofinisher.
And the next step: making the image a decent size for web use. If your file size is too large, it will take a LONG time to download. Screen resolution on your monitor is 72, so anything beyond that is simply wasted file size. To resize for posting on the web, simply to to Image>Image Size

and set the resolution to 72.

Then determine the size you want. On the C-Brats, I will use 600 pixels or less for the largest dimension (height or width). Plug in that number, the other will take care of itself. Now “Save As” once again. For my purpose, I usually use the same file name with an “e” added at the end. Save the file where you can easily retrieve it (I usually put it on the desktop or into a new “e” folder).
Here’s how the final image will look on the C-Brats...

Your new smaller file will upload and download faster.
You now have 3 similar files. Time to clean house. If you will be using the files again, you can keep them in whatever file system you use; if not, toss ‘em (not the original!!).
These few steps will make your images look better and load faster. Now, if you haven’t done so before, it’s time to share some images with us!
Hope you find this useful,
Jim B.
From the Wild Blue thread: http://www.c-brats.com/viewtopic.php?t= ... &start=660
(There have been several discussions on how to put the images in your photo folder here, and how to post as part of your text if desired. Do a search to review those topics.)

