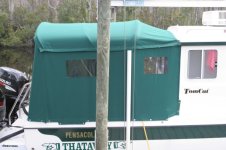
Canvas

Donald, go to my Midnight Flyer album, and look for the nested album on my enclosure. I had it custom done by a local guy that does good work. The same guy did the bimini on C-Traveler. I don't remember if the bimini folded forward as well on my 22, but it does on my 25. So I can fold it back, or forward. I trailer the boat with it in the forward position, and normally on the water either have it back, or fully open over the cockpit. However, when trolling, I will also fold it forward. I think I have photos of it in C-Traveler's album as well. As for the full camper back, let me say this. After having it on my 22, I elected not to have it on my 25. The bimini alone suffices. The problem I found on the 22, is I really didn't use it enough to make it worth while. There was probably only once where it really came in handy, and that was when I did the Inside Passage of Alaska. There were a couple other times I used it, but mostly because I had it and felt I needed to get my money's worth by using it. I also had to figure out where to carry the extra enclosure when it wasn't in use. That was probably the biggest disadvantage on the 22. I have not really missed having a full camper back on my 25. But I do use the bimini a lot. Colby

http://www.c-brats.com/modules.php?...ame=gallery&file=index&include=view_album.php

http://www.c-brats.com/modules.php?...ame=gallery&file=index&include=view_album.php
 
On our Tennessee River Cruise we were the only boat to have a full camper back.---and it made a huge difference--We had a place to dry off when coming in out of hard rain. It also doubles your usable living space. Also a full camper back with insect screens is a delightful place to sit and relax, when others a bug zzaping or getting eaten up! I have had this type of enclosure on a number of boats, not just C Dorys--and we consider it to be an essential.....different folks--different strokes!
 
different folks--different strokes! Very well said, you need to decide what will work best for you, and we all have different priorities and different cruising ground. Here, it rains a lot, and unless you are doing day trip, you will be spending most night at anchor. I only had a top cover on my 22, and I really wanted a full enclosure. Being able to leave thing in the cockpit and knowing they will stay dry in a real bonus, especially after a few day out and wanted to reorganize or do some clean up, usually best done on a rainy day anyway. The 22 is a great boat, but it can get crowded fast when you try to get stuff done in the cabin.
 
I would say put it on the Stbd. side. Mainly because the cabin door secures to the port side bulkhead.

I recommend docking your boat to port because the boat backs to port, making it easier docking on the port side. Using propeller walk in your favor (pro-tip) for boat handling.
 
You folks are so helpful. Thanks for all the comments. We feel like when we get advice here is comes with some seasoning from seasoned owners.

We're going to get more familiar with this and to that end we have begun watching Sailrite and other video's. I now think I can work this out and design our own frame. Then a local canvas guy can cover it for us.

How does the vertical seem, up the cabin side, not leak while under way. And, the valence that connects the Bimini to the back of the cabin...Is there a track and bolt rope attached there?

The photo I attached above shows that the Bimini stays very high (tall) well forward of many I see. In fact Larry said somewhere it was 6'4"-6'8" and that is what I would need to be comfy...I'm a fat 6'2 1/2". The little Connector piece, I call it a Vallence, should indeed be removable for ventilation on hot days and while underway to help push any exhaust fumes from the cockpit.

As many of you have mentioned that you don't always use your sides, and since the latest estimates put a full tent 50% higher than we budgeted, we are now thinking to only make the Bimini this year. Built in such a way that we can add panels in the future finesh it out.

Thanks for all the free advice.
 
recommend docking your boat to port because the boat backs to port, making it easier docking on the port side. Using propeller walk in your favor (pro-tip) for boat handling.

Even though Waypoint is a professional mariner, I will disagree, in that with an outboard motor; I have my outboard turned to turn to Starboard (steering)as I come to a dock with my C Dory (or any outboard boat). That way when. you put the boat in reverse, it pulls the stern to Starboard and snugs you up to the dock. This is one of the reasons to have a 'Brody" steering knob on the outboard boat's wheel. The steering knob allows turning the wheel and maneuvering the outboard boat much faster and makes it more maneuverable. (Thousands hours at the helm of single powered outboard boats over a period of over 70 years.)

I also have thousands of hours at the helm of single engine (single prop) sailboats up to 62' in LOA, where "Waypoints" point is well taken. In sailboats the rudder is larger than power boats. With practice you can back a single screw boat long distances depending on the type of rudder and size. This takes movement of the rudder and then kicks in forward to swing the stern as the boat has gathered sternway. The direction a boat is pulled in reverse, depends on the rotation direction of the prop.

I strongly disagree with making your own frame. You want a crown on the top, with a gradual radius on the upper corners--that is very difficult to do, with out a hydraulic tube bender which easily puts in the proper amount of curves. You do not want flat top on a Bimini.
 
It's Ironic, I've been practicing Starboard docking as I figured port would be easy. I figure that in reality I need to not differentiate so much as there will be many times ahead that I'll need to take the opposite of my preference. You and Mark/Yuka are welcome at my dock anytime...just let me know which boat you're bringing, I mean my dock is only so long, lol.

I grew up with those spinner knobs on all of our Massey Fergusson's on the farm. while I plan to get one for this boat I'm not positive there will be enough room btwn my knees and belly.

Sailrite has come a long way since yrs ago when I first visited their site. Now you design your frame plan while using their Best Practices. Then they bow bow the roof and bend the corners. They offer drilling jigs that make it possible to drill at will without the the hassle of scraping and rolling off the pole. Plus I have some experience in layout and would find it fun. Both My wife and I both sew, or did at one time sew, but we're not sure we want to make our own top. There is simply certain entry sizing and roof heights that we want and so if we make the frame that sets the parameters.

Another member mentioned aluminum, that is another light option, That is a great option but it is not clear if there are metal fittings that would be appropriate.

I'm on edge considering these things. Then I realized we don't have to be in a hurry.

Learning...
 
How is the roof and sides waterproofed.

Sailrite mentions the potential need for a diagonal brace at the back to keep the Bimini from wracking or wobbling. Is this ever needed on our short cockpits or is it ever needed if the front of the Bimini is attached to the cabin?
 
Learning how to dock takes time.

With weather, current and perhaps visibility limitations with all that canvas astern
you have Donn, I'd advise pracitcing with someone else's boat if you can...

Potential problems I foresee with your canvas set up: 1) access to your stern cleat
for securing a line to a dock cleat in a blow and 2) boarding/disembarking from/to
a dock without taking it down. I had zippers - port and starboard put in my
canvas - for easier access at thee dock.

Your twins should assist you in docking, not detract once they become familiar.

Aye.
Grandpa used to say, "Live and learn."
 
How is the roof, where it attaches to the cabin top waterproofed? is it a bolt rope/track, ahead of a zipper and a then a flap?

Donald Tyson":3vesvtmy said:
How is the roof and sides waterproofed.

Sailrite mentions the potential need for a diagonal brace at the back to keep the Bimini from wracking or wobbling. Is this ever needed on our short cockpits or is it ever needed if the front of the Bimini is attached to the cabin?
 
Practice: When I get a new boat, I always practice. A good way to do that is to take 2 fenders and tie to ends of a PVC pipe or boat hook. Go out in a quiet bay with no wind or current to start with. Practice coming along side of the fenders/boat hook float.

Top and Sides of a Bimini can be snapped on or put on a bolt rope and into an awning rail. I have also put the forward side ends of the camper canvas where it attaches to the cabin side into an awning railing. If you do this, you want the the first panel of the Bimini and camper back sides to be only 2 to 3" wide before the zipper.

If a Bimini frame is in one piece the shipping is going to be costly--also if broken down there will have to be fitted to mate the various "legs". This may make the frame less stable. I prefer the SS over Aluminum for strength and stability.

No need for a cross bar or lateral bracing if it is built well.

DIY canvas work. I have been doing this most of my life. My dad did much of his canvas work on an old treadle machine belonging to my grandmother. I still have a piece of needle in my left thumb from building a small boat sail when I was about 10 years old. Later I helped friends who owned sail lofts cut or sew when they were pressed for time or overwhelmed by orders.
You do want a machine which will handle the size of needles, and the thickness of the canvas (Sunbrella or similar). It is not that hard to do, but there are a number of "tricks of the trade". I have made a couple of dodgers--that is more difficult than a camper back and Bimini. I made the camper back for the last C Dory 25, using ShelterRite and HL66 glue for both the "canvas" and Clear Vinyl.

SailRite has excellent patterns, supplies and videos for canvas work. You should be able to do a good top and canvas if you want to take the time and have an adequate sewing machine. Double sticky tape. can be your friend! Do good mockup and make good patterns. Look at a number of different photos and videos before you start.
 
I agree with Bob (Thataway) that it is possible to sew your own tops. And, in my experience an old treadle machine is the way to go if you can find it. I purchased a 1929 Singer over 30 years ago from an antique store, and it is still going strong. Since the internal mechanisms are are mechanical linkages (no belts) it will punch through as many layers as you need depending on the strength of your wrist. We have had 4 electric sewing machines in our house and my wife and two daughters have only ever used the treadle! The control in my opinion is much better than an electric.

Duckworks Boat Supply has a very strong 3/8" double sided tape that works well to hold fabric pieces together for sewing. They also have good polyester thread. I like to support our local small businesses when I can. Also, if they have an item I need I find their prices to be slightly lower than the big companies.

For zippers and snaps I like to use Rocheford https://rochfordsupply.com/. I find their prices slightly lower than Sailrite.

Also as a compromise between cost and amount of work I suggest purchasing a standard bimini top and then sewing your own side panels (clear, mosquito, privacy) and adding the connections to the boat. That is what I have been doing for all my previous boats. There is a wide variety of sizes and shapes (both aluminum and SS) so you should be able to find one that meets your need.
 
Just a thought--"Tenara" thread by Gore (as in Gortex), will outlast polyester or other threads by years. It is much more expensive, and slightly more difficult to sew with. But if a cover is to be constantly exposed to UV and the elements it is worth it.
 
A Lot of info Tom. Sounds fun. Right now I'm in the middle of a lot of retirement planning and activities. Won't have the Wife until she retires in August/Sept. So for our initial Bimini I agree that we will design or purchase the basic kit/frame and then will engage a local professional to sew the Bimini together for us. I still need to learn about how they are constructed so I am not taken advantage of. Then hopefully, when fully retired, we can make up the rest of the panels.
Question: do future panels get sewn to the existing flaps of the basic Bimini? I'll have a year to research it all, and the initial Bimini will serve us well for the first year.

"-my experience an old treadle machine is the way to go if you can find it. I purchased a 1929 Singer over 30 years ago from an antique store, and it is still going strong.

-Duckworks Boat Supply has a very strong 3/8" double sided tape

-For zippers and snaps I like to use Rocheford https://rochfordsupply.com/. I find their prices slightly lower than Sailrite.

-Also as a compromise between cost and amount of work I suggest purchasing a standard bimini top and then sewing your own side panels (clear, mosquito, privacy)"
 
Donald, The side panels are attached with zippers to the top. What needs to be done is sew zippers (#10) to the top and to the panels. That way one zipper on the top can accommodate all three types of sides (see-through, mesh and privacy). You can buy #10 zippers in a variety of lengths and then cut them at the end if they do not fit exactly. A little hot melt glue on the end will keep the zipper from coming off. Amazon sell no-name zippers in a variety of lengths and Rocheford has their own brand as well as YKK. I did not find any difference in quality between the Amazon brands and the YKK. One way to check the quality is to look at the strength and weaving patter on the webbing used as the base of the zipper.
 
Also, if you buy a standard bimini top, purchase one that is a bit wider than the cabin top with the frame slightly higher than the cabin top. That way you can bring the bimini top over the cabin and attach it to the railings with the webbing provided. That way the water will run off to the sides out of the cockpit. The best option however is to attach a 4-6 inch wide fabric with a zipper (overlap the top to prevent water ingress and apply a seam sealer) to the end of the bimini top. This strip can be attached to the top of the cabin in a variety of ways (glue, welt, velcro).
 
Tom Hruby":3aa6pyps said:
Also, if you buy a standard bimini top, purchase one that is a bit wider than the cabin top with the frame slightly higher than the cabin top. That way you can bring the bimini top over the cabin and attach it to the railings with the webbing provided. That way the water will run off to the sides out of the cockpit. The best option however is to attach a 4-6 inch wide fabric with a zipper (overlap the top to prevent water ingress and apply a seam sealer) to the end of the bimini top. This strip can be attached to the top of the cabin in a variety of ways (glue, welt, velcro).

I differ on several issues here:

If a top is wider, it will not stop rain from entering the cockpit. Much of the time rain is accompanied by wind. The wind will blow the rain into the cockpit.

If you extend the Bimini frame over the entry area (the first 18" to 24" from the cabin Top--it can impede your entrance to the boat. You want a clear path of entry. I like a zip out/up panel there. If the Frame is high enough it may have less effect. Remember there is not a lot of room up there even in the best of Bimini's

I would never glue any canvas material to the top of the cabin. The proper method of securing any fabric to a cabin top is with an awning rail and bolt rope or snaps/Common Sense Fittings. Long term Velcro exposed to UV and salt elements does not do well.

Zippers need a bit more attention. You do not want corrosion. Buy the best you can find. A YKK #10 with molded Delrin teeth and pull have served me well in all of my boats. Smaller and or metallic parts will cause issues. There are silicone and teflon sprays for zippers which will make them easier to use and lengthen their useful lives.

You want at least 3 bows in the Bimini. Any less will allow sag and water pooling on the top.

If you look at the front of the photo in the first photo, you will see the flap which will over lap the zippers on front and back. You may want to use velcro on the underside this front flap to be sure it is water tight. (The Tom Cat is considerably faster than the 22, but in wind, water could enter even on a 22.)

The side panels will normally have the insect screens sewn in place. The clear vinyl will be zippered in. The top of the clear can be fixed or removable. In any case, make sheaths for the clear material out of terry cloth or sheet material, so it will not be scratched and avoids the distortion of rolled material. The side panels can be stowed flat under the V Berth.

You want the panels easy to remove. There are many ways to secure the Bimini forward against the aft end of the cabin top, if necessary to gain access around for your fishing.

Look at the flaps necessary to attach the forward and aft panels..if you buy a pre made Bimini, these will have to be added--and you don't want any more seams on top than necessary.

I made a camper "back" for my last 25, using ShelterRite PVC coated fabric (similar to what Inflatable boats are made of). I used no sewing and HL66, a vinyl material glue to assemble all of the components of the side and back curtain. No sewing; the clear vinyl is easily glued to the fabric. I did use Common Sense fittings for the top and sides instead of zippers, and used standard button snaps for the bottom and front to the cabin sides. It was done as an experiment--the only down side, is that the ShelterRite is heavier than Sunbrella. The cost for all materials was less than $500--and that would include "tools" necessary, including the snaps and "common sense" fittings.

There is a flap for the stern lines on the photos of finished. I intentionally made the side "view" small--and we used separate insect screens from the camper back. For "full privacy" we used light weight dark material to be hung on the inside of the clear vinyl.

I am including some photos of my Tom Cat Bimini. It allowed plenty of room for entrance, and the SS post allows you to steady yourself as you enter or leave the cockpit. The entire Bimini could be folded up and attached to the forward SS post on the first bow--and fixed there for fishing with Bungie cords..
We intentionally put in very small windows on the side, mainly for privacy at docks. We had almost fully clear vinyl on the back

In fitting stage--the front will have solid SS posts with quick release pins as does the back.
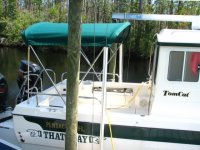
Bimini_camper_canvas_in_construction.sized.jpg

Completed camper back:
Camper_side_2.sized.jpg
 
Back
Top