Bearing Buddies / Bearings Redux

localboy":cxuao6se said:
BrentB":cxuao6se said:
I think it is fully retracted in the pic.

Based on the pics, I'd agree. The only other issue I could think of is frozen piston or a frozen master cylinder. I'd put the pads back in an see if you gained enough clearance to install the caliper on the rotor.

OK, after lunch that is the plan...put 'er back together and try to slip 'er on one more time!
 
I looks like you may have gained a little spacing, based on the pics of before and after (pushing in with C clamp). I'd try to see if it goes over the rotor. don't need a lot of clearance; just get it over the rotor and it'll be fine.
 
Hi Pat, I don't know anything about replacing brake pads, etc, but to answer one of your earlier questions, it appears that you have Titan disc brakes, available from etrailer.com, based on comparison of your photos to these:

https://www.etrailer.com/Accessories-an ... 70900.html

https://www.etrailer.com/Accessories-an ... 41200.html

Now etrailer makes some pretty nice how-to videos but unfortunately I couldn't find any on the Titan disc brakes on their website.

Sure hope you are able to get back on the road soon, only 2 more weeks!

Best,
Mike
 
MikeR":m0m8d5wv said:
Hi Pat, I don't know anything about replacing brake pads, etc, but to answer one of your earlier questions, it appears that you have Titan disc brakes, available from etrailer.com, based on comparison of your photos to these:

https://www.etrailer.com/Accessories-an ... 70900.html

https://www.etrailer.com/Accessories-an ... 41200.html

Now etrailer makes some pretty nice how-to videos but unfortunately I couldn't find any on the Titan disc brakes on their website.

Sure hope you are able to get back on the road soon, only 2 more weeks!

Best,
Mike

Thanks, Mike. Not my brakes but close. This morning I talked to the guy at the shop who installed the brakes in 2014. He said he got them from his supplier, Six Roblees (imagine that) and they were more than likely unbranded generic brakes. He said he will check with Six Roblees and let me know if he can find out anything, he has the invoice nuber, and that would lead you to think SOMEBODY ought to be able to say what the invoice was for!

One way or another, my way or Potter Water's way, we WILL be back on the road!
 
localboy":2uaev65q said:
No updates. It's like a soap opera...what's gonna happen next?!?!?


:lol: :wink:

Houston, we have LIFT OFF!

It took me three days to get the first brake caliper back on so the wheel turned freely. The second one took less than half an hour. maybe even 20 minutes (I wasn't keeping time).

On the second one, I immediately saw the piston needed to be retracted, so I retracted it before I fooled around with anything else. I put the two halves back together, hindered only by my well known spatial dsylexia (really). It slipped right over the rotor, and I bolted it on. I tightened up the studs that hold the two halves together, tightened the bolts that hold the whole kit and kaboodle to the suspension, put the rim and tire back on, and we now have two freely spinning wheels with the brakes back on!

I still have the other side, but I know that is going to be a piece of cake now. I learned a LOT and gained some needed confidence dealing with this stuff. But mostly, I learned you all have my back and I am SO grateful!

THANK YOU, THANK YOU, THANK YOU ALL!!!!
 
Nice. Always good to accomplish something you are uncomfortable taking on. The other side should go smoothly.

Don't forget to grease them.
 
localboy":myerazaj said:
Don't forget to grease them.

Yeah, this was outside my comfort zone for sure. But now I know what the parts inside my hubs and brakes are, what they look like and how they go together. Next time I will probably repack the hubs myself. When all the hubs are back and on, they will each get a shot of grease until it appears around the castle nut. I have normal dust covers until the new EZLube dust covers (same size as the SuperLube I am told) arrive (not in stock at Six Roblees).

One of my bleed screw caps is badly compromised. Is that an easily found item? NAPA?
 
Pat Anderson":2rheiy05 said:
Yeah, this was outside my comfort zone for sure. But now I know what the parts inside my hubs and brakes are, what they look like and how they go together.

Isn't that a good feeling? When I first got my trailer, I had a "good" shop rebuild it, because it was out of my knowledge zone. Then I spent the next year or two limping from place to place as their work went bad (with scattered spurts of all being fine in between). Ugh!

This past spring I found a broken/dangling brake hose and I decided the time had come to dig in and see it for myself. I did somewhat similar to you, watched a bunch of youtube videos, read various .pdf's from the manufacturers, and then finally dug in. In the end I learned a lot, and now I know everything that's in there (because I put it in myself).

I decided just to get four new Kodiak hubs, which included all new calipers, and came with new races already installed. So that made it a bit easier (but now I know how they go together because I took apart the old ones). But then I had a bunch of other stuff to do too (brakes lines, coupler, wiring, tires, etc.) so I decided I deserved a break :D Like you, the first one took me FOREVER (and much frustration :amgry), but the other three went much better. Ahhh, so nice to know what's in there, isn't it?
 
One of my bleed screw caps is badly compromised. Is that an easily found item? NAPA?

Just little rubber caps but I don't know where you'd find them. You could always "make" one with tubing and silicone. Or check McMaster Carr.
 
Pat, this is a little late, but if you think about what disk brakes do, they're pretty simple.

They just squeeze 2 pads against the rotors, whilst the rotors are turning and the calipers are held still. That differential motion has friction and is what slows down the rotor and thus the trailer.

So to squeeze the pads you need a hydraulic cylinder to push against one pad and since the other end of the cylinder is forcing the cavity the other way, that force can be used to force the other pad also against the other side of the rotor. Both forces have to be equal, Newtons Second law. So that's how you get the squeezing action.

Since the pads wear, you need a sliding pin arraignment to take up the wear, and that's where those 2 allen head pins come in. They let the caliper body slide one way and the piston press the other. And when you replace pads, you need to squeeze the piston back in, as you did.

Simple when you stop to think what those calipers have to do.

Boris
 
journey on":2prggthz said:
Pat, this is a little late, but if you think about what disk brakes do, they're pretty simple.

They just squeeze 2 pads against the rotors, whilst the rotors are turning and the calipers are held still. That differential motion has friction and is what slows down the rotor and thus the trailer.

So to squeeze the pads you need a hydraulic cylinder to push against one pad and since the other end of the cylinder is forcing the cavity the other way, that force can be used to force the other pad also against the other side of the rotor. Both forces have to be equal, Newtons Second law. So that's how you get the squeezing action.

Since the pads wear, you need a sliding pin arraignment to take up the wear, and that's where those 2 allen head pins come in. They let the caliper body slide one way and the piston press the other. And when you replace pads, you need to squeeze the piston back in, as you did.

Simple when you stop to think what those calipers have to do.

Boris

Simple or obvious? "Not to your child, Watson" as Holmes once remarked! That would be me.

Right now I am waiting for the other two hubs to come back from the trailer shop, should be today, and it all should go back together tomorrow, so the trailer can roll. Looking at the brakes, I see that at least one will need to be retracted as the others did.

Now, that has got me wondering. I retract them, and the all go on and the wheels spin freely. The first time the surge brakes activate them and then release, suppose they again don't retract fully, so the brakes are binding? I mean, why were they needing to be manually retracted in the first place. Inquiring minds want to know!
 
Actually the entire scene went more like this:

Holmes had just solved a crime with a deduction. Watson says "Why Holmes, it is so simple a child could do it!"

Homles replies dryly, "Not your child, Watson."

This is the Basil Rathbone / Nigel Bruce Holmes and Watson, not the much more believable Jeremy Brett / David Burke (first year) or Edward Hardwick (subsequent years), where Watson is actually a competent sidekick rather than a bumbling idiot!
 
The "sopa opera" continues...

I got all the hubs on the spindles and all the brake calipers on the hubs. The hubs are fully filled with grease now. Rims and tires are back on.

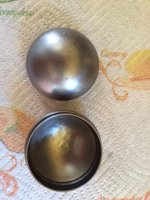
And yet...I am not done, it is maddening. I CANNOT for the life of me get the dust caps on. They are the right size for 2.328" hubs. But they are incredibly tight and the dome shape prevents me from being able to drive them in straight.

Dustcaps.jpg

I have watched Youtube videos. Some brands have a dust cap installer tool...not these. Some say sand down the dust cap, tried it, didn't work. A block of wood, a deadblow hammer, tried them all. I called the trailer shop, said I was thinking about grinding them down. He said "Don't do it, they will fall out."

These are only temporary until the EZLube caps arrive in a week or two, so I don't care if I dent the crap out of them. I just have to get them driven in, but no she go, matter what I try.

I am out of ideas, and yet, I want to launch tomorrow. Please does anybody have a magic bullet here?

Thanks!
 
I don't have the answer, but I can sure see why you are having a hard time. My Bearing Buddys are a VERY snug fit. But of course that's what you want, because they have to stay on through heat/cold cycles, bumps, water, vibration, etc.

So I use a combination of two methods to get the bearing buddies on. One is putting a flat board (say a 2 x 4) across them and beating on it with a mallet. Nice even force and no damage to buddys. Or, I can tap "around" the rim in succession going around and around tapping like the second hand of a clock. This "walks" them in (or, more usually, I do that when i want to remove them).

But how would you do either of those with a dome shape?!?

I just looked at the dust caps on my tow rig and they are basically flat on top. If yours were flat it seems like it would be much easier (OTOH, maybe this is why you see dented dust caps). Sounds like you are going to supersede these anyway, but if you weren't I'd be wondering if flat caps were available.

Let's see what others have to say.
 
I use a piece of pipe that fits over the cap and rides on the thin lip. You can also use a piece of square tube. Then use the side of a 3 lb hammer. Hold it in place and work the edges into the hub then drive it home.
 
Back
Top