A Couple of New Customizations on Daydream This Weekend!

Pat Anderson

New member
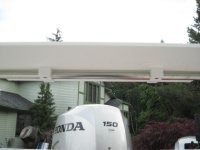
First, we have wanted a rearview mirror for some time, opted for an "off-the-shelf" solution - this is a 6" convex mirror from Grainger. It is on a ball swivel, so easy to adjust for helmsman to adjust. It was easy to lag screw to the underside of the radio shelf just as it came out of the box.

Rear_View_Mirror.sized.jpg

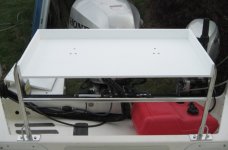
The biggie, though, was installing our brand new motor well rail from Railmakers, building a Starboard table, and clamping our new table on the rail.

Motorwell_Table.sized.jpg

Table.sized.jpg

IMG_1328.sized.jpg

We got 3/8" Starboard at Tap Plastics in Bellevue, they cut the table to 30" x 14" and then cut the back and side pieces as well, fit perfectly. They told us there is no glue in the world that works with Starboard, so we just used screws. It is all screwed together with #6 stainless screws. The rail clamps are from West Marine. I still need to chamfer the edges, but otherwise that is it.

Learned a bit. We should have used either 1/2" Starboard or #4 screws, because the Starboard is bulging out where the screws go into the 3/8" side. If we do another table, it will be 1/2" Starboard, and we will have them round the corners. I also need to buy some countersinks, the flat head screws do go down into the Starboard, as it is really fairly soft, but it would have looked a lot nicer if I had used a countersink.

Not saying this is necessarily a practice run, and we will probably use the table this year, but I think I will probably do another one with the thicker Starboard and a little nicer construction some time in the future, But for now, this is a huge amenity we have been wanting in the cockpit, and think it really will be dandy!

 
What part of the railing is Railmakers and what part is West Marine? What are the part numbers or description? Did you order the OUTDOOR 6 inch diameter convex mirror from Grainger?
 
The table looks good, Pat! :thup Are you still able to get the motor all the way up? Inquiring minds want to know.

Best wishes,
Jim
 
We have the same splash-well rail from Railmakers NW. I did not like how open it was...especially w/ grand-kids on board. Once installed, I made a table out of Starboard; I used some quick release rail mounts I got from Defender. With them you are able to either remove the table entirely or simply tilt it 90* into the cockpit, which allows us to raise our engine out of the water entirely. We mount our grill there and the table provides a nice work surface. It's a good addition, Pat.
 
The motor will come all the way up when, as Mark says, the table is rotated down. That requires loosening two screws on these clamps, not a big deal. I may yet find some thumbscrews to make that easier.

Here is the Grainger page on the 6" convex mirror.
 
The entire stainless rail is Railmakers, the table is Starboard, and the plastic clamps under the table that clamp it to the rail are West Marine.

trepp":39sbp762 said:
What part of the railing is Railmakers and what part is West Marine? What are the part numbers or description? Did you order the OUTDOOR 6 inch diameter convex mirror from Grainger?
 
Good ideas, and good work on both of them! :thup :thup

I have also learned something about using screws in StarBoard (don't ask me how :sad).

Pat wrote: "...Learned a bit. We should have used either 1/2" Starboard or #4 screws, because the Starboard is bulging out where the screws go into the 3/8" side. ..."

Increasing the thickness of the StarBoard, and/or decreasing the diameter of the screw may be a good idea, but I think you should also use a larger drill bit than normal for a given screw size. I guess Starboard is not as compressible as most wood, and so the screw tends just to push material outward, resulting in a bulge. This phenomenon will be especially noticeable when the screw is into the edge of a thin piece. I believe StarBoard is also relatively more sensitive to temperature changes and therefor expands and contracts to a greater degree than wood. (This latter characteristic becomes more significant, of course, as the size of the piece of Starboard increases.)
 
Nice mods. One thing I did that worked well for me is a couple of holes in the rear corners for drains, if your cleaning fish this is a must, tilting the table a few degrees aft is also a good idea to avoid wearing any fish cleanings. Also I had good luck with a couple of kuuma barbq mounts clamped to the rail and two c channels screwed to the bottom of the table with a couple of thin stainless plates inside the c channel this allows the table to slide fore and aft.
:thup
 
NORO LIM":38b3ywpl said:
Good ideas, and good work on both of them! :thup :thup

I have also learned something about using screws in StarBoard (don't ask me how :sad).

Pat wrote: "...Learned a bit. We should have used either 1/2" Starboard or #4 screws, because the Starboard is bulging out where the screws go into the 3/8" side. ..."

Increasing the thickness of the StarBoard, and/or decreasing the diameter of the screw may be a good idea, but I think you should also use a larger drill bit than normal for a given screw size. I guess Starboard is not as compressible as most wood, and so the screw tends just to push material outward, resulting in a bulge. This phenomenon will be especially noticeable when the screw is into the edge of a thin piece. I believe StarBoard is also relatively more sensitive to temperature changes and therefor expands and contracts to a greater degree than wood. (This latter characteristic becomes more significant, of course, as the size of the piece of Starboard increases.)
Starboard has a larger coefficient of thermal expansion than wood. Starboard's coefficient of thermal expansion is 6×10>-5 inches/(inch-degree F). So 30 inches of starboard will lengthen about 0.0018 inches for every 1 degree change in temperature or about 0.07" for a 40F change. That doesn't sound like much but it's about 3 times as much as wood but a little less than stainless steel and about 1/2 as much as aluminum. I have a starboard fish cleaning table with an aluminum yardstick attached for measuring fish. The first time I installed on (on my old 22), I screwed the measuring stick firmly to the board. When the temperature changed, the measuring stick would warp up a bit between the screws. On my Tomcat, I cut slots in the measuring stick and didn't tight the screws completely tight to allow for relative movement.

The rail clamps as Pat has them positioned will allow for a minor slip in the long dimension without deflection of the board. Where the thermal expansion of "plastic wood" really comes into play is on decking where it's not uncommon to have long runs of Trex or similar material. In such applications, you definitely don't want plastic wood pieces butted right up against each other.
 
Bill, I came to he same conclusion about the pilot hole. I took it from a chart and selected the "hardwood" size (the "softwood" pilot hole is larger). I am guessing the Starboard pilot hole should be even bigger. A lesson learned from which others can benefit!


NORO LIM":1ydg9w7r said:
Good ideas, and good work on both of them! :thup :thup

I have also learned something about using screws in StarBoard (don't ask me how :sad).

Pat wrote: "...Learned a bit. We should have used either 1/2" Starboard or #4 screws, because the Starboard is bulging out where the screws go into the 3/8" side. ..."

Increasing the thickness of the StarBoard, and/or decreasing the diameter of the screw may be a good idea, but I think you should also use a larger drill bit than normal for a given screw size. I guess Starboard is not as compressible as most wood, and so the screw tends just to push material outward, resulting in a bulge. This phenomenon will be especially noticeable when the screw is into the edge of a thin piece. I believe StarBoard is also relatively more sensitive to temperature changes and therefor expands and contracts to a greater degree than wood. (This latter characteristic becomes more significant, of course, as the size of the piece of Starboard increases.)
 
Don't worry, Pat. Yours isn't the only one w/ "bulging" screws. I used a router to round over the edges too and that was a challenge. The stuff is so slippery that my router bit actually slid across making some ugly cuts. I was in a hurry as rain came and I was working in my driveway.

But in the end who cares. They may not be pretty, but they work.
 
Back
Top