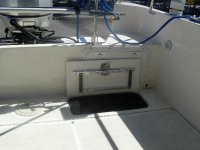
Significant water under cockpit floor on 07 CD-25: Normal ?

Just got my CD-25 back yesterday from Cutter after the 20hr service and some warranty work.

Their solution to the leaking hatches was to "grind down the hatch covers" to improve the way they fit. The surface area ground was several inches around much of the perimeter of the covers. I'll see how this solution stands the test of time and rain and report back.

Cutter hadn't been aware of this problem. They looked at another 2007 CD-25 on their lot and realized it was going to be a systemic problem on all of the CD-25s of that vintage.

I forwarded them pictures of the Meander's hatch covers so they'd have another solution in their repair arsenal if needed. I felt I needed to have the leakage addressed under warranty first before I made changes that would have caused the problem to be completely mine.

Bill
Edgewater, MD
 
Ron on Meander":1jxlruto said:
We used to get lots of water in our bilge area. We had the dealer replace the scuppers with larger ones which improved the cockpit draining dramatically. We also had a piece of aluminium angle attached to the underside of the hatch lids. This stiffened up the hatches and stopped a lot of the leaking.
Ron

Whenever it rains, I have a inch or so of water in the cockpit that does not drain out through the scuppers, and I have to sponge it out each time. Would you please provide me with some details of what your dealer did for you in enlarging the scuppers, including the dealer's name?

Thanks for your help.

Dan
 
I've been there and suffered with the same problem. Part of the problem is scupper size but the larger problem is the installed check valves. See the following thread:

"Scupper Check Valves on CD-25"

It will describe the problem I was having with water in the cockpit and how I removed the flappers in the check valves to permit water to exit the scuppers and flow out of the cockpit.

Bill
Edgewater, MD
 
Thanks for the prompt response, Bill.

Very interesting thread. I think I will do as you did: remove the check valves and test to see if any water comes into the cockpit while underway.

Dan
 
On a prior thread I mentioned my plans to check to ensure that all the bilge and bracket screws directly into the hull beneath the cockpit floor were installed with sealant. In order to do this the area must be dry. I don't think this has every been dry in my boat so fixing the two leaking hatches in the floor becomes the first priority.

Yesterday I was on the boat and took some measurements of the hatches to order some aluminum angle (I was leaning towards building a stiff rectangular bracket for each), and noticed both hatches were warped about 1/8" end to end. Also, the hatch itself appeared very stiff. I have concerns that anything short of bolting completely through the hatch to support the bracket will work at a long term solution.

A different approach is to leave the distortion in the hatch alone and build up the material under the hatch around the seal until this bottom surface is flat. Any thoughts?

Are others seeing actual flexing of the hatches or are they warped like mine? You guys that have implemented solutions- are they holding up ok and would you do anything differently based on your experiences?
Thanks,
 
My own past experiences with the 6" round port screw in type of hatches is that they work well (if not you can get bronze ones, with "O" rings and a finer thread which do). As for larger hatches--short of buying commercial type of dogged water proof hatches, (Often made of alunimum) I have never been able to have a truely water tight hatch. Will the building up, make it more likely that you will trip or stumble on the hatch? (Of course these is always the option of building up the entire hatch support rim 1/4 to 3/8 inch and thus most water from getting on the top of the hatch...Or keep a camper back/cockpit cover on the boat at all times....and live with the water which gets in the bilge during washdown.

On my 25 I am definately going to add at least one additional bilge pump. I don't think that the small rule which is in place is adequate if one got into a large amount of water aboard. (and the only "leaking" I have is around the "gaskets" in the rectangular hatches) The cracks around the edges and between the transom and the cockpit floor have been repaired..
 
The "grind down the covers" approach used by Cutter Marine (see my previous post on this thread) stopped the vast majority of of the leakage. I've already purchased (but not yet installed) a second bilge pump for the reasons Thataway has cited.

The combination of ground down hatch covers and removal of the scupper check valve flappers has made a very appreciable difference from the way the boat had been when it was delivered.

Bill
Edgewater, MD
 
Bill,
Do you know how they "ground down the hatch covers"? And does this mean they flattened the bottom of the hatches until the entire sealing surface was flat?
 
I don't know the grinding methodology. Cutter Marine took off a rough 1.5 inches on the latch side and the two narrow sides, nothing on the hinged side. It did make the hatch cover flatter and reduced leakage markedly.

Bill
Edgewater, MD
 
My 2003 never had check valves ahead of the scuppers, not familiar with the newer setup. But I replaced the rubber flappers with ping pong ball type scuppers, fit in same opening and screw holes ($7 ea), work great, never a problem.
 
Ping pong ball type scuppers will only work in the older CD-25s where the scuppers exit from the transom. On the newer CD-25s, the scuppers exit from the sides and the ping pong ball type scuppers would be dragged through the water.

Bill
Edgewater, MD
 
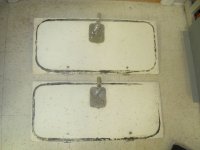
A few days ago I did a little more investigating on my leaking hatches. Before removing the hatch lids I put an even coat of black paint on the sealing gaskets and closed each. The imprint of the paint on the adjacent hatch show how poorly the gaskets are sealing. This appears to be happening because the bottom surface of the lid is so rough and uneven. I previously believed the port lid was warped, however after looking closer it appears to be lacking material instead (note the upper right hand corner on the lower lid in the photo where not black paint exists).

100_0127.jpg

Based on these finding as well as the comments from others, my approach is now:
- sand or grind the entire sealing surface on the bottom of each lid until smooth and even all around.
- build up (with epoxy) the upper right hand corner of the bottom of the port lid until it is in the same plane as the rest of the sealing surface.
- stiffen the lid by constructing and attaching (with epoxy and screws, but not thru bolting) rectangular brackets to the bottom of each lid.
- repair the cut gasket

During my investigation I found a screw and tack underneath the edge of the gasket in the hinge area of one of the lids. These had obviously been overlooked during manufacturing and had severely cut the gasket in that area (as well as kept the lid from closing all the way in the area around this hinge). It was apparent that this was an additional source of leakage.
 
I finished my modification to the cockpit hatches this weekend. This includes:
- sanding the sealing surfaces until smooth
- filling in the "missing" material on the portside hatch with epoxy
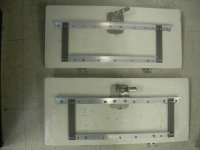
- constructed brackets with 1/8" thick 6063 Al (ultra corrosion-resistant) angle and anodized cross bars. Bolted the latch and hinges into the brackets. All stainless fastners.
- used center spacers to preload the lid with an 1/8" total downward bend (per Sea Skipper's recommendation). Attached with epoxy and wood screws.
- repaired the damaged gasket and filled the gaskets seams with RTV.
DSCN0241.jpg
DSCN0253.jpg

I haven't tested the hatches yet as the gelcoat coating on the sealing surface isn't completely dry. I will be disappointed if these guys are pretty watertight. I went to quite a bit of effort to get them as perfect as possible- my engineering side kicking in. Anyway, time will tell.
 
Back
Top