Solesurfer
New member
- Joined
- Jul 17, 2011
- Messages
- 20
- Reaction score
- 0
- C Dory Year
- 2006
- C Dory Model
- 25 Cruiser
- Vessel Name
- Cheers
Hello,
Firstly, sorry for the size of my pictures, I couldn't figure out how to make them smaller, but bigger gives you more detail I suppose.
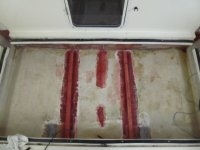
I recently noticed about a gallon of gasoline in my bilge. I pulled the cockpit floor/steps and noticed corrosion where the wood stops touched the tank. I disconnected all the hoses which included a vent and fill hose on both starboard and port sides, and the two fuel pickups centered on the tank.
I referenced Anna Leigh's post and it really helped alot. They're approach was to cut the tank and get a retrofit to fit the opening. I wanted to see if I could pull the whole thing out.
http://www.c-brats.com/viewtopic.php?t=18784


I've been in touch with C-Dory and they installed the tank and then built the deck around it. From looking at it, it almost looks like you could wiggle it out, but the fill nozzle on both sides are hitting the lip of the cockpit floor. I had to cut about a 3-4 inch notch into the lip of the cockpit floor so the vent/fill nozzles would clear. This was all under the step area, so I'm hoping I can get away with not building it back up. I also had to cut the wood stops out and noticed what I think is the failure point. The wood stops are glassed over, but the ends are raw wood. The raw wood is flush against the tank and naturally water gets in the bilge and gets trapped which leads to corrosion.


I then was able to get the whole tank out and sitting in the bilge was about 10 gallons of fuel. I got in touch with Coastline Equipment in Bellingham, as they manufactured the original tank and they said they can provide an exact replacement.
Now I just have to clean up the fuel and muck, scrub everything until it's white again.

Once I get the tank I plan to primer and epoxy it. I've heard about people putting a layer of fiberglass after that, but I'm wondering how much thicker it will make the tank, as the opening is pretty tight as it is.
I wanted to post about my experience so that someone else might find it useful.
If anyone can lead me in the direction on how to create an album on c-brats that would be much appreciated.
Firstly, sorry for the size of my pictures, I couldn't figure out how to make them smaller, but bigger gives you more detail I suppose.
I recently noticed about a gallon of gasoline in my bilge. I pulled the cockpit floor/steps and noticed corrosion where the wood stops touched the tank. I disconnected all the hoses which included a vent and fill hose on both starboard and port sides, and the two fuel pickups centered on the tank.
I referenced Anna Leigh's post and it really helped alot. They're approach was to cut the tank and get a retrofit to fit the opening. I wanted to see if I could pull the whole thing out.
http://www.c-brats.com/viewtopic.php?t=18784
I've been in touch with C-Dory and they installed the tank and then built the deck around it. From looking at it, it almost looks like you could wiggle it out, but the fill nozzle on both sides are hitting the lip of the cockpit floor. I had to cut about a 3-4 inch notch into the lip of the cockpit floor so the vent/fill nozzles would clear. This was all under the step area, so I'm hoping I can get away with not building it back up. I also had to cut the wood stops out and noticed what I think is the failure point. The wood stops are glassed over, but the ends are raw wood. The raw wood is flush against the tank and naturally water gets in the bilge and gets trapped which leads to corrosion.
I then was able to get the whole tank out and sitting in the bilge was about 10 gallons of fuel. I got in touch with Coastline Equipment in Bellingham, as they manufactured the original tank and they said they can provide an exact replacement.
Now I just have to clean up the fuel and muck, scrub everything until it's white again.
Once I get the tank I plan to primer and epoxy it. I've heard about people putting a layer of fiberglass after that, but I'm wondering how much thicker it will make the tank, as the opening is pretty tight as it is.
I wanted to post about my experience so that someone else might find it useful.
If anyone can lead me in the direction on how to create an album on c-brats that would be much appreciated.


") . I have no way of knowing if a problem has developed under that deck, but I smell and hear nothing unusual.
. I have no way of knowing if a problem has developed under that deck, but I smell and hear nothing unusual.