Mounting 1 KW Furuno (Airmar) Transducer

jmcknight00

New member
Hi, I'm wondering if anyone out there has experience mounting a Furuno (Airmar) 1kw 525TID-TMD TM transom mounted transducer on a C-dory. I just got the transducer in the mail and did not realize how HUGE it was. It is roughly 12 inch in diameter and weighs about 17 pounds! I'm worried it might cause a lot of pressure in the transom area since it is so large. Thanks everyone!
 
I don't think the transom will have a strength issue but I might lean toward through bolting at least the upper mounting points. 17 pounds with water pressures is more than I would trust to partial depth/shallow screw mounting alone.

Finding a good spot for it mixed with motors and trim tabs could be a piece of work and I would not use any glued on mounting boards for such a chunk of weight. Maybe one of those starboard panels bolted at motor height and extending down below the water line would work well. Using a 1/2 -3/4 inch thick board about 8-12 inches wide with bolts above the waterline would hold the weight and keep your underwater hull un-holed. Depending on the location of your fuel tanks, accessing bolts on the upper transom will also be an easier reach than behind the tanks.

Greg
 
WOW!

That's some Transducer!

If you see any fish, call Starcraft Tom.

If you see any submarines, call 1-800-SUB-Patrol.

If we don't hear from you again, we'll know the subs won…………!

Joe. :teeth :thup
 
Hmmm... Furuno says their 525TID-TMD is the same as the Arimar M258. And Airmar says the M258 is 4.25" X 10.25" (with all the mounting shims), and weighs 7.9 pounds. I'm not sure what you have, but are you sure that it's a 525TID-TMD, and is actually "12-inches in diameter and 17 pounds"?

In any case, I don't think you should have any issues mounting it on the transom. It was, after all, designed specifically for that purpose.
 
Reading the mounting instructions from Furuno, this transducer should be on the downward rotation side of the prop, and 6" outboard of the circle of the diameter of the prop (since he has a 13.5" prop--this would be at least 12.75" outside of the centerline. He also has a trolling motor (not sure which side--but the transducer should be on the opposite side, if he is using the trolling motor when using the sounder.

The instructions call for 5 screws (hex head, so apparently are a bit larger than the usual "screw"). It would be very difficult if not impossible to install with thru bolts into the transom at the level this transducer needs to be installed (flush with, or 1/8" below the hull). Normally I would say use the starboard block which is screwed into potted epoxy holes, This may be possible with a thick block (at least the thickness of the length of the screws.) Starboard is a relatively flexible material, and 1/2" thick would probably not be stable--probably even for the 7.9#. I would probably mount directly to the transom--drilling out the holes where the screws are going to be set--then undercutting, and filling with epoxy. Drill the pilot holes in the potted epoxy, and mount there. You may want to be sure that the position is going to be proper--and clamp a board to the transom, which will put the transducer in the exact position you determine will be correct for the transducer--run the boat to verify this. (Temporarily bolt the transducer to the board check the position.

One of the problems with mounting to the transom, with just sealants, is that there often is water intrusion. The second issue, is that often the first guess on position where the transducer belongs may not be correct, and the transducer needs to be moved a small amount--this could end up with several holes in the transom--and more chance for water intrusion. The Starboard, is a solution, since you are only drilling holes in it, and it grips well, but in this case, the screws are most likely larger than the normal transom screws. How big are the includes screws? (length and diameter).
 
jmcknight00,
I have an Airmar TM260, 1000 watt transducer. I have put some pictures in my photo album of how I mounted it. I used a piece of starboard between the angle wedge and the stainless bracket to take up some of the screw length. The factory provided screws were 1/4" x 2" long. I used Boat Life between the starboard and the gelcoat after lightly sanding both. I heated the starboard before applying the boat life. I also filled the pre-drilled screw holes with boat life and filled the threads of the screw with Boat Life before tightening them down. Oh, and it sure was hard to drill that first hole!
Good Luck,
Forrest
 
I mounted a smaller transducer (Airmar P-66), so was able to use a Starboard block (for the adjustability and other reasons that Thataway mentions). However the way I mounted the block to the transom was to overdrill (generously), remove all the core in a good-sized surround, then do the usual fill (neat epoxy followed by thickened epoxy). When I redrilled, instead of using "pointy" screws, I tapped for machine screws. Feels solid.

Then, in my case, I tapped the Starboard block for my transducer fasteners. Incidentally, I experimented with butyl to bed the Starboard block to the hull (Starboard is not the easiest to bed). I later decided to remove the Starboard block (unrelated reason), and found that the butyl had *really* gripped the Starboard (and the boat, but that was not surprising). Hasn't been a long term test yet, but I found it interesting (of course if water gets in, it's only getting to my epoxy lined holes anyway).

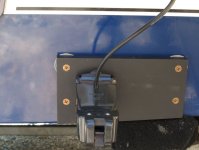
Here is a photo of the transducer block. Even if you can't use a block you might consider tapping the mounting holes in the transom and using machine screws. When I took this photo I had not yet secured the transducer wire, so it's hanging a bit free.

Transducer_block_before_wire_secured.jpg
 
Argh, sorry about the "not showing up" photo above. I lost my Internet connection just as I was trying to post it, so I couldn't get back to check/fix the tags. I don't know exactly why, but for some reason the closing image tag is often orphaned on the next line and I have to go back and fix it (but I couldn't this time). Anyway, here is the image again. I know your current transducer is nothing like the P-66, but it was more just to show the effect of the tapped mounting fasteners, in case you could use that part of it. Please just ignore the wire that hasn't been routed/secured yet and the bedding compound that hasn't been trimmed (photo taken mid-install).

Transducer_block_before_wire_secured.jpg
 
Back
Top