HATCH COVERS IN BERTH

A reciprocating saw would certainly be tool enough to get through the fiberglass but maybe too heavy and awkward to manuever. I used a skill saw with metal cutting blades, the wood cutting blades were wiped out by the abrasive fiberglass in no time. Even the metal cutting blades needed to be replaced after each hatch hole was cut. I think the verticle access behind the porta potti space is a great way to go. But in my case I wanted to remove the large water tank in the bow and thought going at it from above was easier.

There has been a lot of discussion about installing hatches, cost, size, and a bump under the mattress, etc. A good, cheap and workable solution would be to install access boards. All of my past sail boats had them under the vee berths. You can cut any size hole and then attach about 3/4 x 2 inch support battens underneath the perimeter of the cut out and then cut a piece of 3/8 marine plywood to fit in the hole with a 1 inch finger hole drilled near one edge to lift it out. I know all the former rag boaters out there know what I'm talking about. I imagine plenty of power boats used the same storage access method too.

Rich
 
Roger - I understand your concern about flooding your batteries. However, if you get pooped with anough water to put over eight inches on the deck of a 22', our discussion becomes very academic.

One time after launching and forgetting to put in the plug - Ill blame my friend who said it was in - but the captain must accept responsibility, with the boat tied to the dock over fifteen minutes passed before we returned after parking the pickup and trailer. The water appeared to have leveled off but was below the door sill. The bottom flotation and the tanks with gasoline being lighter than water were providing additional flotation. Enough to offset the gravity factor. I'm not sure. What keeps the water from rising in the pet watering bowl with 3 gallons of water parked above it? Some physicist can give us the answer. John
 
I solved the mattress problem by taking mine to an upholstery shop and having it split down the middle like most other boats do. It cost me about $100. Makes it simple to access the hatches. Some of you are thinking saddle tanks and that is one idea that really excites me. I would love to get those space hogs out from under the splashwell. I am going to check with a guy I know about doing it for me.
 
Before I had my cushions recovered I cut the somewhat U shaped front mattress into 3 pieces. the larger piece is still the front vee shaped piece, with 2 somewhat rectangular pieces going back to the bulkhead. And I still have the drop in center cushion over the porta potti that i extended to the bulkhead so the entire bed now is full length.
This makes it a bit easier to move one of the cushions to access a hatch.

Capt. Harpoon, I bought the $20 hatches from Defender. they are 13" x 17". I am using the same size hatch in all three positions. Temptress part number 44632.

Warren, No danger to the hull during removal. The foam is messy but cuts and breaks into little chunks without banging with a heavy hammer or chisel.
Any foam that is left will leave a easily abraded surface that will result in a constant supply of coarse grainy foam residual and dust. So rather that hollowing out an area, I elected to remove all the foam. Very tedious work, so I hired a college kid. Took him all day, but he is a farmers son and knows how to work. I am guessing that it would take the average college kid twice as long. When I finally have the area completely cleaned out, will sand, prep and coat the interior with white 2 part epoxy paint.

Tex
 
Hadn't thought about just building board covers. That would be pretty simple and cheap and you'd avoid the "bump" under the mattress. Also, you could just slide the cover out of the way and not have to hinge it open.

Do those of you who've completed this project keep your stuff in waterproof or damp-proof containers? Or do you just hope that you never have water intrusion? And it seems like if you kept stuff in heavy plastic bags you wouldn't have to be too concerned about how fancy you finished the inside of the hull.

jd
 
localboy":17zmj4ka said:
The matress padding in our 25 is cut in 4 peices, so accessing the hatches is simple.

Mark-

Are the four pieces fitted with Velcro on the sides to hold them together so they don't open up and let one slide down into a crevice when sleeping on the mattress?

Joe. :teeth :thup
 
No, Joe. They are just covered in the Sunbrella. There's a triangle at the bow, two pads on each side and the small center section that is removable at the entrance like a 22 would have for the porta-potti. That's how it came to us. We did feel the "cracks" when we slept only on the pads, but we've laid down a memory foam mattress over the top and it's improved that 100%.
 
nimrod":1vlqedbo said:
Hadn't thought about just building board covers. That would be pretty simple and cheap and you'd avoid the "bump" under the mattress. Also, you could just slide the cover out of the way and not have to hinge it open.
jd

Yeah, no kidding JD; never entered my mind either. It's the KISS rule.
 
Resurrecting this thread, as I plan on going ahead and putting two hatches in the V berth of my CD-22. I found some Tempress hatches at Amazon for about $50 each. Looks like the deal at Defender does not exist anymore. I've been reading some thoughts about just using the cut out fiberglass and boards to make access easier under the cushions. However, seems to me that you still have to lift the cushions to get stuff out. ;-) I'm getting the 13x17 hatches. I was going to go a little smaller and install them vertically just behind (or in front of, depending upon how you look at it, but closest to the Helm) the porta potty. But think maybe the 13x17 size will be a better access hole to store stuff through, so that means probably a horizontal install under the cushions. I do like the idea of cutting the large V shaped cushion into 3 sections. I may think about that later. I will probably go ahead and order the hatches, but any other suggestions or comments besides those before my entry into this thread? Colby
 
colbysmith":2xhsdrns said:
I've been reading some thoughts about just using the cut out fiberglass and boards to make access easier under the cushions. However, seems to me that you still have to lift the cushions to get stuff out. ;-)

I think it's a matter of degree. Picture that you want to grab something out from under one of the hatches without completely moving the cushion. Say there is a bit of bedding on top of the cushion, so not moving it completely is easier. You know what you are reaching in for, so no need for a complete, everything-open shopping spree. With the flat hatch you slide it to the side (under the cushion) so it's out of the way, and then just reach your arm in the hole. The cushion will be pressing on your upper arm, but it's soft and "deformable." Grab what you need, slide the lid back over till it drops into the opening, and that's it. Or, alternatively, tilt the cushion up a bit.

If you do the same operation with a hinged hatch, you have the hatch trying to open against the cushion and/or trying to close on your arm while you try to grab and pull something out. In order to open the hatch all the way, you'll probably want to move the cushion completely away. Not that it's like building the pyramids in terms of effort, but it can be a minor hassle, especially if you have bottom sheets connecting the cushions, etc. You can make prop sticks to hold the lids up, as long as they are strong enough not to deform.

So, both methods will work, but I would give the ease of use nod to the plain cover - but then I prefer them so of course I'll say that. Others may prefer the hinged hatch lid. There is a bit more finishing work to making the cover/cleats in the first place vs. dropping in a pre-fab unit.

Sunbeam
 
My CD-22 has the hatches installed in the berth. I also have the stock one piece cushion for the berth. Unless there is a lot of stuff piled on the cushion I find that just lifting up the part of the cushion over the desired hatch, opening the hatch 90 degs. and then letting the cushion down onto the open hatch holds the hatch open and holds the cushion up so I can get into the compartment (I move the potti and the center cushion out first). The weight and the friction of the cushion hold things pretty well in place and there is enough room to get stuff in and out. I haven't tried this while the boat is cruising, but it should still work.

The thing I want to do is add some compartment lighting so I can see what's in the bins without a flashlight.
 
Once I do cut the area out, does any sealing or epoxy work need to be done along the edge, or do you just drop the hatch in, install the screws and be done? As for the cushion and lifting, for the stuff I would have in there, the cushion will probably have to be up high enuf anyway to open the hatch lid. But shouldn't be that big of a deal for the way I plan to use it.
 
colbysmith":3iwdyjtp said:
Once I do cut the area out, does any sealing or epoxy work need to be done along the edge, or do you just drop the hatch in, install the screws and be done?

Presuming your berth flat is cored (and I can't imagine it not being so), then I would want to seal the core somehow, myself. Even if it's not going to "soak" in water, exposed core can get mildewy in a moist environment (and under the berth doesn't usually get a ton of ventilation). I'm particular, so I'll likely remove a small bit of core and re-fill with thickened epoxy, but one could also just "paint" the exposed edge with neat epoxy.

Sunbeam
 
Captains Cat":3lweyvhl said:
I doubt that any inner fiberglass piece, including the flat piece under the berth cushions is "cored"!

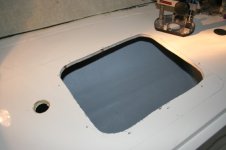
I believe the V-berth flat is cored. This makes sense to me - because a flat surface that wide that was "just" fiberglass would be pretty flexy. The skin-core-skin sandwich gives it stiffness. Let me see if I can dig up a photo.

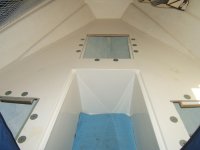
Okay, here we go. If you look at the cut out areas you can see the core. I would imagine it is balsa. First shot is "Reel Knotty" and second one is "Susan E" (both 22's).

vberth_hatches.jpg

IMG_4633.jpg

Sunbeam
 
Using core is expensive to construct. I still believe those surfaces are all fiberglass, not solid but built up with woven roving or by using a chopper gun in the mold when built. Someone that took those pictures needs to chime in. If a boat mfr can do something adequate for less money, they will!

The dashboard on my 22 was about 3/4" thick when I cut it to install gauges.

Charlie
 
Back
Top