Cutting out the transom

stevej

New member
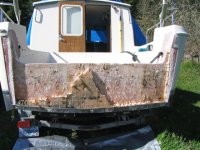
Took advantage of the sunshine to start removing the outer skin and core from Shearwater.

Took some measurements and connected the markings detailed out in the survey last week for the cutout area.
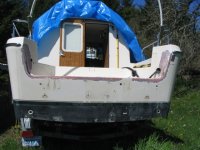
Cut_out_lines.sized.jpg

Cut along the dotted line using a 3.5 inch circular saw then sectioned into thirds. The intent was to keep the sections for reference if needed.
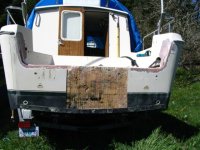
center_cut.sized.jpg

Took a bit of prying and pounding but went pretty well. All three sections came off intact.
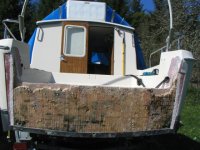
outer_skin_removed.sized.jpg

The the balsa in black areas ranges from punky to mush and was totaly saturated with water. The gray areas were wet and had started to delaminate from the skin. I doubt that more than 3 sq/ft of the total area was dry.
Interesting to see the problem areas and how the water migrated.
Looks like the damage was caused by a number of things. The original owner had installed a kicker mount that was not sealed well, and same with the motor well drains. The joint for the side edges of the transom was not completely filled in. When cap cracked water was able to migrate along the edge and find a path to the bottom of the transom.

Starboard side damage
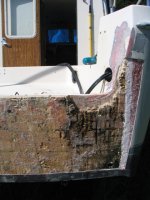
got_rot.sized.jpg

Next week I haul to the shipwright Thomas Becker of Becker Enterprises. Mr. Becker is a true craftsman and I have no doubt that the finished design will be far stronger and the work almost undetectable.

stevej
 
stevej-

Thanks for a great job of documenting the work with your boat!

It will be an invaluable reference for others that think they might have the same type of problem, whether they have the same exact model of C-Dory or not.

Will you be able to take some photos of the reconstruction? They would likewise be of great value!

Good Luck with your project!

Joe. :teeth :thup
 
Excellent photos and documentation Steve. It's so reassuring to have what the meters and other methods have been indicating actually match what you see! The transom will definitely be stronger after the reconstruction.
 
SteveJ,

Thank you so much for posting the photographs. I assume that the details have changed over the years, but an actual view of what is under the fibreglass is worth a million.

Boris
 
It will be interesting to see how stevej's transom is rebuilt.

After the old core is removed, re-insterting a plywood transom would be relatively easy, the key being how to attach it to the sides of the hull and at the sids and at the bottom.

Assuming the core can be removed from a "slot" at the bottom into which the new core can be mechanically trapped, the next question is how to bond the sides together.

Hopefully the core is still good at the sides, and perhaps it could be reduced to half thickness and the new plywood insert cut down to half thickness to overlap and transfer the load without an abrupt joint, but instead an overlapped one, e.g., a scarf joint instead of a butt joint.

The transom can then be glassed over at the back and all around the sides and over the top and bonded together.

I'd be inclinded to add transom knees in the center and at the sides where the overlap occurs, leaving room for the gas tanks.

Depending on the C-Dory model, quite a bit of upper support is also gained from the motor well top piece.

Some one experienced in more exotic materials could use one of the composition materials instead of plywood for greater strength and water resistance. As I remember, Dr. Bob did this on his 25.

Fun to think about!

Joe. :teeth :thup
 
SteveJ: Thanks from me as well for the picture posts. I love it when someone takes the time and effort to share construction details with the rest of us. Best of luck with your repair. Mike.
 
More than happy to share the process.

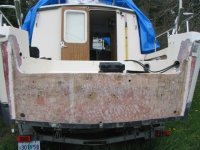
Removing the core
core_removal.sized.jpg

Full transom with the core removed
cleaned_transom.sized.jpg

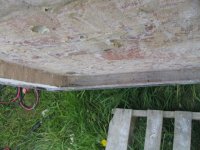
Port inside corner
bottom_inside_corner.sized.jpg

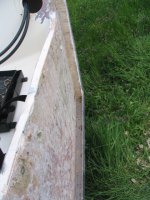
Starboard inside corner
starboard_corner.sized.jpg

Joe, the new core will be a synthetic
Area under the motor bracket will be built up with additional glass
3" above water scuppers replacing the old below water system
Drains, motor mount bolts, kicker bracket bolts, trim tab hydraulic and attachments will be epoxy cored
Inside wings above the transom will be reinforced
Transom edges extended out

When I take the boat in next week I will ask if I can get pictures of the construction process

stevej
 
Shearwater went into the shop yesterday. The new transom will be done with a combination of foam densities using airtek foam. The entire motor pad, drains and areas requiring a hole through the transom (trim tab, kicker, transducer) will be done with the highest density foam.
Mr. Becker will document the build with pictures as he progresses.

Pretty excited about getting this completed but what I am really excited about are the new scuppers. The new design will be dual 3" drains that will be partly below the rear deck level. Should keep the deck drained, what a concept.

Will post more as I get updates, estimated completion is in 3 weeks.

stevej
 
stevej":13av6an2 said:
.......what I am really excited about are the new scuppers. The new design will be dual 3" drains that will be partly below the rear deck level. Should keep the deck drained, what a concept.

stevej

This may be a real innovation of the "why didn't they think of that before?" variety!!!

The principle is simple, but success will depend on exactly how it's executed, especially the control of back flow (inward) when in chop at rest and low speeds.

This is a common recurring design problem in self-bailing (or "double-bottom") boats.

Keep us posted, Steve!

Joe. :teeth :thup
 
Joe, I was never a big fan of the old deck drains to start with and considered it one of the weakest points of the boat. To me there is a world of difference between a deck drain and a scupper in that a scupper can move a large volume of water in a short amount of time.

The original system had a 1 inch below water line outlet in each corner. You always had to stay on top of the inlet, they would clog if you sneezed, add glopped up fish blood and scales then some poor crew member has to crawl under the motor well reach into two inches of slop and get things flowing. Not as popular of a job as one might expect.

I know the new system will have some backflow, lot of people complain about flapper style scuppers but with almost six inches of drainage space it will empty pretty fast and clogged drains will be a thing of the past.

Shearwater is pretty light in the stern and only drafts about 11 inches. So I have about three inches plus to the bottom of the scupper and the deck has depressions for the old drains. In theory the scupper being 1 inch below the water line would only fill the drainage areas on the deck. To submerge the scupper an inch the entire stern would need to be pushed down 4 inches. Have not run the numbers how much weight that would be but I would guess several hundred pounds.

With that said I am very interested in how they will be executed also

stevej
 
Some how I missed the earlier posts. Thank you for showing us what you found, and keeping us informed on the progress. It really shows how important it is to seal any holes in wood cored structures, especially balsa.

I replaced the transom on a Grady White--the plywood was nothing more than tooth picks: we vacuumed it out. Of course with a 225 hp, there was more flex on the transom. We used a synthetic core material, and reused the outer skin. After relamination and gel coat you could not see that a repair had been done---but the top of the transom was totally sealed!. The hull to deck joint on the transom is a weak point in the C Dories. For the most part, the joint is just on the top of the transom, and is not atequately sealed.
 
Back
Top