Cutting fiberglass?

RichardM":2dx49sqj said:
Did it outdoors

There's my secret. Since my boat is on the trailer, I wait for the rain to stop, pull it outside, make my cuts or do my sanding, blow the whole thing off with the air compressor, then back inside. That sounds like a lot of work, but it is so much nicer than dealing with dust in the shop.

Mark
 
Mark,
Was your cut on the outside or inside of the boat? If inside, I am trying to figure how you got all of the "dust" outside of the boat? A good shop vac will corral dust well.
 
My biggest dusty project was inside the boat when I ground down the fiberglass to feather in my deck repair. I also camphored some of the deck hardware holes in preparation for butyl tape. When I removed the seat boxes, I also took those outside to modify. I use my shop vac if I absolutely have to do something inside, but even for small cutting projects, I try to go outside. The time consuming part isn't moving the boat, it's waiting for the rain to stop.

It's not raining right now and I'm heading to the shop to move the boat out and sand the deck to prep for KiwiGrip.

Mark

modules.php


I may have learned how to put an image in a post. Nope, not yet.
 
Understand--you are not inside of the enclosed cabin, such as in the C Dory 22, where you would end up chasing the dust around in corners. You are outside in the cockpit area--but that does stir up the dust--and it lands "somewhere", other than specific trash. Not being critical---just wondering.

Thanks for the answer. The compressed air would probably not work well for in an inclosed boat cabin.
 
Drilled some holes in corners taped everything,shop vac respirator ect. Ended up using jig ,saber saw clamped board as guide, if I ever cut berth opening larger will buy that blade with the grit, I did put plastic over work area to make cleanup easier. Tomorrow painting door, today at Lowes found access panels that may have worked. They are plastic,white in color and flush mount,no painting,no hinges ,just use adhesive and done after hole is cut. They don't stick out pretty much flush,they have a few size options.
 
Well I finally got around to cutting holes under my V-berth to accommodate the old hatches for some much needed storage. I had foam sprayed in through 2" holes on top of berth (under mattress). It was full of foam. What a bear getting that all out. I used Sunbeam's suggestion of the grit blade to cut out the holes. It worked really well. Thanks Sunbeam. Of course I had on all the PPE and the shop vac running to capture the dust the jig saw made.

Sunbeam":qwunoqa6 said:
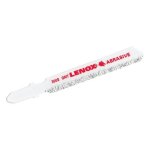
This is what I mean by the "grit" blade:

313tYUPB0uL.jpg
 
Oh ya, forgot to add the foam photo.
IMG_20160227_114615.sized.jpg


Three garbage later and the foam all came out. I used an insulation knife (like a bread knife) to cut up the foam in manageable pieces then scraped and vacuumed.
On to fastening the hatches covers. But before I do I am thinking about painting the insides or I may leave it raw. Any suggestions? Pros/cons?

Grazer
 
My berth compartments were already painted. However, I lined them with indoor/outdoor carpet (held with carpet tape) to prevent rattling of whatever I put in there.
 
Grazer":2tlqe63l said:
Well I finally got around to cutting holes under my V-berth ... I used ... the grit blade to cut out the holes. It worked really well.

Glad to hear it worked well for you. Bizarrely (considering that cutting fiberglass seems to dull most types of blades rather quickly), I'm still using the same grit blade I bought in around 2005. Just keeps on cutting! (Not all on my C-Dory - it's still mostly intact :lol:)

Interesting to see the foam in your 2004. My early 2002 had the pre-cut/fitted huge (did I mention HUGE) expanded polystyrene blocks; so I guess sometime between then and 2004 is when they switched to the sprayed in expanding foam. (I didn't have any of the plugs, so was pretty sure before I even cut that I didn't have the expanding foam.) I've also heard of some boats in this same general era that found no foam.

One interesting note: Some Brats have worried about losing critical flotation if removing the foam. That's a valid consideration. In my boat the area was solidly packed with polystyrene (I mean, there was basically no void space at ALL), and that would have provided pretty good flotation, albeit I never calculated the square footage to buoyancy ratio. No flotation in the stern at all though. On the other hand, looking at your photo, I don't think you've lost a whole lot. Looks like it was basically a "Dairy Queen swirl cone" just right under the hole, and basically nothing anywhere else. Doesn't look like it would have provided much meaningful flotation (not saying it was meant to).

I wanted to be able to get to all of the inside hull and not have any big hidden places - I just don't like that - so removal was my choice. Side bonus is that I can stow larger/lighter/bulkier items there (my spare prop for example - that is so oddly shaped for stowage, window screens/covers/spare sleeping bag, etc.)

I will likely paint the insides of my V-berth lockers, although I haven't yet since I'm not sure whether I may glass in a few dividers. I have a few yoga mats I had hanging around (like thin foam sleeping pads) placed inside for now. That actually works pretty well. Would be brighter inside painted white (the natural color is sort of dark brown - I suppose that's a combo of the translucent caramel colored glass and the blue bottom gelcoat).
 
My compartments were painted a light color by the factory. Not the speckle finish light on the inside of the cabin. However, even after 8 years that paint still has not dried all the way. If you put something in there (without protecting it) it ends up with white marks from the finish.

When I bought the boat 3 years ago you could still smell paint fumes if you opened one of the berth compartments.
 
No solvent based paint would take that long to degas. OTOH, as thataway suggests, a matrix of uncured resin on the surface will stink forever. Even cured resin will stink up an enclosed area for a year or so.

Try fans and maybe a protected heat source while the boat is in storage. Might take a while.
 
Thanks for the comments. I may just leave as is and lay down some pieces of rubber or yoga mat just to dampen the rattle of items stowed up front. I am glad that no water or even damp foam was encountered. It was dry as a bone under there as I have seen others post about finding litres of water trapped in there. I was a little concerned as I found some foam directly under the porta potti 2" hole slightly damp. I figure it must have leaked into the plug from an overfilling event of the toilet or perhaps some condensation.
 
Some paints are incompatible with polysulfide caulking if applied prior to the caulking drying. BoatLife caulking can be painted when dry, but if painted prior to drying it can create a surface that stays sticky. Very weird.

I finally got to use my carbide grit blade. Works great. It is also possible to do some very fine detail work. My gas shutoff cock required a round hole and an index slot to keep the shutoff from rotating when the handle was rotated. Just a 1/8" notch. Very simple to do with the grit blade.

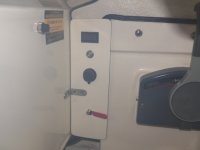
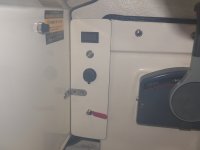
Here is a new instrument panel cut out using the grit blade on some scrap fiberglass.

modules.php


Mark

Well, I still haven't learned how to post a picture, but it's in my picture folder as the last picture in the permanent gas tank album.
 
Marco Flamingo":36lq54ae said:
I finally got to use my carbide grit blade. Works great. It is also possible to do some very fine detail work....
Well, I still haven't learned how to post a picture, but it's in my picture folder as the last picture in the permanent gas tank album.

I like the little panel - nice. Isn't that fiberglass stock handy? I had a bunch left over from an extra set of fuel tank cover panels, and have found many uses for it (since it's all nicely gelcoated to match the boat already).

On the photos: You're so close! Here's the last bit. Go to your album where you have the photo and click on it so you have the whole photo, not just the thumbnail. Then right click (or whatever you do on your particular computer to get to the little sub-mouse-menus) and select "copy image location" (if on a Mac) or... let me see if I can remember.... I think "properties" if you are on a Windows computer (?). That's what you want. Copy it, come back to the post text box, and paste it in. Then select it and go up to Img above the text box and click it to put the tags on it. Then Preview the post and you can see if it works. If it doesn't "Preview" then it won't show up in the post correctly either.

BTW, you may see "sized" as part of the image location you paste in here. If so, that means it's a slightly smaller version of the photo. You can remove "sized" from the address and get the larger one if you want it (presuming it was sized and you copied over the smaller version - if not then never mind).

Sized:
102_0172.sized.jpg

Not Sized:
102_0172.jpg
 
Sunbeam":3ax2v9bx said:
Isn't that fiberglass stock handy? I had a bunch left over from an extra set of fuel tank cover panels, and have found many uses for it (since it's all nicely gelcoated to match the boat already).

When I visited C Dory to buy my balsa core, I got a little tour and they were cutting out the windows on the cabin of a 22. I got distracted and forgot to ask what they did with the scraps. Perfect for shelving, panels, etc. I would like a bigger piece to cover up all of the electrical on the back side of my helm. All of the wiring is exposed to any wild activities in the V berth.

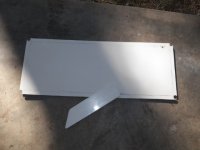
Here is a picture of my last scrap of fiberglass and another little electrical panel that I'm making. This will determine whether I can follow your instructions on how to post a picture.

Mark

102_0171.sized.jpg
 
I wanted to try pasting the photos this way too.

Here is the tool I used to cut the sprayed in foam into manageable pieces.
IMG_20160227_114646.sized.jpg


It works, thanks again Sunbeam.
 
For those of you cutting out foam, when I had a foam removal project I bought a vintage electric carving knife off of Ebay. Probably spent $10. Worked like a charm and I then gave it to Salvation Army. Also works great on soft foam like seat cushions.

Mark
 
Back
Top