Bearing Buddies / Bearings Redux

Pat Anderson

New member
So, today I got my hands dirty!

Two threads you should look at for the run-up to this one!

First, my thread about Bearing Buddies and bearings in general and then Localboy Mark's tutorial on bearing maintenance.

I have Bearing Buddies, and was having some problems with them, namely, the plate was not moving when it was supposed to, so I probably blew the rear seals when I kept pumping grease.
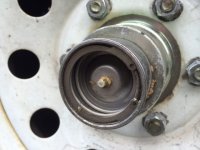
Bearing_Buddy.sized.jpg

Today I jacked up one side of the boat, and determined for sure that I have bearing problems (grinding noise) on both wheels on that side. So I decided today was the day to pull the hubs.

I followed Localboy Mark's tutorial to the degree I could, but I soon found that our hubs and brakes were drastically different, even though we both had King Saltwater trailers of approximately the same vintage. The difference, I suspect, is due to all the work we had done over the years, most recently in 2014 just before we left for Lake Powell.

First problem was getting the dang Bearing Buddies off, I finally figured out that I was just too timid. After ruining my HF deadblow hammer, I finally got an old fashioned claw hammer and beat the crap out of them and they came off!

Here is the hub right after the rims were removed.
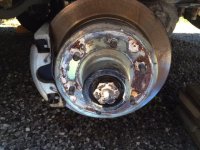
Hub_after_removing_rims.jpg

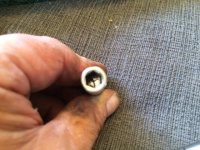
Per Mark, the first thing you do is remove the brake caliper by removing two studs. That is where I could see my boat had different brakes entirely. The studs on my brake calipers have Allen heads:
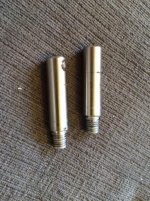
Brake_Caliper_Studs.jpg

[ing]http://www.c-brats.com/albums/album2159/Allen_head_on_brake_caliper_stud.jpeg[/img]

Mark has you removing studs and then the brake caliper and rotor. My studs were completely different, and the brake caliper was actually in two parts, one bolted to the suspension and the other mounted in the first part. So removing the caliper did not allow removal of the rotor!

So after I got the brakes off, both parts, the rest was pretty easy. i don't know how easy it will be to put it all back together however!

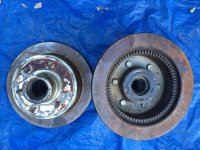
So here is where we are at the end of the day today.

http://www.c-brats.com/albums/album2159/Hubs.jpeg[img]

[img]http://www.c-brats.com/albums/album2159/Spindles.jpeg

A fork in the road, now do I (A) rebuilt the hubs myself or (B) take them to Circle A Trailers for the rebuild? My choice is B for now, now enough time to mess things up!
 
Damn 30 minute edit limit! Ran out of time to correct...

Allen head on caliper studs:
Allen_head_on_brake_caliper_stud.jpg

Hubs:
Hubs.jpg

So, hoping I can remember how to put the brakes back on after the hubs come back from Circle A Trailers!


Pat,

is that a zerk fitting on the end of your spindle?

is that a super lube spindle? original from a King trailer?

If so they are not designed to be used with bearing buddies. The super lube spindle is designed to pump grease through the spindle to the back bearing and push the old grease out the front.

If it is not a super lube spindle forget i said anything.

http://www.tiedown.com/pdf/c718.pdf
 
Hmmm Stefan, I thought the same thing when the shop I brought my trailer to last month told me they wanted to install bearing buddies on my King trailer with super lube spindles. I just got back from towing all the way to Port Alice so I don't think they caused any damage. Does anyone know how bearing buddies would affect hubs with super lube spindles?
 
If you heard "grinding" then your bearings may be damaged. Mine were so I had to replace all bearings and races.
Best way to find out if bearings are damaged is to take one bearing out, clean all the grease then examine. If you see scoring or pitting on the roller bearings, they are beyond repair.

When reinstalling the bearing buddy, I fill the whole thing with grease BEFORE putting it on the hub. Then I know it is full. After installing , put a few pumps of grease. Your hub is full and won't leak if everything is installed correctly.
I then leave it alone. If I pump in too much grease, I blow the rear seal and then have to start over again.

Make sure you torque your wheel nuts properly after you are all done, too.
 
Yes, these are Superlube SPINDLES, so how does this system then get returned to Superlube configuration? I would really prefer to do that.

When the hub goes back on the spindle and the castle nut is installed, there must be some other part with the zirk and the little rubber cap?

 
Also, should I be concerned about all the rust on rotors?

I have rinsed them faithfully after every time the trailer went in the water, both after launching and after retrieving. But it all seems awfully rusty.
 
Pat Anderson":2dj681c3 said:
Also, should I be concerned about all the rust on rotors?

I have rinsed them faithfully after every time the trailer went in the water, both after launching and after retrieving. But it all seems awfully rusty.

When I did brake jobs, way back in the olden days, I always sent the rotors to a machine shop to have them turned on the brake lathe. They would mic them and, if specs allowed, they would turn them just enough to get them as near perfect as possible.

Unprotected steel will tend to rust even from the moisture in the air after a while. Just have a peek at any car that has been sitting for any length of time and you will probably see the beginnings of surface rust on the discs. (especially on our sunny west coast :lol: ) From the pictures they don't look all that bad to me but I would get a machinist's opinion if there were any doubts whatsoever.

Thanks so much for posting the pictures.

Chris
 
Hi Pat, the link I gave is for the spindles and hubs from tie-down eng Maybe print it to and take it to Lordco . Or show it to to your trailer service place to get the hubs and rubber caps...

Maybe you can just buy the caps.

Surface rust on the discs is normal.

Peter, bearing buddies are notoriously crappy for getting grease all the way to the back bearing I've heard.
 
First off, GOOD JOB, PAT! Don't be afraid. Get a hold of me is you got any questions. You can pm me for my cell #.

Looks like the brakes were changed to Kodiaks from the pic, hence the different mounting bolts. No biggie. You figured that out.

Based on our setup, which has the same spindles as yours, I would not use the Bearing Buddies with the zerk on the end of the spindle as noted. The zerk does not allow enough free clearance/spacing for the diaphragm of the Bearing Buddy to float. In other words, the zerk takes of the space the diaphragm should be filling, as it's pushed inward by the spring.

...how does this system then get returned to Superlube configuration?

They system is the spindle w/ internal grease galley, zerk etc. It's on there. Grease is pushed into the galley (tunnel) via zerk. It exits at the rear, inner side of the spindle, in front of the seal. New grease is pushed thru both bearings and any voids and exits thru the outer bearing. You just need to install the proper grease covers. Do you have any washers that were installed under the castle nut? You should. Hers is a diagram of how it works.

http://www.c-brats.com/modules.php?...ame=gallery&file=index&include=view_photo.php

Personally, I like the SuperLube spindles with the proper grease caps (which contain the rubber caps in the center). They make maintenance so much simpler. Jack up the trailer, pump grease in while spinning the wheel until new, clean grease comes out. Clean up. Done.

Surface rust on the discs is normal.

Totally. It will come off the first time the brakes activate.
 
Thanks, all! Mark, I will PM you for your cell.

So the Bearing Buddies go in the trash can, but I have to get the proper Tie Down part with the little rubber cap. I will print the Tie Down manual and take it to Circle A Trailers to see what we need to do.

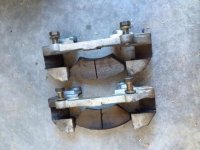
Here is one picture I forgot to include, it is the part of the brakes that bolts to the suspension and where the calipers get attached. In addition to the two studs, there is also a wire clip that goes on the front side.

Part_of_disk_brakes_bolted_to_suspension.jpg
 
Wire clip is probably the spring that holds the brake pads.

Those are half of the caliper; exterior side without the pistons. Looks like you took the calipers apart too! :lol:
 
Hubs came back from Circle A Trailers yesterday, and are now reinstalled on the spindles. I still have to bend the little tab down, but I THINK I have it right, I tightened the castle nut, then backed it off until there was just a SLIGHT amount of free play with the rims and tires mounted.

Today, I will bend the little tab down, pull the rims and tires, and have a go at reinstalling the brakes. I actually DO have a photo of how the retaining clip works in the second photo in my first post, so it should be no biggie. Then I will move to the other side and pull the hubs WITHOUT disassembling the brake caliper this time!

The Bearing Buddies are headed for the trash bin, and I will be getting EZLube caps with the rubber plug to access the zirk, the EZLube system is functionally the same as the SuperLube system apparently, and are the same size, 2.328 inches. They are on order right now.

The guy at Circle A thought I MIGHT be hearing brake noise rather than bad bearing noise initially (I forgot to ask what he found inside the first two hubs, but I will today when I take the second two hubs in to him). So if I was hearing brake noise, what should I be doing about that? There does not seem to be any adjustment on them as far as I can see. I got these brakes in 2014 without the literature that should have come with them, so I am shooting in the dark a bit. Thoughts?
 
Salmon Fisher":12c7emee said:
Make sure you torque your wheel nuts properly after you are all done, too.

I have always just tightened them as tight as I could with my lug wrench (my history of struggles to remove lug nuts is legendary here).

So do you mean tighten the lug nuts with a torque wrench? If so, to what spec? I also just bought a DeWalt cordless 18 volt 1/2" impact wrench with proper 13/16" impact socket a week ago. It says it is 300 ft/lbs. So far I have only used to remove lug nuts on a fifth wheel, for with it worked magnificently. The new ones are all 20 volt but they had one remaining 18 volt, and I have a couple of DeWalt 18 volt batteries for my DeWalt cordless drill, so I was able to buy the bare tool for a lot less than the kit with charger and batteries!
 
The first of the brakes on the two hubs has been reinstalled, and as feared, it is obviously I am now in over my head. I put it all back together exactly the way I took if off, except now the wheel will not turn freely, the brake is locking it up. I am stymied...

I should not have disassembled the caliper when I removed the brakes (and when I remove the brakes on the other side I will NOT disassemble them). But unless somebody can tell me how to make the brakes "looser" (?) it looks to me like I will need to find somebody who does mobile service...

Advice solicited!
 
The pads are probably binding. There is a caliper piston that pushes the pad (when pushed by the fluid), thus tightening the brake pads on the rotor. Pull the inner pad, push the piston in, re-install the pad. Sometimes a C clamp makes pushing the piston easier.
 
On the calipers, try pushing the pistons back into the caliper. I use a large socket and a suitable C-clamp.

BTW, I assume the rotor runs free without the caliper installed.

Boris
 
Back
Top