Backing plate for Lewmar pivoting bow roller?

PNW_Wesley

New member
My new pivoting bow roller (Lewmar 66840007) will arrive next week. I will be installing it myself.

Other than using large washers below the deck, is it advisable to use some form of backing plate to reinforce the deck?

Zenith has a Maxwell HR6 windlass, and a 5 kg Bruce anchor.
 
PNW_Wesley":vrwuk12u said:
My new pivoting bow roller (Lewmar 66840007) will arrive next week. I will be installing it myself.

Other than using large washers below the deck, is it advisable to use some form of backing plate to reinforce the deck?

Zenith has a Maxwell HR6 windlass, and a 5 kg Bruce anchor.
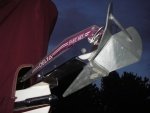
I used a piece of 1/4 Alu. for a backing plate & nylocks. :thup
 
I would either use Fender washers or an aluminum backing plate. Be sure that you over drill the holes, cut back core, and fill with thickened epoxy, then drill the final bolt holes.

Remember there should not be a lot of load on that roller, Anchoring load shoaled be on the snubber lines from either the main blow cleat or secondary cleats placed on the side of the foredeck.
 
Thank you for the excellent suggestions, which I will follow.

My wife and boated and anchored on the Mississippi for 17 years, and we have now logged more than 500 miles on the Columbia.

Since having the windlass installed, I have enjoyed anchoring 4 times, in the full current, with headwinds and tailwinds, from 16 to 35 feet deep, using various scopes to test the system. I keep all the data, including wind speed and direction, in my log.

I use a wired remote, and stand on the berth while using it. This lets me watch the rode as it goes out, while I wait to see the effect of the wind and current. This reduces the potential for the slack rode to drift under the boat toward the prop.

After the anchor reaches the bottom, I hold the down button for about 5 seconds, and let the slack get taken up. I can then let it out with 5 to 10 second bursts, and see how well it is holding with each length.

Just north of Multnomah Falls, midstream at 35 feet and a 12 mph headwind, it held nicely with a scope of about 3. With all 210 feet out, we enjoyed lunch without budging.

I will post some pictures while using the new bow roller.
 
Wesley, It is very unlikely that you will find balsa core in the foredeck area that the "pivoting roller" will be installed. Any undue stress will be one of "sheer" upon the deck bolts, not "tension", as a backup plate would demand. And as Bob has suggested, best that you assemble a short "snubber" line using a "grab hook" if the rode is chain, or a rolling hitch if line, that attaches to the vessels bow eye while at anchor.
 
Barry Rietz":2e337p5s said:
It is very unlikely that you will find balsa core in the foredeck area that the "pivoting roller" will be installed.


Bob Austin implied there is balsa core in the mounting area.

Would Bob or Barry please comment about the balsa core?
 
Wesley, If you intend mounting the "pivoting bow roller" at the extreme foredeck bow, where it was designed to be mounted, that part of the deck should be solid glass. (in order to enjoy the "pivoting function" of the roller, it would require it be located there) If, when you drill holes to mount the roller and you find other than a solid glass substrate, the boat builder has been remiss in providing extra strength in the fiberglass layup at this critical stress area.
 
Wesley, You said:
"Since having the windlass installed, I have enjoyed anchoring 4 times, in the full current, with headwinds and tailwinds, from 16 to 35 feet deep, using various scopes to test the system. I keep all the data, including wind speed and direction, in my log."

You can look in where the chain goes through the fore-deck and see the thickness and even the layers there. Does that same thickness translate forward to your mounting position? If Yes, it is cored. If no, It is not cored.

Might just be me, but I would use at least to layers of fender washers, (stainless steel), each layer (washer) as separate, different size, the smaller one next to the Nylex nut, the larger one above that.... and I would probably back the whole piece with a piece of good thick hard plastic cutting board. ( I think that would be like HDPE or what we used to call, Poly Pro. It will have a bit of flexibility to conform but will also add good backing strength.

But then, that is just me.

Harvey
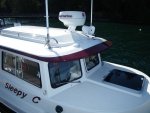
SleepyC :moon

IMGP6713.thumb.jpg
 
My experience is that there is coring in the way where the roller is bolted. Barry is probably correct that the very first bolt (depending on the roller) is gong thru solid glass. The core stops just before the downward lip of the hull mold is formed.

Having epoxy plugs will prevent core compression--which is why one puts plates under the bolts for the bow roller. I have but heavy aluminum plates under my larger boats--but the load on the C Dory anchor roller should not be huge. Again, the epoxy plug should take a lot of the compression load.

If you have aluminum plate handy, it is easy to drill out... SS, a bit tougher. Any high density plastic would also work.
 
My reasoning for not using aluminum would be to keep from mixing metals. The bolts would be stainless, and unless you use something to keep them from contacting the aluminum, (I used nylon bushings on my Radar tower base), you have mixed metal and eventually a corrosion issue.

Harvey
SleepyC :moon

January_2010_346.thumb.jpg
 
I just put a pivoting bow roller on my 2003 22 and it was cored there.

Wesley- If you need only need a little epoxy and filler I have some and I believe you have my number from a previous PM. No need to buy it if that is the only thing you need it for.
 
I also have aluminum if you want to make a backing plate.

Somebody, please correct me if I'm wrong but I think aluminum and ss are okay together when above the water line?
 
clayhubler":2eztndaz said:
I also have aluminum if you want to make a backing plate.

Somebody, please correct me if I'm wrong but I think aluminum and ss are okay together when above the water line?

You should use something like Tef-Gel on the threads where it contracts the aluminum. An example is the mast of a sailboat. In the mast, you are actually putting screws into the aluminum of the mast. But I also put TefGel on the bolt s where it contacts the aluminum--such as a bail at the top of the mast, or thru bolts with internal tubes at the spreaders/shroud supports. Is it essential for the C Dory? Probably not, but I do it anyway.

There can still be some corrosion of the aluminum from galvanic action, even in the high humidity of the anchor locker area.

SS fittings are the proper ones to use for the aluminum backing plate.

On our Cal 46, to get a live aboard slip, we had to get the LOA down to 45'. This included a custom double roller weldment. We thru bolted a 3/8" thick SS plate to the deck, with a large aluminum backing plate, including the windlass fastenings and coated the the threads with TefGel where the screws passed thru the plate.
 
Early this morning I crawled up into the forepeak of my 1991 Toland built 22' Cruiser and found "SOLID" fiberglass across the entire foredeck area! Since the 19' C-Dory shares the same mold configuration as the 22', I would like to assume they are the same. However, the difference in model years, and the fact that another factory built Wesleys 19', I would not hazard that guess. Perhaps if Wesley would photograph the underside of the forepeak deck area, one of us will be able to make a final determination. Would someone please explain why the "pivoting" anchor roller has advantages over the fixed type? My thoughts lean toward retaining the fixed anchor roller, especially if a remote operated windless is installed, since in an emergency, the chain and line could hackle and jam in the bail. This would require going forward at a time when one would rather not!
 
"Would someone please explain why the "pivoting" anchor roller has advantages over the fixed type?"

Barry, I think the advantage is that the pivoting one allows the anchor to self launch easier. For me, I had to move the swivel bolt about 1 inch for the self launch to work, but now it does, every time.

IMGP6713.sized.jpg

Harvey
SleepyC :moon
 
clayhubler":qcutbb9y said:
I just put a pivoting bow roller on my 2003 22 and it was cored there.

Wesley- If you need only need a little epoxy and filler I have some and I believe you have my number from a previous PM. No need to buy it if that is the only thing you need it for.

Clay - Thank you for your offer. I may also be doing some other mods, and I have on hand some materials for backing.

I don't have epoxy or filler, but I will order some to ensure I have enough. I'm not sure exactly what to order.

I will be using 3/8" bolts to mount the roller.

What is the diameter of the larger hole, for access to cut back the core?

How far back do I need to cut the core?

For the large hole, what type of bit did you use? Spade? Hole saw?

I have to admit, I am a little intimidated by drilling into my deck!
 
The 1990 vintage built boats may be entirely different than the later boats.

Same or similar deck molds have nothing to do with the coring. That has to do with the "lay up' and where the coring is placed.

The pivoting roller allows many anchors to be "self launching" when they are not with the solid roller. If don't want self lanuching--then.....

Yes, a photo which shows the "bulge' of the 3/4" deep coring will help. The hull to deck joint is an edge to edge joint, and not a "shoe box" joint where the top or deck molding drops over the hull molding. The hull to deck joint is glassed together on the inside, instead of an extrusion with a "H" section profile. Thus is much stronger than many hulls. This allows full inspection of the upper deck mold.
 
The core doesn't need to be "cut back" really. Using a dremel tool with some kind of rotary file works to kind of ream out the core around the hole. I actually only drilled 7/16 holes and then sealed the core with epoxy because I thought that would suffice.
I suppose the best way would be to drill a 1/2 or slightly oversized hole through the top skin and core but not the bottom that way you could easily fill with thickened epoxy. Then drill your holes all the way through after it cures.
 
Back
Top