Water Tank Sight Tube

RichardW

New member
For interested Brats, I just added a water level sight tube to my commuter version CD 22. I understand that most standard CDs already have a water level indicator, but my CD came without a water tank. I made a few other mods as well which can be seen in this album group: http://www.c-brats.com/modules.php?set_ ... _album.php

I got the idea of the colored ball from Sea Wolf (thanks, Joe) and it makes checking the water tank very quick - a real convenience to us. The sight tube is simply a loop with the lower end teeing into the line exiting the tank bottom and the upper end teeinng into the air vent line entering the top of the tank. The tube clamps are spaced so that the upper clamp is full and the middle clamp is 50%. This project only took an hour to install because of easy access to the water lines.
 
I tried the sight tube on Journey On, a C-25. It doesn't work as well as I had hoped. Since the tank is not accessible (sealed in the V-berth) the tee is where the water supply exits the V-berth molding. Also the tank is low, obviously under the V berth, so the tube water level isn't very high, except when the tank is full. Additionally, when the pump pumps, the suction draws air into the feed line through the sight tube, so I have to seal it off when I'm not using the sight gauge.

Anyone have a better setup for a C-25 (pre 2006, with the tank in the V berth)?

Boris
 
:D From past experience on many boats that I have owned and cruised, the last thing I do before leaving I fill the water tank full. When leaving my yard on the trailer I do this and when leaving a marina I do this.

Once I did not do this and ran out of water the first day. You do not realize how important it is to be able to just wash your hands in clean fresh water. I always have drinking water in the refridg however. :D
 
Dave, I couldn't agree with you more. We fill the tank every chance we get, just before we leave the dock. However, if you're out a couple of weeks, it's nice to know when you HAVE to stop and fill up the tank. I think the tank on the 25 is good for about 3-5 days, but it's embarrassing to run out of water.. Also, Judy insists on carrying 5 gal of water in the cockpit (is that trust or what?)

Any good ideas on a sight tube for the 25?

Boris
 
Boris, I tried adding a sight tube, didn't work well, too far from the tank so boat attitude had too much affect. Plus sucking air, etc, as you experienced when running the pump.

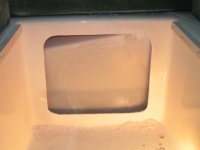
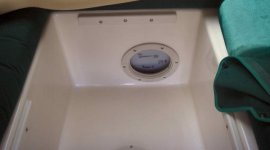
Cut a hole and added a hatch cover to the face of the V-berth, problem solved, love it!

060304_1.sized.jpg

PICT0015.sized.jpg

I'll look for a picture of the finished project with Bomar cover.
 
Steve, we’re going to spend a week or two at Santa Cruise Island, etc. where, as you know there are no water stations open to the general public. So, your post got me thinking. For some time I’ve wanted to be able to access the top of the fuel tank; and you’ve shown that a cutout in the face of the water tank is the only way to gauge the level. I thought I’d kill 2 birds with 1 stone (only in a metamorphic way, of course.)

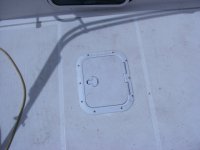
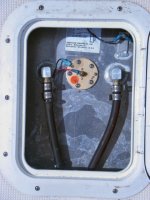
First the fuel tank. The 8” dia access port doesn’t allow one to get to the fuel outlets and the level gauge, so I thought I’d get a bigger hatch. I used a Bomar access hatch, 121x10. This was the only type of hatch that didn’t have a vertical ½” lip. I could just imagine leaping out of the cabin door, catching the edge of the hatch, and going overboard. The one I used doesn’t have that problem. The pictures below show the installation and the cutout portion. Now I can look right down on the tank connections. The hatch flexes a little but it’ll take my weight. The cockpit floor on a 2005 C-25 is removable, and as you can see is a fiberglass/ balsa laminate. Used a drywall cutter with the appropriate bit. Sealed the edges with 3M 4200.

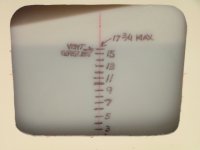
Next the water tank. I used the round port I’d removed from the cockpit floor, and thus cut a round hole. I had to be careful, since I didn’t want to cut the tank. From your picture, that panel in front of the tank is only ¼” thick, so I was careful to set the depth on the cutter. Good thing, because the tank almost rests on the panel at the top. After cutting, I measured the various levels in the tank, by pouring in a gallon at a time, and marking them on the tank, again as you can see. 23 gal full.

The final part of this story is that now I can see where the hoses come out of the fuel tank, and we quit arguing about how much water we have. Judy is happier than a kid with a new toy. Don’t know where that second hose goes, yet.

Cockpit Floor Cutout
Cutout_1.sized.jpg

Installed Hatch
Deck_Plate_1.sized.jpg

Access to Tank Top
Deck_Plate_Open.sized.jpg

Water Level Access
Water_Level_2.sized.jpg

Boris
 
Boris, yep, the only way to go, no question on the water level. I really like mine too. By the way, I also added a round porthole like yours but up on top of the v-berth, slightly left -- centered over the inlet hose and vent tube for maintenance if required. Thanks for the post.
 
Sorry about being off topic, but the fuel tank picture shows it well.
What say you-all about the practice of using brass fittings in an aluminum tank?
I've read that this is a big no-no from a galvanic standpoint.
 
Journey On Wrote:

"Don’t know where that second hose goes, yet. "

Is it an air vent, a water hose to the toilet, or a supply hose for a fresh water washdown?

Joe. :teeth :thup
 
Those two FUEL lines are gas supply lines. One goes to the main engine, via the RACOR filter. The second goes to a fuel line for the Honda kicker, complete with attach fitting; supplied by the factory. I don't use this line, using a separate tank for the kicker, so I'll probably convert it to a drain tube.

Boris
 
Back
Top