Water leak in hull- forces winter projects: advice needed

Thanks Sunbeam. I was thinking along those line too. It's nice to hear what other think. I concur with the potential to be sloppy with the brass under the guard.
Chars!
 
Grazer":3lj6z3ok said:
I was thinking along those line too. It's nice to hear what other think.

Isn't it nice to get a "check in" when you're about to tackle a project? So many things on boats can be approached a number of different ways. I was working on my 22's transom drain today, and there were two or three times I asked a friend to give me feedback on my thoughts as I went along (happened to have someone to do that on the premises today).

I have a trailer project I'm considering, and I'll be making a post here on the forum before proceeding because trailers are something I don't have a lot of experience with. I'm looking forward to hearing what other C-Brats have to say about it.

Sunbeam :hot
 
Project Update:

Over the last 5 weeks I have been chipping away at my projects. What turned out as a small leak has turned into a much larger project.

Foam removal:
My first task was to cut holes for hatches and remove the foam. As others have mentioned, this task was both tedious and time consuming. I equate it to doing work in the crawlspace under a house- cramped, dirty, and requiring great persistence. I found that a combination of a small potting/ garden shovel and a small pry bar were the most useful devices for foam removal.

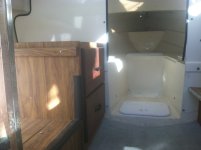
After removing all of the foam, I quickly discovered that the leak was coming from a screw in the keel guard that was too long. I epoxied the hole from the top and bottom and then painted the inside of the v-berth hatches with grey epoxy paint. It turned out wonderfully! It is amazing how much storage space this has added.
http://www.c-brats.com/modules.php?set_ ... _photo.php


Keel Guard:
I have gone back and forth over the last few weeks over whether or not to reinstall the brass strip or to go with a keel guard. I have never beached my boat, nor do I intend to, since all of my trips are to Catalina and the Channel Islands. The idea of reinstalling screws below the water line just kept bothering me, so I opted for the installation of the Keel Guard. The installation was very easy and took about two hours, since I had to remove the bottom paint along a 5 inch strip in the keel.
I used a 6’ keel guard and followed the directors exactly as instructed in the DVD. I found that a roller (in picture) was the ideal tool for applying the keel guard. The burnishing tool worked, but I felt that I could apply more pressure and smooth out the bumps with the roller. After drying for a day, I applied 3M 4200 along the edges, below the water line. I am not sure if this was really necessary at all, but I figure a little added protection can’t hurt. I am going to wait a few more days and then began coating it with bottom paint.
http://www.c-brats.com/modules.php?set_ ... _photo.php

Helm seat and Drawers:
I am 6’5” and spend most of my time hunched over while driving. I lowered the helm about 4” and now have a much better view out the front window.

One of my biggest complaints on previous trips was the fact that I would often have to store things under the seats and constantly have to remove the seat tops to get at the gear below. I used to build furniture for a living, so off all of the projects, this was the most fun. I built 5 drawers with full extension slides. What a difference! It is going to be so easy to get at everything in these drawers. I used Baltic Birch for the sides and African Mahagony, with a walnut stain, for the exterior faces. They match the original Decaguard plywood beautifully.
http://www.c-brats.com/modules.php?set_ ... _photo.php

http://www.c-brats.com/modules.php?set_ ... _photo.php

Projects Still left to complete:
Reupholstering the interior: the seats in the cabin and v-berth cushions are getting new fabric. I am having the v-berth cushion cut into three pieces so I can access the hatches.

Two New Bilge Pumps: I am going to install two 750 gph pumps, to replace my current 500 gph pump

Paint the Cockpit floor: It is scuffed up pretty bad, so I am going to apply a coat of the epoxy paint, since it is the same color.

Trailer Maintenance: The previous owner removed the trailer brake calipers and brake lines, so I will have to replace these and get the surge brakes working once again.

We are hoping to spend 4 days at Catalina over President’s day, so I am under pressure to finish.

Thank you all for the previous posts and insight. I love the feedback and ideas I get from this site.

Tim
C-Pelican
 
trpsurf":20wk3mvr said:
What turned out as a small leak has turned into a much larger project.

Isn't that the way :cry On the other hand, your V-berth looks fantastic, and what a difference it's going to make! Great project, and one I have on my list.


trpsurf":20wk3mvr said:
After removing all of the foam, I quickly discovered that the leak was coming from a screw in the keel guard that was too long.
Well at least you found a definitive source. I had checked a few of the screws on my boat and they were all good, but now I think I will check them all, just to be sure. If I do put the brass keel guard back I may cut the screws a hair shorter to allow more room for thickened epoxy in the holes. The rubbery keel guard seems like a really good option too though :thup

trpsurf":20wk3mvr said:
One of my biggest complaints on previous trips was the fact that I would often have to store things under the seats and constantly have to remove the seat tops to get at the gear below.

I could instantly tell this was going to bug me too. Those seats/plywood/foam/fabric are just so cumbersome to move around. The drawers look great! (And are a project that is not in my realm of expertise at all.)


trpsurf":20wk3mvr said:
Paint the Cockpit floor: It is scuffed up pretty bad, so I am going to apply a coat of the epoxy paint, since it is the same color.

One thing to check on (you may already have): Epoxy as I know it is not very UV resistant, so I wonder if an epoxy paint outdoors might tend to chalk after awhile. Perhaps they've figured out a way to eliminate this problem (I use epoxy, but not typically epoxy paint.)

Thanks for the photos and explanation - I really enjoy reading this type of post.

Sunbeam :hot
 
Tim, when you installed the hatches in the deck between the berths how much space was there between the deck and the inside of the hull and was it filled with foam?

IMG_1101.jpg

My 22 Angler came with storage already in the three places where you removed the foam and installed hatches in the berths but I've debated installing an inspection hatch in the floor between the berths in order to keep an eye on any leaks from the screws in the stem guard. I was just wondering how much work would be involved. Thanks!
 
I would say there is about 3-4 inches of space. In my boat, every square inch of the v-berth was filled with foam.

There is a story behind why I installed two hatches between the berths. When I cut the first hole closest to the helm/ cabin, it was clear that there was water under the berth, but I was unsure at that point where it was coming from. Next I cut the hole for the forward hatch and realized at that point that the leak was coming in from the last two screw holes, which are under the area below. It wadout ofreavh from both holes I had created, hence the need for a second hatch. If I had to do it all over again, I would have just installed one hatch in that area, toward the front of the boat. This gives you perfect access to the area where the screws are.

The space small, but I plan to store trolling lures and other random fishing supplies under there that get infrequent use.
 
trpsurf":38oe93l6 said:
I would say there is about 3-4 inches of space. In my boat, every square inch of the v-berth was filled with foam.

I want to cut hatch openings for storage up in the v-berth, and I am so curious about what I'm going to find. I have conflicting clues!

1) I went to unscrew the small (~6" round) inspection hatch that's in the sole under where the porta-potti goes, and...hmmm... won't unscrew? So I got a piece of wood, and padded it, and put it up against the hatch lid and tapped it with a hammer... no... still no go. Well, I didn't want to break anything, so out came the screwdriver and I removed all the perimeter screws and pried it up. I'm sure you can guess what was holding it in: Blown or poured in foam, which was obviously blown in from somewhere else and had gotten all over the hatch lid/O-ring/etc. and caused them to stick together. That area was really packed with foam.

2) But.... there are none of the ~2" plastic, push-in plugs on the V-berth that are the usual place where the foam was blown/poured in from. So far the V-berth flat looks to be just a blank, molded fiberglass section (unless the plugs are someplace really hidden). But the way the existing foam is molded up into the access hatch (it looks like a perfect "reverse hatch" when I take the hatch away), I really don't think it was put in from there. Maybe it's possible that it was poured in there and then the hatch was quickly screwed on before it billowed up?

3) When I knock on the main V-berth flats it sounds very hollow. Of course this makes me hope that I will cut the tops open and find no foam! Hope springs eternal :D

Only one way to find out I guess....

Sunbeam
 
Sunbeam-
I hope you are luckier than I was. Like I mentioned earlier, it was filled to the brim with foam.

Like you, there are no external plugs on the top of the v-berth where it would be obvious that they would pour or inject the foam. It sounded nice and hollow as well, when I tapped on it.

I am curious about where they injected the foam.

If it is full of foam, I would say that the extra storage is definitely worth the effort. Yesterday I put two extra anchors in the forward hatch, with 200' of rode and still have room to spare.

Tim
 
trpsurf":2sqheft6 said:
Sunbeam-
I hope you are luckier than I was. Like I mentioned earlier, it was filled to the brim with foam.

Like you, there are no external plugs on the top of the v-berth where it would be obvious that they would pour or inject the foam. It sounded nice and hollow as well, when I tapped on it.

Way to dash my hopes with reality! :cry

trpsurf":2sqheft6 said:
I would say that the extra storage is definitely worth the effort. Yesterday I put two extra anchors in the forward hatch, with 200' of rode and still have room to spare.

Seems like it would be super handy. Although I don't think I would want to put a lot of weight up there (for trim/handling reasons), I can think of quite a few bulky/odd items that would be perfect: Spare anchor, spare prop, clothing I probably won't need but might, spare fenders for raft ups, etc.

Sunbeam
 
I too am in the process of opening up my V-berth area, removing the foam (I have the 6 two inch black plastic plugs and all are filled to the brim with foam) and add some hatches. I have a couple of questions for those who have completed this project already.

What tool did you use to cut out the hole for the hatches so as not to damage the gelcoat to much through chipping? I don't think the chipping will make much of a difference as it will be hidden behind the flange of the hatch cover.

Below the porta potti and the step in front, once the foam backing is removed, won't this fiberglass flex and crack/craze in the corners when one stands on it to say go forward and up through berth hatch? Has anyone noticed this? Does it require a reinforcement stringer underneath?

While I am asking questions, for you folks who are experts at using epoxy, does anyone know an easy (read less messy) way of getting thickened epoxy into those syringes used for filling drilled holes?

Also, has anyone used the WEST SYSTEM fillable caulking tubes to apply thickened epoxy in larger volumes. It seems to me that they would generate lots of heat as it is essentially in a confined pot.

Any and all comments would be greatly appreciated.

Grazer
 
Grazer,

To cut the holes for the hatches, I first drilled out the radiused corners with the appropriate sized hole saw, drill bit. Then I used a multi function cutting tool from Harbor Freight to cut along the lines. The cutting attachment cut though like butter.
http://www.harborfreight.com/variable-s ... 67537.html

I have not done a ton of epoxy repairs, but I did use West Systems Six10 epoxy to fill a number of holes. I am sure that it is more expensive per volume than mixing it yourself, but it is super convenient and is applied through a caulking gun. No mixing required!

Regarding the strength of the area below the v-berth, I wondered about this as well, especially since I have two hatches in this area. It seems plenty strong, although I am sure a little support down there can't hurt. Like I mentioned above, there is not a ton of space underneath there, but you can only get access to those rear screw holes by cutting into the forward area.

Good luck. Given that I just completed this project, let me know if you have any questions.

Tim
 
trpsurf":12sjquxg said:
... but you can only get access to those rear screw holes by cutting into the forward area.

I may be into this at some point, so I'm curious why you needed to access the inside of the screw holes vs. just filling/repairing them from the outside. Did you put fiberglass cloth over the inside of the holes, or ?

Sunbeam
 
Reading all this, I'm just curious, what kind of foam is this if it holds water? I'm thinking of something like the spray stuff in a can that you buy at the hardware store for sealing around a home, but I can't imagine that stuff holding water.
 
Colbysmith

The foam below the V-berth seems just like the expanding foam used in house-hold insulation for sealing up gaps. When I checked through the inspection port underneath the porta potti the foam was damp, not thoroughly wet like some other folks have found. I simply want to check it out, remove any unnecessary weight and create some storage area.

Grazer
 
Sunbeam":3q2u4gvw said:
I may be into this at some point, so I'm curious why you needed to access the inside of the screw holes vs. just filling/repairing them from the outside. Did you put fiberglass cloth over the inside of the holes, or ?

Sunbeam

I cut the second access hatch for a few reasons. The foam under there was really wet and I did not want to wait for it to dry or risk having it get moldy, since it was almost impossible to remove from the first hatch I cut in. Also, I did want to repair it from above, as an added precaution. I figured since I was in the repair mode, I might as well go the extra mile.

It is also important to not that in the center of the bow, above the screw holes, the factory applied some adhesive (seems softer than 4200/5200). This material did not cover the bottom two screw holes. If it did, I would imagine might not have leaked. This adhesive was a bit cracked, so I grined it down a bit and applied a layer of 5200 over the area. I don't think this will reall do anything, other than to smooth out the area in my new forward. storage compartment.
 
trpsurf":2a5rceg8 said:
I cut the second access hatch for a few reasons. The foam under there was really wet and I did not want to wait for it to dry or risk having it get moldy, since it was almost impossible to remove from the first hatch I cut in. Also, I did want to repair it from above, as an added precaution. I figured since I was in the repair mode, I might as well go the extra mile.

Makes sense. Thanks for the added info.

trpsurf"It is also important to not that in the center of the bow said:
Could you elaborate on this a bit? Do you mean that there were "insurance blobs" of sealant on the inside where the screws were holding the brass strip on the (supposedly only) outside? Like the things on the inside of the hull/deck joint fasteners? I wonder if they knew they drilled too deeply on a couple and so "sealed" them with the blobs. Or am I visualizing something completely different from what you are describing?

Shoot, now I really want to get to those V-berth hatches just to see what I'll find :D But I'm going to wait as I'm frying other "upgrade fish" right now.

Sunbeam
 
colbysmith":2ugzpr44 said:
Does anyone know what the original purpose was for the foam anyway?

My guess is that it was intended for flotation purposes. Smaller boats than the 22 do actually require some amount of flotation (IIRC the 22 is long enough to not have this requirement), so they were probably already putting it in the smaller C-Dorys. There may be some amount of practical flotation with the foam in a 22, but I kind of doubt it would actually work very well in practice - though I haven't specifically calculated or tested.

Also, some buyers feel more comfortable if they can hear that the boats have flotation foam, so they may have put it in for that reason. A problem is that most foams will absorb water, even many that are not supposed to be able to, and obviously this has happened on many of the boats due to inopportune holes (ironically, apparently most often put in at the builder). Also, from accounts I have read of people removing it, there really wasn't a consistent amount or application, but rather more of a "oh, don't forget to squirt some foam in those holes in the V-berth! Okay, done!" type of thing. Some people's are packed full, others just have "ant hills" beneath the fill holes, and a few have had no foam (lucky sots).

I don't believe they put foam in the new 22's now, but rather install hatches and finish the compartments as stowage.

Sunbeam
 
There is some sound deadening effect of the foam. Also there is some minor stiffness imparted. There is probably enough foam to float the weight of the outboard.

Many foams will adsorb or trap some water with time. Thus boats like Boston Whalers take on water= weight as they age. Once water is trapped it is very difficult to remove.
 
Back
Top