Water intrusion into balsa core

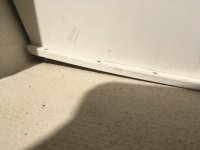
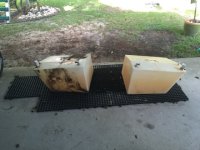
Over time the plastic gas tanks on my 2002 22' C Dory have buldged on the sides, causing the screws holding the tank anchors to the bottom of the hull to pull loose. When I removed them for inspection I found the balsa to be completely rotten underneath. There are twelve holes with varying degrees of intrusion.
By tapping and probing, it appears the moisture has only permeated to a radius of a couple of inches, but it will take a good moisture meter test and probably a hole saw to know for sure. I plan to disconnect the tanks and batteries and slide them forward.
I know it itsn't rocket science, but any helpful tips would be appreciated, including whether I should replace the balsa with something else.
My big question is that if the tanks tend to bulge like this over time why the heck did they put so many screw holes in the bottom anyway?
 
Because the balsa is end grain- meaning the grain goes up/down instead of parallel to the boat hull, damage will be localised to a very small area surrounding the deck penetration.
 
H & J,

My boat sat for about 10 years before I acquired it. Two-thirds of the balsa core in the transom was rotten. When balsa cores are made, they glue up end-grain square blocks to form a sheet. The glue helps to keep water from migrating between the blocks, but that didn't work in my case. I don't know if a freeze-thaw cycle delaminated the fiberglass from the core and allowed the water access to a larger area or not, but that's not uncommon; particularly over the course of several years.

I already had a pinless moisture meter (PMM) in my wood shop and used it to detect the extent of moisture intrusion in my boat. My sole is cored with plywood; that core material didn't rot and I was able to dry it thoroughly by removing the inner cockpit fiberglass. I don't recommend you do that unless you find that the whole core is soggy toast and you're willing to take on a real project. If you use a PMM on your boat the percentage readings won't necessarily be accurate values of core moisture; just use it to see where the most moisture is located. Having been a cartographer in a previous life, I drew a six-inch grid pattern on the transom and sole, then I moved the PMM along those lines and marked where the readings were 10%, 20% and 30%, then I drew 'contours' connecting those points. It was a very valuable illustration for me. PMMs aren't cheap (I own a Wagner), but after about three or four hours worth of a good marine surveyor you're gonna break even. That said, a good marine surveyor might be quite valuable in determining the extent of the moisture and structural integrity of the core if you're over you head. There are good articles online about how to use a PMM on a cored fiberglass boat. There are also good articles elsewhere online as well as in this forum on how to use a fastener through the fiberglass skin so that water can't penetrate the core.

If you could post some pics of your boat in the Speckled Pup photo album here showing what you're finding, those of us who've been through these projects may be able to provide more focused recommendations. It'll all depend on what you find below the fiberglass. Do be cautious though, because you don't wanna tear out lots of fiberglass just to dry an otherwise structurally OK core.
 
Good suggestions--and definitely the freeze thaw cycle does accelerate damage, as does any water standing in the cockpit. Any large area is unusual in these boats, and I would start by just sounding out the area around the screws. It is very likely that the damage is only an inch or less--and you can probe the balsa by drilling out the top glass by about 1/2" and then using a right angle pick to check for the integrity of the balsa. If the Balsa is OK beyond an inch or so, then you can just route it out, fill with epoxy and in this case, I probably would use Cabosil and micro ballons--at least for the larger area--then a higher density filler where you are going to put the screws back in.

I note on my "new"--2006 C Dory 22, there are longitudinals glassed in to support the bottom of the tanks. So far we have not found any water intrusion.
 
I think everyone with a 22' around your time frame has had issues with the fuel tank mounting system. There have been several different fixes over the years. I eventually epoxied wooden strips under the tanks and used the wooden strips to hold the anchor screws for the tank hold-down fittings. I epoxy filled and sealed all the old screw holes. While you have the tanks loose it would be a good idea to check the bottom of the tanks carefully. I have a 2002 also and one of my tanks eventually cracked on the bottom. I have no idea why. I was working on the floor project when I noticed it and luckily the tank only had a few gallons in it.
 
Ken,
Did you have to route out any of the balsa core,--if so how far out was it involved. Why do you think that these year boats had more problems? I noted one photo of snow on what I think was your boat--do you think that the freeze thaw cycle made things worse?

A few fuel tanks of this era in some 25's and even some Tom Cat 24's did develop leaks. How many of the 22's had leaks in the tanks--and was it only one or both tanks?

Thanks.
 
On my boat the area affected was very small. I just drilled out 1/2in holes centered on each screw hole and that revealed dry balsa in every hole. I then filled each hole with thickened epoxy. I made three approximately 1" x 1" wooden strips which I epoxy coated to seal them. I epoxied these to the floor and then mounted the tanks atop these. This raises the tanks about 1" but on my boat there was plenty of headroom under the splashwell for the tanks.

The cause of the problem, which involved several year models, was how the tanks were secured in the boat. The tanks were sitting directly on the floor. The piece of starboard which covered the front of the tanks was screwed to the floor with four SS woodscrews. A nylon strap was attached to the back side of the cover board and ran over the top of the tank. The screws only had about 3/16" of laminate to bite into on the floor. When the tank expanded and contracted this put a vertical pull on the screws. Check the first few photos in CAVU's album and you can see what I am alluding to. There was no way those screws could hold any load at all.

Why the tanks cracked I have no idea. Both tanks had a random pattern of cracks on the bottom, although only one was actually leaking. I felt the other one would leak soon so I replaced both tanks.
 
Bob, after about 2003 C-Dory began to install the tanks with the glassed in runners that you have. My old 22 was a 2003 model and originally came with the tanks installed as Ken describes. The factory had enough problems with that installation that they decided to fix/upgrade many of the 2003's at no cost. Mine was fixed when I brought it back to the factory (3 owners ago at the Kent shop) for other minor issues.
 
Thanks for the reply. The 1992 C Dory 22 I owned before did not have any problems with the screws or tank. I suspect that the 2002 boats had a thinner inner glass layer. That boat also had the tanks sitting on the floor. What you have done is far better and should last well into the next century!
 
I've had problems logging on. I took my boat in to my marina and consulted with the "experts". Although the holes around most all of the old screws look bad, the intrusion is only a couple of inches around the hole, at most. Simple fix to that. As far as fastening the tank down we decided to glass in a 1X1 and screw into that. Based on what I see now, I'm also going to inspect the tanks for cracking.
 
My 2002 I just bought has the same issue. The outer ends of each piece of starboard forward of the tanks have pulled the screws out. I ran almost all of the fuel out over the last 3 days. We put about 16 hrs on the boat and did a lot of exploring, anyway before I digress, I plan to pull the tanks and inspect the core around the holes. I also have screws through the cockpit that hold the batteries down which sit between the tanks. Initially I thought about burying stainless anchors in epoxy, then using machine screws through the starboard to hold down the tanks. After reading this thread though I'm considering glassing in starboard or some other hardwood and using that to mount the starboard strip that holds the forward bulkhead and strap over the top of the tank. I just need to make sure I have enough clearance over the top of the tanks to lift them out and over whatever I glass in. Should I lay strips of something under the tank also to raise it up off the floor? Or just set it back on the cockpit floor? I can't really see a reason to raise the tank, unless I'm missing something. Is that the way they build them now? Once I fix the tank problem and glass something in to hold the battery boxes I won't have any other possible intrusion into the core, except the cockpit drain, trim tabs and depth transducer. Probably just let them be I guess. Plan on keeping this boat a while, trying to ensure it lasts a long time for me and the next owner.
 
I would place the tanks on the floor, or on a neoprene pad, if you wish. If it was an aluminum tank, then I would suggest coating with coal tar epoxy, and using 5200 to glue plastic or fiberglass battens to the bottom of the tank, and then the tank to the floor--straps to hold in place into the strips you glass in place.

Often I have found that the trim tab screws are below the cored material--, so may be into solid glass.

The transducer should be removed, the holes filled in with under cut if necessary. Then a Starboard block fixed to the transom. In the 25 I just bought. I pulled the transducer, and it was properly installed with epoxy plugs. So I used those holes to put in the 2 SS Screws which hold the Starboard (HDPE) that I put both new transducers into. I also used "G Flex" epoxy with the Starboard. On the back of the Starboard, I made a number of channels, with a Fein (Osculating saw) which undercut the interface, to give the Gflex channels to flow into, and grip the Starboard.
 
I found a bit of water intrusion in the screw holes under the cleats that locate the fuel tanks.
I pulled the tanks, drilled exploration holes and fished out the wet balsa. Next step was to use aquarium air pumps to blow air into the core. I did this for a month under the sun in the summer. Then used epoxy and filler to fill the void.
I sanded the cockpit sole where the tanks sit to reduce chances of abrasion.
Good to go.
 
I'm still mulling this over. I'm thinking glassing in something to screw the starboard hold down strip into may be a little overkill. What I think would be the easiest fix would be to just drill out the holes in the deck, undercut them and fill it with epoxy and then just screw the starboard strip down into the new epoxy plug.
 
Either method will work. Be sure that the batten which you glass in or screw into plugs, is thick enough for the screws to get a good hold. I almost always use epoxy to glass in new items, since it has superior adhesion over polyester, in a secondary bond.

(I have been dealing with core water intrusion on the "new" 25, around the inspection ports and the "Steps" into the cockpit. Pulled the steps, and the 3/8" balsa core was complete dry in some places, in others it was saturated as deep as 3"--and this was water migration up! The sealants C Dory used in 2007 (and many earlier years just didn't do the job. I am going to use Loctite PL for Marine use--similar formula and specs to 3m 4000 (but cheaper). So much for just redoing the seams!
 
So I finally tackled this job today. Hows your new 25 coming Bob, we're dreaming of one after hopefully getting many years out of our 22, lol.

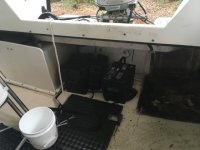
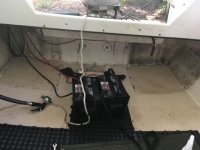
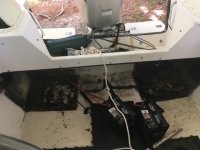
The plan was just to do the port side first as I'd ran the tank almost empty but after getting going I just removed both tanks. There were/are 26 screws through the cockpit sole, 8 for the two battery hold downs, 14 for the forward and midship starboard strips that hold the tanks in place, and 4 at the aft end of each tank that holds the tie down strap.

On the starboard side one of the forward star-board strip screws had an elongated hole through the deck. Look like someone tried to remove the screw and put it back in at an angle so it would bite onto something and tighten. It just made a larger hole for water intrusion. I was able to stick a screw driver down in there and move it a good inch or so forward and aft and felt no balsa. So tomorrow I'm going to overdrill the hole and poke around in there to see what I can find, then eventually use either penetrating epoxy or thinned epoxy to fill it.

Now I have to find the best way to go back with these. Tentatively the plan is to overdrill all of the holes and fill with thickened epoxy, then use the wood screws (best screw choice?) and some sealant adhesive (3m 4200?) for the star-board strips that border the tank. For the metal strap that holds the aft tie down I'm thinking of eliminating those screws through the deck and glassing a block down to the cockpit, or just up on the transom to screw into. In "This Old Boat" by Casey he recommends laying some cloth over and under the block, other wise he says it will eventually pop off, any thoughts on this versus just sitting the block in thickened epoxy?

For the battery hold down I'll also glass some block down to screw those into. That will eliminate 12 screws.

I've considered glassing down the star-board strip that sit toward the centerline and are oriented for and aft so I could eliminate those screws but if I laid cloth over them it would create a little lip around the edge of the bottom of the tank and I don't want to do that. I've also considered just eliminating that forward partition and just strapping the tank down to the forward starboard strip as seen in that 90's C-Dory 22 on the for sale page. Lots of decisions to make in the morning, plus I need to take a hair dryer to the holes and make sure it's dry in there. I prob got a little water intrusion while I was cleaning the area.

I've also thought about putting a thin piece of rubber or neoprene under the tanks for cushion but I don't have a lot of clearance above the tank. I need to find some store where I can get something like that, any ideas?

I also decided to replace all of my fuel lines from the tanks to the filter, and I need to find a new decal for my fuel tank selector as the old one is faded but the lines were hooked up wrong anyway. Port drew from the starboard tank and vice versa. Sorry for the rambling, just thinking out loud.

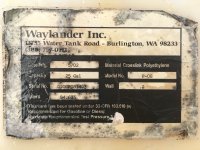
Last thing, I was surprised to find 25gal tanks, the owners manual says 20 gal tanks.


fullsizeoutput_29f8.jpg


IMG_0907.sized.jpg


One tank removed
IMG_1479.sized.jpg

IMG_1482.sized.jpg

Cleaning up the tanks

IMG_1483.sized.jpg

Just about ready for the install
IMG_1484.sized.jpg
 
Back
Top