Tomorrow I drill through the roof...

matt_unique

New member
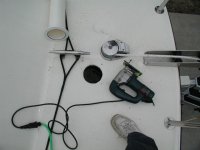
If the weather holds I will be drilling through the roof of my new Tomcat tomorrow. I will be installing a VHF antenna, radar/gps receiver, and a radar reflector. It definitely helps I have already drilled through my helm area installing the VHF, compass, and depth sounder. There is definitely a 'moment' as you're holding the trigger of the drill on brand new fiberglass!

I have a Seaview aft leaning mount with the light bar for the gps receiver. The cables for the GPS and radar will snake through the mount and through one hole at the center of the mount.

Any final tips? I will be overdrilling, undercutting, etc. to seal the core. I know I need to align the radar mount so she is pointing straight forward and aft. I will be sealing the entire perimeter of the base of the radar mount with 4200 to keep everything water tight. I had hoped to be able to install everything forward so the wires/bolts coming through the roof would be above the overhead shelf (and thus hidden from view when I install a board to close that little shelf). Upon closer review this will not be possible. The front of the roof begins to slant down where part of my mounting would need to be.

How have you guys snaked the wires after they are through the roof? I see where most run them forward then down beside the windows.

Thanks
 
capt. mattie
YOU KNOW ME, I CAN'T RESIST.
measure twice, cut once! of course you all ready know to mask off the area to be drilled, saves the surrounding gelcoat. wear a mask and eye protection and a long sleeve shirt. these suggestions only reinforce what you all ready know.
i'm sure you're going to have a great outcome.
good luck.
pat
 
There is most definitely a "moment" before pulling the trigger. I mounted my new stern rail yesterday, and I must have measured, masked and clamped over and over for 45 minutes. Even after measuring repeatedly, I cringed a little as the drill bit in. All went well. :)

Regards to all,

Greg
 
Yes, I know the feeling well.
The first hole I drilled in Fishtales was to bring the rode through for the windlass-- I wanted to drill a large hole first to get it over with. :shock:
 
Oh, how I dreaded drilling holes for the radar arch, and like others posted here, I measured and re-measured for hours before I finally cut. Afterwards I lined the holes with 3M 5200 sealer. There's no way rain can get in, but moisture does condense in the tubes on cold windy days.

BTW, I mounted my GPS receiver inside, and it rarely loses the necessary satellite contacts. If anyone is thinking of drilling a hole just for thatt, try it inside first. Also, again to prevent drilling a hole in the roof, I mounted my VHF antenna port side on the vertical surface of the cabin, and that works fine also.
 
I began the projects at 7:30 am and stopped at 5:30 less a short lunch break and a quick run to the store.

I had 13 holes to drill, undercut, and apply epoxy. All are cut, all are undercut, but I only managed to get 8 of them done with epoxy. The epoxy application is by far the hardest part. I'm experimenting (read learning) a bit with the precise consistency but even with a small popsicle stick it's hard to get it to do what you want it to do. It did not sag on me but I would apply paste and it would want to come back out when removed the stick. It got a little easier as it began to cure. I think it would be much easier to add a piece of duct tape over the bottom, fill the hole, then drill the center once it cures.

As others noted above I measured and eyeballed MANY times..then I decided to run a masons line from the anchor roller to the stern light to have one more reference to make sure I was aligned to the center line of the boat. After every drill I made sure the template (or actual part) still lined up with the holes I had drawn with a pencil.

So far so good...I also wired my depth sounder for power. I crimped and heat shrunk all the ring clamps.

I need a few more days of good weather to get through the rest of it...On the wet/cold days I'm inside wiring and mounting.
 
Matt, you're gonna get yours done before me! I'm up at our place in Maine to pack up and won't head south until about 8 May or so.

Is that cabin top balsa cored? I didn't think it was...

Pix would be great..

Charlie
 
I should have taken more pix...I took one on the inside showing my 13 holes before I installed anything up top. I will post that and some completed pics.

The roof is balsa cored...I found it plenty strong though...it's 7/8" thick as I recall.

I just came in for lunch (decided to take another personal day today since there is no rain and temps in the low 50's). I have the radar mount (which has a bar for the GPS) and radar reflector fully mounted and sealed on the roof. The wires for the GPS and radar are now inside the cabin. It's coming together! I'm waiting for epoxy to cure for the VHF antenna holes. I hope the rain holds out until I get that done and sealed.

Can I just say the Dremel tool is fantastic...so many applications and it works really well for this type of job.
 
Matt, how much oversized (read how much bigger than the bolts that go through them) did you drill your holes? I'm not sure filling the entire hole is the way to go. Maybe Dr. Bob can chime in here. Seems like a lot of drilling....Epoxy gets pretty darn hard!

Wish I were in Va working on the boat, instead I'm in DownEast Maine until 8 May packing boxes! It's gonna be a struggle getting the boat done before the Ches Bay Gathering 6-8 June! I promised Sally I'd get the A/C in too so she wouldn't have to spend her time with her feet in a bucket of ice water like last year when it was 100deg plus in the shade! :cry

Charlie
 
The epoxy for the VHF antenna was not quite solid before it was time for me to clean up. I will redrill the bolt holes tomorrow or Sunday and let you know how hard it was.

I eyeballed the drill bit over the bolt for the first part then of course undercut with the Dremel. I undercut every hole except for the screw holes for the water tight cable gasket gizmo.
 
I completed the exterior portion of the install today. I had good drill bits and it was not at all difficult to drill through the solid fiberglass. I added a picture of my finished work to my photo album.

While out at dinner we had a downpour. I planned to test the sealing with a hose in the morning but when I got home I did not have a single drop in the cabin. Phew...

I also added some epoxy paste to the drain hole between the anchor locker and the port storage area. I suspect I may have had a leak from that area leading to my port sponson. I will test that with a cup of water tomorrow as well.

So far so good! I can't get over how handy the Dremel tool is. I'm fabricating my own support for my multifunction display screen. I'm using the bracket that came with my system. The Dremel has been great to cut the metal, remove burrs, etc. I will post pictures when I'm done.
 
Congratulations on the install! If you like the Dremel--you will love its bigger brother, the Rotozip, with or without the flex shaft!
 
I completed the mounting of the multifunction display today. I was able to match the Furuno gray color pretty well. I used a Dremel tool and a hacksaw to fabricate the port side mount using the mount support that comes with the unit. I needed a few angles in the install so I had to make two pieces held together with bolts. I added a few more pics to my album.

I also temporarily wired all the electronics - eureka everything worked! I will do the final wiring once I decide exactly where I want to route all the cables.

A few more things crossed off the list...if all goes well splash weekend after next but I still have a lot to do...
 
thataway":1gzlmg84 said:
Congratulations on the install! If you like the Dremel--you will love its bigger brother, the Rotozip, with or without the flex shaft!

Bob, I had never heard of the Rotozip, so went looking for it. So many models but looks very useful! Any recommendations?

Thanks,
Warren
 
Warren, The roto zip is a great tool for the right application. Needs to have a template or they can jump and do allot of damage quick. The sheetrockers love them as they can cut out J-boxes fast and go back and mud the areas they messed up. For round holes stick with a hole saw kit as they cost more upfront but gives a nice clean finished product. In the process (when the weather cooperates) of installing a 4 inch solar vent in the roof over the stove. My 2 cents.
 
mmitchell":pmwauafv said:
Warren, The roto zip is a great tool for the right application. Needs to have a template or they can jump and do allot of damage quick. The sheetrockers love them as they can cut out J-boxes fast and go back and mud the areas they messed up. For round holes stick with a hole saw kit as they cost more upfront but gives a nice clean finished product.

Thanks for the warning, maybe not the best tool for someone like me!

Warren
 
Back
Top