You are using an out of date browser. It may not display this or other websites correctly.
You should upgrade or use an alternative browser.
You should upgrade or use an alternative browser.
SO WHAT DID YOU DO WITH OR ON YOUR C-DORY TODAY??
- Thread starter TyBoo
- Start date
thataway
Well-known member
- Joined
- Nov 2, 2003
- Messages
- 21,725
- Reaction score
- 89
- C Dory Year
- 2007
- C Dory Model
- 25 Cruiser
- Hull Identification Number
- DOR25652A707
- Vessel Name
- thataway
This is about my second boat, the Caracal Cat. She is an 18' single engine center console catamaran with a 140 hp Suzuki. We are having some nice days (between hurricanes). The Caracal was not high enough on the boat lift to fully avoid the 9' storm/flood surge we had with Sally. I had removed the tubing from the live bait well overflow, and not replaced it. The stern of both hulls filled with water, but the bow floated high with the full foam floatation. The water got up to the EMC which is potted epoxy in the Suzuki, and all of the fuses looked OK, but were cleaned and checked anyway. The start battery and positive cables were toast and were replaced. The engine started up and ran fine.
Great time to introduce the newest member of our boating family; "Gigi" to a boat ride. The breeze was about 6 knots and a little ripple in the water. The trip also involved photography of waterfront damage from Sally, and searching for several missing PWCs from the hurricane. We are probably have to use the drone to find those which have not yet been found. There was a 22' boat driven about 30 feet into the pine forest wetlands, and it was barely visible. The missing PWC's could have been pushed even further back.
Gigi is a miniature poodle, who is 6 months old, and still growing. She will be an inch or so shorter and a couple of lbs lighter than Angel, who is now 14 1/2 years old, blind and deaf, but still enjoys a good run and tussle with the new pup.
Gigi on the seat in front of the console (over the live. bait well). Note the Torpedo electric 3 hp "kicker" on the floor.

Gigi on the helm seat/leaning post, where she rides when we are at planing speed snuggled next to me.

Gigi is going to the "beauty shop" in two days for her second grooming...
We have not let her swim yet--She has been inquisitive when I have been in our pool. So that is next. Generally poodles are good swimmers.
Great time to introduce the newest member of our boating family; "Gigi" to a boat ride. The breeze was about 6 knots and a little ripple in the water. The trip also involved photography of waterfront damage from Sally, and searching for several missing PWCs from the hurricane. We are probably have to use the drone to find those which have not yet been found. There was a 22' boat driven about 30 feet into the pine forest wetlands, and it was barely visible. The missing PWC's could have been pushed even further back.
Gigi is a miniature poodle, who is 6 months old, and still growing. She will be an inch or so shorter and a couple of lbs lighter than Angel, who is now 14 1/2 years old, blind and deaf, but still enjoys a good run and tussle with the new pup.
Gigi on the seat in front of the console (over the live. bait well). Note the Torpedo electric 3 hp "kicker" on the floor.

Gigi on the helm seat/leaning post, where she rides when we are at planing speed snuggled next to me.

Gigi is going to the "beauty shop" in two days for her second grooming...
We have not let her swim yet--She has been inquisitive when I have been in our pool. So that is next. Generally poodles are good swimmers.
hardee
Active member
- Joined
- Oct 30, 2006
- Messages
- 12,651
- Reaction score
- 17
- C Dory Year
- 2005
- C Dory Model
- 22 Cruiser
- Hull Identification Number
- Brat # 2202
- Vessel Name
- Sleepy-C
BBlalock
New member
- Joined
- Jan 31, 2017
- Messages
- 159
- Reaction score
- 0
- C Dory Year
- 2013
- C Dory Model
- 25 Cruiser
- Vessel Name
- Finale
I'll add my .02 to this thread. Back in March I decided to detail Finale. The green trim looked way over 8 years old so after about 12 hrs. it didn't look that good. So I paid a detailer $650 to do it and after about 2 weeks it looked just like after my free job.
I accidentally got some grease on the trim in the cockpit and when rubbed off the spot looked almost new. A month later the spot still looked great. A little research and petroleum jelly looked like a good option. A total of 2 hrs. of labor and the green looks almost new. That was Oct. 1, 2020. If it doesn't last but 2 - 3 months it will be well worth it. Maybe I'll give monthly reports.
Benton :smiled
thataway
Well-known member
- Joined
- Nov 2, 2003
- Messages
- 21,725
- Reaction score
- 89
- C Dory Year
- 2007
- C Dory Model
- 25 Cruiser
- Hull Identification Number
- DOR25652A707
- Vessel Name
- thataway
Not sure what "grease" you put on, but it will adsorb into the pores of the gel coat. It will attract dirt with time. If this is a silicone compound later painting will be difficult. It may look good for awhile, but in the long run, it will be an issue.
A 2013 25 should not have problems with the green stripe. Mine is a 2007 and the black keeps polishing out very well. But it has been kept up thru the years.
You probably will have to have the gel coat wet sanded--that is a progression of very fine abrasives ending up with 2000 and then use Finesse it by 3M to do the final rub--polish, and then use one of the good wax: Colinite Fleet Wax is the standard.
You should have got that detailer back and had it do it properly, before you put grease on it....
The latest range is ceramic coating the hulls after wet sanding and compounding. Expensive but lasts several years, and then a light renewal. There are other ways to skin the 25...
BBlalock
New member
- Joined
- Jan 31, 2017
- Messages
- 159
- Reaction score
- 0
- C Dory Year
- 2013
- C Dory Model
- 25 Cruiser
- Vessel Name
- Finale
I did try the ceramic stuff too. That didn't last very long either. Weeks. I read about the dirt in the pores while researching it but it seemed to be not a big issue. I guess I'll deal with it in the future. Since I have completed the job we'll just have to see. I'll report on this.
The grease was an accident and a small spot. I applied petroleum jelly on purpose, rubbed it on, let sit overnight and then buffed it off by hand.
If I get a detailer in the future I will do a better job of checking the job they do.
Benton :shock:
The grease was an accident and a small spot. I applied petroleum jelly on purpose, rubbed it on, let sit overnight and then buffed it off by hand.
If I get a detailer in the future I will do a better job of checking the job they do.
Benton :shock:
Desert Dory
Member
- Joined
- Sep 9, 2006
- Messages
- 180
- Reaction score
- 0
- C Dory Year
- 1989
- C Dory Model
- 22 Cruiser
- Vessel Name
- Desert Dory
The Mrs and I are heading to Lake Powell next week so I have spent the last couple of days trying to get some little projects done on the boat.
These were things I've been wanting to do for awhile but our summer heat has just been relentless this year. Since we had a cold snap and dipped down to the upper 90's it was time to get er done.
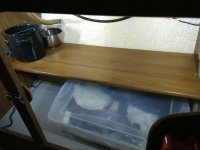
Added some LED pods to the inside of the galley cabinet. HUGE improvement for finding stuff in there when it's dark.
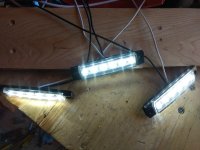
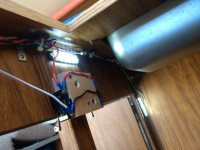
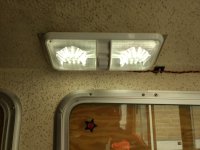
Also, added a dual LED light above the galley. Our boat only had the light above the cabin door and one in the v-berth. I had switched the bulbs in those lights to red LED's because they don't attract bugs (NOT a fan of bugs). It's temporally stuck to the ceiling with aluminum brackets and 3M automotive tape until we see if this is indeed where it's going to stay. This new light is like having the sun inside the cabin. It's SOOOO bright.
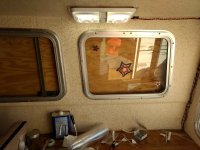
Also added a reading light in the v-berth for the Mrs. She likes to read a bit in bed before conking out.
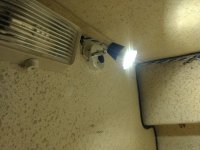
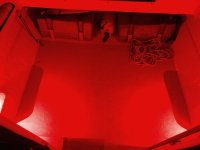
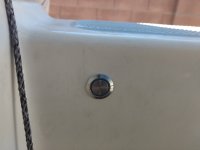
Awhile back I added a couple of red LED's to light up the cockpit. The only way to turn them on/off was the switch on the main panel. When I installed them I ran a wire up under the gunwale to eventually add a switch in the cockpit. The time is now!
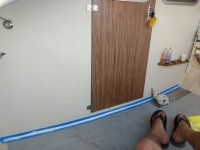
I was also getting a tiny bit of water seepage into the cabin through the bulkhead/deck joint. Being 31 years old, the caulk had seen better days. Cut it all out, cleaned it with acetone, and recaulked with 3M 4000 UV.
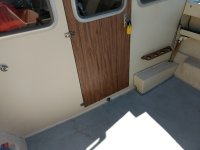
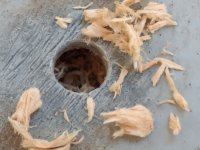
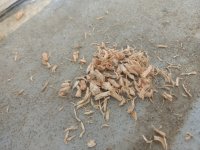
I figured this was also a good time to go ahead and drill and epoxy fill the screw holes holding the bilge pump, float switch, and pump cover.
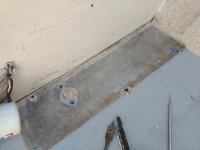
I was thrilled to find nothing but clean, dry, balsa when undercutting the holes.
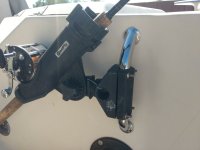
Awhile back I had added this grab handle to the port (swim ladder) side of the splash well to assist in getting back onboard the boat. Not long after installing it I thought it would be a great place to attach a rod holder, which kind of defeated the purpose of having it there in the first place.
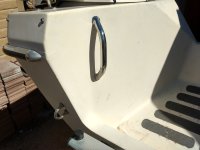
So, I ordered another one and mounted it to the starboard side and moved the rod holder over there. Much better!
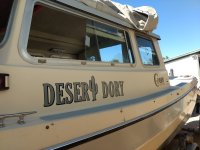
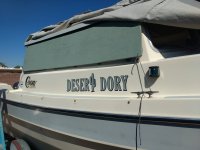
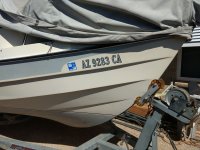
Then, back in early July the boat name and matching registration decals I had ordered arrived. Another one of those little things I wanted to get done but it was just TOOOO FRIGGEN HOT!!! Well, I finally got them on today.
So, that's what I've done to my C-Dory over the last couple of days.
These were things I've been wanting to do for awhile but our summer heat has just been relentless this year. Since we had a cold snap and dipped down to the upper 90's it was time to get er done.
Added some LED pods to the inside of the galley cabinet. HUGE improvement for finding stuff in there when it's dark.


Also, added a dual LED light above the galley. Our boat only had the light above the cabin door and one in the v-berth. I had switched the bulbs in those lights to red LED's because they don't attract bugs (NOT a fan of bugs). It's temporally stuck to the ceiling with aluminum brackets and 3M automotive tape until we see if this is indeed where it's going to stay. This new light is like having the sun inside the cabin. It's SOOOO bright.


Also added a reading light in the v-berth for the Mrs. She likes to read a bit in bed before conking out.

Awhile back I added a couple of red LED's to light up the cockpit. The only way to turn them on/off was the switch on the main panel. When I installed them I ran a wire up under the gunwale to eventually add a switch in the cockpit. The time is now!


I was also getting a tiny bit of water seepage into the cabin through the bulkhead/deck joint. Being 31 years old, the caulk had seen better days. Cut it all out, cleaned it with acetone, and recaulked with 3M 4000 UV.


I figured this was also a good time to go ahead and drill and epoxy fill the screw holes holding the bilge pump, float switch, and pump cover.

I was thrilled to find nothing but clean, dry, balsa when undercutting the holes.


Awhile back I had added this grab handle to the port (swim ladder) side of the splash well to assist in getting back onboard the boat. Not long after installing it I thought it would be a great place to attach a rod holder, which kind of defeated the purpose of having it there in the first place.

So, I ordered another one and mounted it to the starboard side and moved the rod holder over there. Much better!

Then, back in early July the boat name and matching registration decals I had ordered arrived. Another one of those little things I wanted to get done but it was just TOOOO FRIGGEN HOT!!! Well, I finally got them on today.


So, that's what I've done to my C-Dory over the last couple of days.
Desert Dory
Member
- Joined
- Sep 9, 2006
- Messages
- 180
- Reaction score
- 0
- C Dory Year
- 1989
- C Dory Model
- 22 Cruiser
- Vessel Name
- Desert Dory
ssobol":k063f10o said:Airmar (which makes a lot of the transducers on the market) makes a piece the snaps into the bracket that blocks the gap between the transducer and the mount. Have it on my boat.
Not sure how long a piece of license plate will last. I have a hard enough time keeping them intact on my trailer and that's not going through the water at 20-30 MPH. Lost one already and caught the current plate just before it came completely off.
Hey ssobol,
I totally missed this post from you. I did a bit of searching for a snap-in shield, even using Airmar in some of the searches, and came up empty. You wouldn't happen to have a link/source?
ssobol
Well-known member
- Joined
- Oct 27, 2012
- Messages
- 3,683
- Reaction score
- 31
- C Dory Year
- 2008
- C Dory Model
- 22 Cruiser
- Vessel Name
- SoBELLE
Desert Dory":1amuidzh said:ssobol":1amuidzh said:Airmar (which makes a lot of the transducers on the market) makes a piece the snaps into the bracket that blocks the gap between the transducer and the mount. Have it on my boat.
Not sure how long a piece of license plate will last. I have a hard enough time keeping them intact on my trailer and that's not going through the water at 20-30 MPH. Lost one already and caught the current plate just before it came completely off.
Hey ssobol,
I totally missed this post from you. I did a bit of searching for a snap-in shield, even using Airmar in some of the searches, and came up empty. You wouldn't happen to have a link/source?
Sorry, it was a while ago and I don't remember all the details. It seems that the spraying was a known problem. Newer transducers came with a plastic piece that fit in the hinge of the transducer mount to block the water flow. Older transducers did not come with this piece. However, you could write to someplace and they would send the piece for free, Sorry I can't remember/find the details of where to write.
If you search online, there are a number of solutions for a transducer spray shield, either home made or store bought (e.g. Amazon). Some people just fill the gap with sealant.
Desert Dory
Member
- Joined
- Sep 9, 2006
- Messages
- 180
- Reaction score
- 0
- C Dory Year
- 1989
- C Dory Model
- 22 Cruiser
- Vessel Name
- Desert Dory
ssobol":1pg1n4gv said:Sorry, it was a while ago and I don't remember all the details. It seems that the spraying was a known problem. Newer transducers came with a plastic piece that fit in the hinge of the transducer mount to block the water flow. Older transducers did not come with this piece. However, you could write to someplace and they would send the piece for free, Sorry I can't remember/find the details of where to write.
If you search online, there are a number of solutions for a transducer spray shield, either home made or store bought (e.g. Amazon). Some people just fill the gap with sealant.
No worries, and thank you.
Headed to Powell next week so I'll just see how my homemade one works out. Should be better than nothing.
alainP
Member
- Joined
- Oct 7, 2016
- Messages
- 235
- Reaction score
- 7
- Location
- Tucson, Az
- C Dory Year
- 2011
- C Dory Model
- 25 Cruiser
- Vessel Name
- deja la
Hey Desert Dory, sorry we missed you on Lake Powell this time, enjoy your trip.
Where in Tucson are you? We live in the Tucson Mountains side of the valley,
Alain
Where in Tucson are you? We live in the Tucson Mountains side of the valley,
Alain
Desert Dory
Member
- Joined
- Sep 9, 2006
- Messages
- 180
- Reaction score
- 0
- C Dory Year
- 1989
- C Dory Model
- 22 Cruiser
- Vessel Name
- Desert Dory
We're on the NE side.
Yeah, I was bummed we couldn't make the earlier gathering. The Mrs has a business (teaches baby's aquatic self rescue) that makes it tough to break away for more than a day or two without planning a few months ahead, so, until we both retire, it is what it is.
I'm sure we'll cross wakes one of these days.
Desert Dory
Member
- Joined
- Sep 9, 2006
- Messages
- 180
- Reaction score
- 0
- C Dory Year
- 1989
- C Dory Model
- 22 Cruiser
- Vessel Name
- Desert Dory
Since we have only taken our C-Dory to inland lakes we tend to beach a lot, which means we track a lot of dirt and junk into the cockpit and eventually into the cabin. I also found that, while underway at 20+ mph, we tend to get a lot of mist/spray from the transducer sucked back into the cockpit area.
This combination of events makes for a muddy mess in the cockpit (not to mention constantly wet feet) that is a real PITA. I made a spray guard for the transducer a few posts back and now I'm trying to address the wet feet part of the problem.
Thinking I want a solution that doesn't add a whole lot of additional weight I found these garage floor tiles on Costco online for a pretty good price (compared to Dri-Deck and some of the alternatives) of 40 sq ft for $90.
The only color choices were a box of all black or a combination of black and gray. I went with the black/gray.
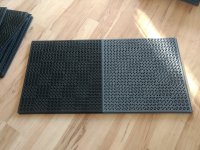
I laid out the tiles in the cockpit to use as many of the gray tiles, and the fewest of the black tiles, as I could. They're a kind of rubbery, plasticky material and the install was pretty easy using just a utility knife to cut the tiles.
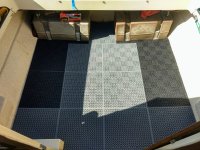
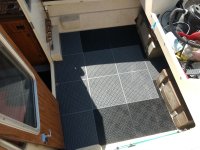
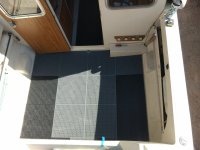
It was about a 100 degrees out there when I finished up the install and , yes, they do get a bit hot in the sun. But, they really don't feel squishy under feet when they're hot like I've read about some of the other products.
Overall, I like how they turned out and I'm hoping this will help with the mess we end up having to cleanup a few times a day when we're out and about. I'm hoping I can just spray them off a bit with our pump up sprayer/shower/dish-rinser and save the major cleanup until after we get home.
Also, our boat only has the one bilge pump up against the cabin bulkhead so, I have a feeling I'm going to have to add another bilge pump back there by the cockpit/transom drain to make this work the way I want it. We'll see.
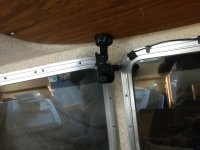
I also had this Caframo 2 speed fan sitting in the shed. I bought it back in July and figured this was as good a time as any to finally get it installed too. Yay for cool breezes!!
This combination of events makes for a muddy mess in the cockpit (not to mention constantly wet feet) that is a real PITA. I made a spray guard for the transducer a few posts back and now I'm trying to address the wet feet part of the problem.
Thinking I want a solution that doesn't add a whole lot of additional weight I found these garage floor tiles on Costco online for a pretty good price (compared to Dri-Deck and some of the alternatives) of 40 sq ft for $90.
The only color choices were a box of all black or a combination of black and gray. I went with the black/gray.

I laid out the tiles in the cockpit to use as many of the gray tiles, and the fewest of the black tiles, as I could. They're a kind of rubbery, plasticky material and the install was pretty easy using just a utility knife to cut the tiles.


It was about a 100 degrees out there when I finished up the install and , yes, they do get a bit hot in the sun. But, they really don't feel squishy under feet when they're hot like I've read about some of the other products.
Overall, I like how they turned out and I'm hoping this will help with the mess we end up having to cleanup a few times a day when we're out and about. I'm hoping I can just spray them off a bit with our pump up sprayer/shower/dish-rinser and save the major cleanup until after we get home.
Also, our boat only has the one bilge pump up against the cabin bulkhead so, I have a feeling I'm going to have to add another bilge pump back there by the cockpit/transom drain to make this work the way I want it. We'll see.
I also had this Caframo 2 speed fan sitting in the shed. I bought it back in July and figured this was as good a time as any to finally get it installed too. Yay for cool breezes!!

Desert Dory
Member
- Joined
- Sep 9, 2006
- Messages
- 180
- Reaction score
- 0
- C Dory Year
- 1989
- C Dory Model
- 22 Cruiser
- Vessel Name
- Desert Dory
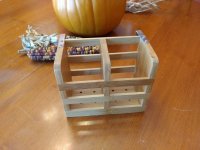
Got a coupon in the mail for Bed Bath and Beyond so this morning I went looking for something to hold some squeezy bottles I want to use for olive oil and balsamic.
Found these bamboo caddies that fit my bottles perfectly and bought two of them. They were $8 each.
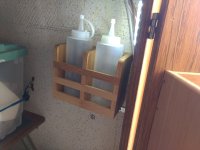
Mounted on the cabin bulkhead wall in the galley cabinet.
I'm not quite sure where to put the other one just yet. Most likely below the first one and will use it for some utensils, maybe?
Found these bamboo caddies that fit my bottles perfectly and bought two of them. They were $8 each.

Mounted on the cabin bulkhead wall in the galley cabinet.

I'm not quite sure where to put the other one just yet. Most likely below the first one and will use it for some utensils, maybe?
rwist
New member
- Joined
- Sep 12, 2020
- Messages
- 1
- Reaction score
- 0
- C Dory Year
- 2003
- C Dory Model
- 22 Cruiser
- Vessel Name
- C-Pearl
Hi folks. This has been our first weekend with new to us C-Pearl, a 2003 22 Cruiser. We like her name so are keeping it as is. We spent day one underway on the lower Columbia River with a stop on Government Island to let the dog potty. Day two we took her over to Tillamook Bay for a little crabbing. Came home with crab and a punch list of things to explore... like how to switch from one fuel tank to the other with out loss of power, why the motor tends to shut off in close quarters when going to neutral. Lucky for us, my wife is handy with a boat hook and we didn't scratch anyone's gelcoat... including our own. We are now having crab eggs benedict so all is well!
ssobol
Well-known member
- Joined
- Oct 27, 2012
- Messages
- 3,683
- Reaction score
- 31
- C Dory Year
- 2008
- C Dory Model
- 22 Cruiser
- Vessel Name
- SoBELLE
rwist":2ujzcqwa said:... like how to switch from one fuel tank to the other with out loss of power, ...
On my boat, the fuel line has a couple of minutes of fuel in it. Switching tanks does not cause an engine interruption as long as you switch before the tank runs completely out. When one tank is very low, I'll be anticipating the cough as the fuel level gets low. When the engine coughs, going to idle and then switching tanks quickly usually results in the engine continuing to run. If the engine does die because of fuel starvation, it can take a bit of cranking to get it going again because all the fuel in the line has been consumed and needs to be replenished.
It happened once when I was in a river. I had to drop the anchor to prevent getting pushed into the bank while I got the engine going again.
Note, my engine is an '08 EFI Honda. Your boat may be different.
gstraub
Member
- Joined
- Aug 2, 2017
- Messages
- 137
- Reaction score
- 1
- C Dory Year
- 1998
- C Dory Model
- 22 Cruiser
- Vessel Name
- EnDoryFun
I don't have any problems switching tanks with the engine running either. As soon as I switch, I also give the squeeze bulb a little action to help and never had the engine even hiccup.
Nancy and Bud
Member
- Joined
- Aug 2, 2019
- Messages
- 314
- Reaction score
- 2
- C Dory Year
- 2005
- C Dory Model
- 22 Cruiser
- Vessel Name
- Emma Mae
Winter project that we will put on top of Emma Mae next season
https://www.duckworks.com/product-p/sca-portagepram.htm
35 lbs
Should fit nicely on top of our bimini

https://www.duckworks.com/product-p/sca-portagepram.htm
35 lbs
Should fit nicely on top of our bimini

thataway
Well-known member
- Joined
- Nov 2, 2003
- Messages
- 21,725
- Reaction score
- 89
- C Dory Year
- 2007
- C Dory Model
- 25 Cruiser
- Hull Identification Number
- DOR25652A707
- Vessel Name
- thataway
Nice looking pram. You mentioned 35#; the article said 65#. Are going with lighter plywood?
The other question--and may not get enough exposure here-- but I wonder if anyone has seen or tried the new dinghy rack that Ranger Tug and Cutwater are using?
here is the video. Looks like it could be done on a C Dory--more weight aft is the major issue I see.. But a 35# dinghy it would be sweet!
I can see where it could have less friction (and maybe the winch not necessary) with a block and tackle like 4:1 or even 3:1).
Nancy and Bud
Member
- Joined
- Aug 2, 2019
- Messages
- 314
- Reaction score
- 2
- C Dory Year
- 2005
- C Dory Model
- 22 Cruiser
- Vessel Name
- Emma Mae
From the web site:
"In addition to being capable of swallowing a lot of people and gear, this 35-pound, 6' 10" tender is stable and comfortable. And maybe most importantly, the Portage doesn’t spin away or drift when rowing—on the contrary it tracks like a mine cart. The special seat shape and multiple oarlock positions allow for lots of different seating and trim options."
The 60 LB weight referred to the original design which they copied in plywood.
Obviously at 35 lbs, it won't be a dink that you can casually beat up over rocks etc, but for our use it will be just right.
Video sure looked interesting. Weight and cost would see to be pretty high.

