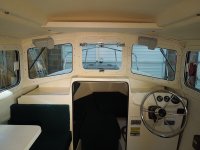
SO WHAT DID YOU DO WITH OR ON YOUR C-DORY TODAY??

I wasn't going to work on the boat today because it was cold and raining but I decided it would be a good opportunity to try out that Wallas stove. I've never had a boat with a heater before but about fifteen minutes after starting the Wallas up I was hooked. It had the cabin on the Angler toasty! I think I'm going to like a heated boat.

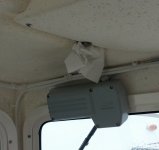
While thumbing through the Wallas manual as it was heating the cabin up I noticed a single drop of water fall from the bolt head on the port end of the ceiling shelf. Yup. A leak. I watched it for several minutes and didn't see it drip again but when I stuffed a paper towel up around it to catch any other drips it came away damp. The bolt takes a very large phillips screwdriver, larger than anything I've got. Looks like an excuse for a trip to the tool store.

6_G.jpg

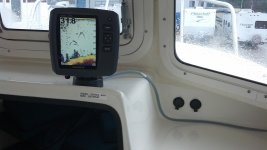
Other than running the heat and checking the roof leak I finished wiring the fish finder and installed four 12 volt outlets, two on either side of the berth entrance.

7_G.jpg

Looks like some pretty good fishing in that parking lot. I many have to take a fishing pole along tomorrow. I ran out of cable ties before getting all the wires routed so that will be the next step, along with a whopper phillips head screw driver.
 
mgarr682":2s593eia said:
...I noticed a single drop of water fall from the bolt head on the port end of the ceiling shelf. Yup. A leak.... The bolt takes a very large phillips screwdriver, larger than anything I've got. Looks like an excuse for a trip to the tool store.

That's a good way to look at it :mrgreen:

Sounds like the Wallas heater made things real cozy aboard :thup

Sunbeam
 
Captains Cat":1dlun84h said:
If you've got SS handrails topside, that may be one of the bolts that goes all the way through to hold it on.

Charlie

Roger that. Also the metal from that large bolt is a good collector for condensation in the cold. I would give you odds that there is no seal around those bolts as it came from the factory. If you undo the bolts, raise the handrail a bit and seal with Lifecaulk or 4200, then snug it all back up, you should be good to go.
 
mgarr682":mitzjzif said:
Looks like some pretty good fishing in that parking lot. I many have to take a fishing pole along tomorrow. I ran out of cable ties before getting all the wires routed so that will be the next step, along with a whopper phillips head screw driver.

At over 31 feet the water is a little deep in the parking lot also. :wink
 
breausaw":9ufbvb1n said:
mgarr682":9ufbvb1n said:
Looks like some pretty good fishing in that parking lot. I many have to take a fishing pole along tomorrow..

At over 31 feet the water is a little deep in the parking lot also. :wink

Yeah, I got to thinking about that last night and decided that the fish finder was obviously demo mode, meaning it wasn't getting a signal from the transducer. When I checked it today I found I hadn't inserted the transducer lead fully into the bracket and it wasn't getting a connection. After fixing that the fish were gone. Drat.

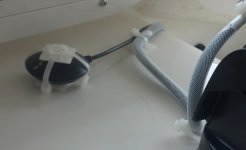
With a fresh supply of zip ties I finished wiring up the 12 volt outlets, the fish finder cables, and mounted my GPS puck.
8_G.jpg

Then I moved on to the dripping bolt in the ceiling, the one that holds the front of the ceiling shelf up on the port side and holds down the front of the roof grab rail. Before leaving the boat yesterday afternoon I stuffed a dry paper towel around it to soak up as much water as possible over night. It rained most of the night and again today. When I checked the paper towel this morning it was just a little damp. Armed with my brand new whopper phillips screw driver from Northern Tool I tried to tighten the screw but found that it was totally tight, tight as in bottomed out in the threaded end of the hand rail.

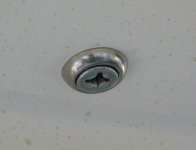
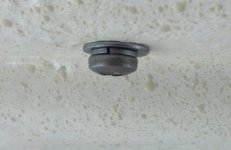
I noticed that both of the screws in the front of the ceiling shelf that attache to the front of the roof hand rails had flat washers but no lock washers. All of the other hand rail screws had lock washer and a flat washer like this one:
9_G.jpg

Suspecting that the missing lock washers would make up the difference and allow the screw to snug down the hand rail and hopefully stop the leak I made another trip to the local bolt and screw distributor (Asheville Bolt & Screw, about the only place in Asheville with a reliable supply of stainless fasteners). Two lock washers later I was back. Before working on the leaking screw I pulled the screw on the opposite side of the shelf to install the lock washer on that one. Before removing it I checked and it was good and tight. Well, the starboard screw hadn't been dripping like the other but it obviously wasn't sealed either. To wit:
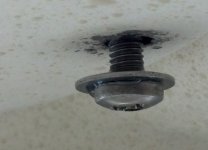
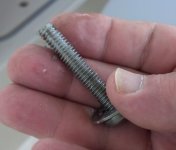
10_G.jpg

11_G.jpg

When I pulled the port screw, the one that had been dripping yesterday, I found something a bit odd:
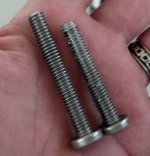
12_G.jpg

The longer screw is the one from the port side, the shorter from the starboard. Even with a lock washer the longer screw was too long to snug down the hand rail. The shorter screw is too short to even get threaded into the hand rail with the addition of a lock washer. Looking at the ends of the screws it's obvious that they've been cut off or ground down. It's a shame they couldn't get them the right length. And too, with water coming in around the hand rails they'll have to be pulled and rebedded if I can get a dry spell soon. Looking on the roof where the grab rails attach there is a thin white layer of some kind of bedding compound but it isn't doing a very good job of sealing.

For today the shorter screw went back in without a lock washer and the longer went in with extra washers so it could hopefully snug down enough to keep water out.
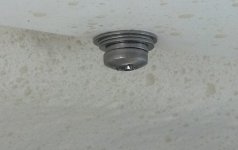
13_G.jpg

Tomorrow, decide where to put the fire extinguisher.
 
Enjoying watching you outfit your new boat :thup

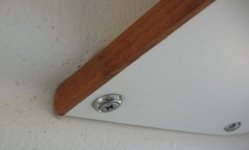
It's fun to note the slight differences in various boats. On my 22 Cruiser they used a different solution for the handrail/shelf fasteners:

plain_fastener.jpg
shelf_fastener.sized.jpg

The same fasteners/washers are used on the inside of the small grabrails that are in the cockpit on the after side of the cabin house.

Side note: It looks like you know your way around a boat, so it's not like you need advice -- but just for the sake of discussion: I see what looks like some bedding compound on the inside of the fasteners (presumably from the builder). I don't like to bed things on the underside, as I go by the theory that if the outside bedding is failing/leaking, I *want* the leak to come on through to the cabin so I know about it and can deal with it - rather than the initial stages of the leak just "stewing" on the fasteners and in the cavity and not coming on through.
 
mgarr,

It's pretty easy to cut the bolts down to a decent length and best of all, it provides another opportunity to buy a new tool. It looks like those bolts are 1/4-20 but I could be wrong on that. Also, it looks like the phillips head on the one is closed to stripped, so you might want to replace it anyway. Regardless, the easiest way I have found to cut a bolt down is to:
1) Measure/determine the desire length and mark that with a sharpie.
2) Screw and appropriate size (e.g. 1/4-20 if that's the correct thread size) die (*bonus - a tool purchase) until it is below the area you will cut.
3) Using a cutoff wheel (*bonus - a tool purchase) on a dremel tool (*bonus - a tool purchase), cut off the bolt
4) Using a small grinding wheel (*bonus - a tool purchase) in the dremel, round off the end of the cut.
5) Take the dye back off - this will clean up the threads on the end of the bolt.

This is fast and easy and produces bolts of the correct length.
 
Sunbeam":nhjo09xe said:
Enjoying watching you outfit your new boat :thup

It's fun to note the slight differences in various boats. On my 22 Cruiser they used a different solution for the handrail/shelf fasteners:
...
The same fasteners/washers are used on the inside of the small grabrails that are in the cockpit on the after side of the cabin house.

I'm not sure when they changed the shelf, mine was built in Oct. of '12. It is totally glassed over plywood now. I don't know if they're doing it like that on all models or just the Angler.

16_G.jpg

Sunbeam":nhjo09xe said:
Side note: It looks like you know your way around a boat, so it's not like you need advice -- but just for the sake of discussion: I see what looks like some bedding compound on the inside of the fasteners (presumably from the builder). I don't like to bed things on the underside, as I go by the theory that if the outside bedding is failing/leaking, I *want* the leak to come on through to the cabin so I know about it and can deal with it - rather than the initial stages of the leak just "stewing" on the fasteners and in the cavity and not coming on through.

I agree with you on that. Looking at the hand rails on the outside there is a white bedding compound visible at the three attachment points. I won't be able to tell what it is until I get a dry spell and pull them to bed them myself. I'll probably use my favorite butyl putty after cleaning up whatever the builder put there.
 
rogerbum":25mxhwcn said:
mgarr,

It's pretty easy to cut the bolts down to a decent length and best of all, it provides another opportunity to buy a new tool. It looks like those bolts are 1/4-20 but I could be wrong on that. Also, it looks like the phillips head on the one is closed to stripped, so you might want to replace it anyway. Regardless, the easiest way I have found to cut a bolt down is to:
1) Measure/determine the desire length and mark that with a sharpie.
2) Screw and appropriate size (e.g. 1/4-20 if that's the correct thread size) die (*bonus - a tool purchase) until it is below the area you will cut.
3) Using a cutoff wheel (*bonus - a tool purchase) on a dremel tool (*bonus - a tool purchase), cut off the bolt
4) Using a small grinding wheel (*bonus - a tool purchase) in the dremel, round off the end of the cut.
5) Take the dye back off - this will clean up the threads on the end of the bolt.

This is fast and easy and produces bolts of the correct length.

:lol: I've already got all the bonus tools except the die. :lol:

I'll just use a small triangular file to clean up the threads after another trip the the bolt and screw store to replace the too short screw.
 
On my boat the shorter screw is for the forward hole...shorter to accommodate the radius in the rail above. The longer screw in the forward position will bottom out on the rail.
 
Chris":2u9s3r2n said:
On my boat the shorter screw is for the forward hole...shorter to accommodate the radius in the rail above. The longer screw in the forward position will bottom out on the rail.

I think they've changed the design of the hand rails a bit over time. Most pictures I've seen show the hand rail with four attachment points, one at the front, a second about eight inches back, a third around half way back and the fourth at the rear. On my boat there are only three attachment points for the hand rail, front, middle, and rear. The ceiling shelf is attached at the front corners with long screws that go through the shelf and the roof into the front of the hand rail. The rear corners of the shelf are attached to the ceiling with wood screws where the older models had through bolts into the hand rails. I'll see if the screws in the middle attachment points on mine are longer when I pull them to reseal them.
 
Removed broken radar reflector from the roof of the cabin. I had the tube style radar reflector (came with the boat). Looks like it leaked and had accumalated 2" of water. When the water froze, it expanded, and snapped off the reflector a couple of inches above the base.
Lesson learned.............Keep an eye on this type for leaks, and/or remove it for the winter.

Martin.
 
Freezing isn't a problem here, but the brow above the windshield sure takes a beating in the sun... kinda dead looking after 2 1/2 months of mostly sunny days... doesn't shine like the rest of the boat. I put my inner Mr. Miyagi on the job: wax on, wax off. One coat didn't do it. Two, and it was looking better. Three, and lots of buffing, and the shine was back. The wax was almost gone, so it got a 4th going over and even more buffing. She looks pretty again...

WBWaxE.jpg
 
I'm sitting here on the work-rack & charging the batteries. It's 45F outside & 80F inside the cabin.

Virginia Beach is the place to be for year round events & you don't need to own a snow shovel. There is always a darn Yankee in the neighborhood who will own one to borrow during one of those rare events called "white gold" in some areas. I have noticed it does not seem to stop the rock fishermen from being out by the Chesapeake Bay Bridge Tunnel.

Did some minor work on the electrical wiring and now playing on the laptop. All systems checkout OK.

It will be tea time in a bit so here is a late Happy New Year to all.

Art
 
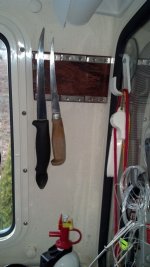
I finished the install of my magnetic fillet knife holder today. I wanted to make better use of the space just aft of the starboard side window. I bought some very strong magnets from K&J Magnetics. The ones I bought are part number BY084DCS. They are neodynium magnets with about 30lb of pull force. The size of each magnet is 2" x 1/2" x 1/4" and there are two counter-sunk holes for #6 screws. They are Ni plated and won't rust. I mounted them on some 3/4" thick red oak that I stained with a red walnut stain. This approximates the color of oak. The board was then sprayed with 5 coats of Helmsman spar varnish. The magnets are held in place with stainless #6 screws. The thickness of the oak mounting board is such that even fairly thick handled knives can be mounted without the handle interfering with the wall below.

The magnets are not cheap - they were about $8/ea. So with the cost of the wood, screws, stain etc., I'm probably into this project for around $55. However, this will hold the knives VERY tightly, and I'm not concerned about them coming down when we're bouncing around over waves. It will hold 4-6 knives depending on the size of the blades and handles.
MagneticKnifeHolder.jpg
 
rogerbum":3d45v206 said:
<stuff clipped> I mounted them on some 3/4" thick red oak that I stained with a red walnut stain. This approximates the color of teak. <stuff clipped>
Fixed a typing error.

Also, a side note - I checked before the install to make sure this didn't impact my heading sensor. It's about 6-8 feet away from a position that has a measurable impact on the heading sensor.
 
Back
Top