Rub rail installment on a cd 22

joechiro35

New member
My rub rails have detached and they are currently being held on by a bungee cord.

Can they be repaired? Or do I need to replace the whole thing?

I would greatly appreciate some info about this.


Thank you in advance.

Joe
 
I've found a few threads with tutorials/info here in the past. I would link to them but there are quite a few. I put "rub rail" in the search box to find them.

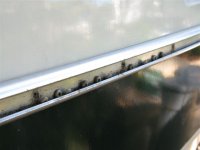
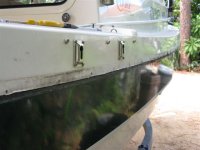
Unless your rail is damaged, I think you could reinstall/re-bed/re-fasten it. You would remove the black vinyl insert from the outside of the rail to get to the fasteners. I believe the original rail was riveted on and the inside ends covered with "blobs" of something like 5200 and then gelcoated over. The hull and deck should be actually joined with fiberglass tabbing, so the rub rail attachment is simply doing that: attaching the rub rail (too bad about all the holes, but...).

Were I to re-do mine, I'd likely use 316 grade stainless machine screws/washers/nuts (bedded of course) instead of rivets. I would simply leave the nuts exposed on the inside. One could use acorn nuts, especially in locations where they would be most visible or most likely to be brushed against. If removing the whole rail I would re-bed the whole thing (under the rail, not alongside its edges).

It could also be re-riveted, but typically that's done for expediency in a production setting, which you won't have doing just one boat. Still an option though.

I do have one spot on my rail which is pulling away from the boat -- it's the very end of the portside rail, where it wraps around the stern end of the lazarette. I'll likely re-attach it with machine screws/nuts. I will simply spot repair/re-bed at this point since it's only one place; but if it were more extensive or there were leaks I would remove the whole rail(s) and re-do them systematically.

Sunbeam
 
Joe,
I had to do 100% of mine several years ago, so call me and I will walk you through a permanent and very nice fix.
Best regards,
Steve Baum
757-477-1453
 
Probably just one of the many examples, but I had saved this from Comfy Dory, which is a 1995 22 Cruiser:

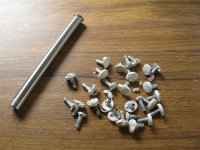
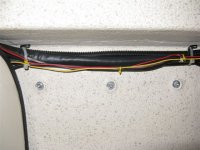
I have not had the opportunity to check out other size C-Dorys, but on the 22' Cruiser, all of the rivets were accessible from the inside. I have posted pictures of my project to replace all of the rivets with SS bolts, washers and nyloc nuts. Probably the most difficult part was finding the right size and type of thin wall pipe to cut through the lump of 5200 that was put over the inside of the rivet before splatter coating the interior.
This project does require 2 people for re-installing the rail. Outside person (me) put the tip of the caulking gun with 4200 into the hole through the rail and squeezed until the inside person (my brother) could see the caulk coming through. I then continued squeezing as I was pulling the gun out so as to get caulk into the space between the backside of the rail and the hull.(about 1/8") I then pushed the screw through the hole and my brother installed the washer and nut and held the nut with needle nose pliers while I tightened the screw. Cinched the screw nice and tight until it was snug and some caulking was oozing out around the screw head.
The finished project sure gives you a better feeling that the rail will be strong and protect the hull from the occasional bump while docking and not end up separated from the hull.

Good Luck...Tad


Link to sub-album with 19 photos of the above-mentioned project:

http://www.c-brats.com/modules.php?set_ ... _album.php


Sample photos from the above-linked Comfy Dory album:

007_7.jpg

010_10.jpg

017_17.jpg

018_18.jpg
 
srbaum":236mj036 said:
Joe,
I had to do 100% of mine several years ago, so call me and I will walk you through a permanent and very nice fix.

Would it be possible for you to post the gist here, even if "bare bones" to save you too much typing? From what I have seen, your projects are very nicely done :thup
 
Hopefully you only have the vinyl insert to the aluminum extrusion which is loose, not the entire extrusion. The posts above address re-doing the aluminum extrusion--which rarely separates. The vinyl insert is more frequently a problem.

The vinyl can be worked back into the extrusion with a couple of good sized screw drivers. You may require a little heat (low setting on a heat gun, or hot water--don't get it too hot). Start at the bow, with the center, and always keep tension on the vinyl insert aft as you work your way around the boat. I like to put a little Boat Life, Life Caulk clear in the extrusion (which should be clean), to assure it will remain in place.

As you work around the end, you may have to put a screw in the very end. Taco Marine makes the end covers if your have been lost.
http://www.tacomarine.com
 
Good point - I was thinking the whole aluminum rail had come loose, but if it is just the vinyl insert then right, no big fastening/bedding/caulking project necessary (although probably a good time to check the rivets, while the vinyl is out).
 
I have seen his boat in person and the aluminum rail which holds the rubber insert is separated from the hull. It was being held on at the bow using a bungee cord. Given that the other side is also beginning to see some separation, my recommendation to him was to remove the entire aluminum channel completely and re-attach.

We had this done last year on our boat and it was a huge pain. We used stainless bolts with nuts where possible and on areas where we could not access, used stainless screws.

Good thing I paid some professionals to do the work as it ended up being more of a project than initially thought. Just when we thought it was done, we noticed that the engines would not turn with the spinning of the wheel. On careful inspection, there was a sound of air an air leak when turning the wheel. Turns out that one of the screws punctured a seastar hydraulic line. 2 days later it was done.
 
Back
Top