Lewmar Hatch Leak Advice

Coach T

New member
I have found a leak in my forward hatch. I believe the leak is from one of the top side screws. My plan is to dismantle the hatch and reinstall with 100% silicone between the top flange and the fiberglass. In doing this I plan to silicone each screw when reinstalling. I also found that the leak is not new, when I took the inside flange off I noticed some black/dark wood. I'm not sure if its mold or rot. The wood does not seem soft. By the way the boat is a 2013 and I just recently purchased it. So I would assume the leak was present from day one. Should I over drill each screw hole and epoxy or is the silicone method ok? If I need to epoxy what type or brand is recommended. I have a product called JB water weld. Any advise would be appreciated.
Thanks
 
Coach T":1lyqn3tq said:
I have found a leak in my forward hatch. I believe the leak is from one of the top side screws. My plan is to dismantle the hatch and reinstall with 100% silicone between the top flange and the fiberglass. In doing this I plan to silicone each screw when reinstalling. I also found that the leak is not new, when I took the inside flange off I noticed some black/dark wood.

Here are my thoughts:

Good on you for tackling this now, before it becomes a larger problem :thup

First off, I detest silicone, so I would 100% not use it. Here is why: First, it doesn't tend to do the best sealing job. Second, it is the absolute devil :amgry to ever get off. Third, it will leave an invisible, nearly impossible to remove layer of contamination, that means no silicone, other caulk, paint, tape, or really anything will ever stick to the area again. This makes a re-caulking job that would normally take a pleasant half hour (or whatever) take days of cursing, scratching things, sanding, destroying, etc. Yes, I'm not a fan :wink:

So okay, now that I have got that off my chest.

It sounds like you have enough moisture or potential issues that you should remove the hatch if you can. Then you can really see what you are doing, clean things up, protect the core, and then re-bed the hatch and the screws. Here is what I would do (presuming what you are describing is what I'm mentally seeing) (have just been doing my own hatch, actually).

Note that there are many ways to do epoxy work, and many of them are "right." There is just variation in the little tips and tricks that various people use to do it.

1) Remove hatch. Clean up hatch flange and deck of boat where it will be going back (I hope silicone was not used originally!)

2) Using a Dremel, dental pick, or etc. remove the core from around the hatch edge back 3/4" or so (or if there is moisture, get all the wet core out). You can include the screw holes in this, so that when you fill it does it all. Sand the newly exposed deck skins (inside where you removed core).

3) Vacuum things out and then wipe down with denatured alcohol.

4) Tape things off six ways from Sunday so as to avoid having to clean up epoxy messes.

5) Wipe down again just to be sure.

6) Wet out all the inside areas with neat (unthickened) epoxy.

7) Fill it all with thickened epoxy*, taking it in stages if you have any huge areas, or it is very hot out (because otherwise it will get really hot and can cause a problem as it cures)

8 ) While the epoxy is in the green stage (hard cheese/rubbery texture - not actual color) trim it back with a utility knife or etc so it's about like how you want it in the end (easier to do this now than sand later).

9) After it has cured, wipe it down with water (only) and a scotch brite pad to wash off any "blush."

10) Replace hatch with appropriate bedding compound (not silicone!)

11) Re-bed and replace screws. I'm actually going to tap mine and use machine screws (I don't get a warm fuzzy feeling from pointy screws into fiberglass) but pointy would likely work fine as well. You'll have to make your pilot holes a bit larger than you would for wood.

12) Remove tape and be happy you spent extra time masking off earlier vs. cleaning up now :D

Sunbeam

* On the thickened epoxy: I have developed quite a fondness for WEST's 610 product. This is a pre-thickened epoxy that comes in a caulking tube and is a joy to work with (yes, really). Expensive, but you're not building a boat with it. It taps well, and has this thing they call "shear thinning" where it is really smooth and workable while you are manipulating it, but then stays put and is stiffer when you stop. You can use the mixing tips that go with it (I often gun it right into a syringe for screw holes, etc.), or just mix it by hand and use it with a popsicle stick, etc.

WEST say you do not need to pre-wet-out with neat epoxy when using this, but I usually still do (absolutely below the waterline). But then I have plenty of epoxy on hand.

If you are mixing your own, I tend to use colloidal silica to thicken it for this sort of application.

PS: I forgot you asked about brands, etc. I would use any of the "good" marine epoxies (not JB Weld, hardware store 5-minute epoxy, or etc.). Some brand names include WEST System, System Three, and MAS. They also sell the thickeners (which are interchangeable between brands). That said, for this I would recommend the WEST 610 in the tube for ease of use and lack of need to buy a bunch of extra stuff/learning curve, etc. I would buy (or have on hand) the following:

WEST 610 tubes and mixing tips
Caulk gun (you may already have)
Box of non-powdered disposable nitrile gloves
Tongue depressors
(I make homemade spreaders out of cut up gallon water jugs)
Blue tape, 2"
Denatured alcohol
Paper towels
Syringes (WEST make some) if you need to do any separate holes (you may not if you include them in the main excisement).
Acid brushes or the like if you are going to be "painting on" neat epoxy.
Dremel with sanding drums, or 115 bit; dental pick, or some other way to dig out core.
Sandpaper
Vacuum

I've probably forgotten something, but this is a start at any rate.
 
Thank you for your response. I will be following your advice. Do you know what the appropriate setting material is called for the hatch (not silicone)
Thanks
 
To keep it short--I agree with Sunbeam. I have had to re do the forward hatch on all of the C Dories I have owned--including the Tom Cat when I took it home from the dealer.

The hatch has to be removed, and every bit of sealant which was there before removed.

I would use 3M 4000 to re-bed the hatch, after the epoxy fix. as outlined by Sunbeam.

While you are at it, check other major fittings, including the Lazarette hatches.
 
I like Thataway's recommendation of 3M4000. It's a polyether, as I understand it, and has the plus that it will not yellow in UV light where the little rim shows at the edge (as polyurethane can). The only thing I don't know about it is how easy/hard it is to remove when the time comes to re-bed (as it always does, but at least next time you get a leak you will know the core is safe) or if the item needs to be removed (breakage, etc.). It hasn't been around long enough for me to have got to that point. I'm sure it's nothing like silicone though! (Does anyone else know how it is for later removal - I've been wondering.)

I have used some on my boat in a few places, but not on anything I have needed to remove.

Other sealants I would consider would be as follows:

Polysulfide. Plus is that it is easy to clean up when "next time" comes. On the downside it is harder to find these days (now that 3M 101 is no longer) and it can dry up in the tube while on the shelf (before you purchase it). The only one I know of know is Life-Calk.

Polyurethane, with relatively lower adhesive (such as 3M 4200). However this can yellow and is still pretty adhesive (which you don't need a huge amount of since there are screws as well, although some is good). This is easy clean up when fixture is removed (not super high adhesive).

Butyl. My personal favorite for many things, as long as it is high-quality and not cheap/bad camper type stuff (you can tell because good butyl will stretch "forever" without breaking whereas the other breaks in about 3" of stretch.. boo). Easy clean up.

What I wouldn't use is the aforementioned silicone, or a really high adhesive polyurethane (such as 3M 5200). You just don't have any need for this kind of adhesive power in a hatch bedding compound and it will make future removal very difficult (likely to bend frame, etc.) So, complication with a "benefit" you don't need in this situation.
 
Sunbeam, if you want to know the "strength" of 3M products there are data sheets for every one of their products
For example 4000 Fast Cure is at:

http://multimedia.3m.com/mws/mediawebse ... 6E666666--

A brief summary from those data sheets some are adhesion, some cohesion failure:

3 M product 4000…4200...5200 in PSI 1" over lap joint
Gelcoat….......424…..244……519
Fiberglass……251…..258……362
aluminum……329……38…….393

All are cohesion failure, except the 4200 for aluminum which is adhesion failure .

If all of this is done properly, you should not have to remove the hatch frame. (new acrylic or polycarbonate can be set in, on the boat). But the best compromise is the 4000.
 
I do have that data, but thanks for posting it. It shows how much more adhesive 5200 is than many other polyurethanes. Another thing I like to look at is how elastic the various compounds are (shown on various charts).

What I am really curious about, is how hard it is to remove 4000. Not to remove the bedded item itself (although I wouldn't mind knowing that either), but to remove the "rest of the caulk" afterward to get back to a clean surface. It's not that I have any negative knowledge about it, but just that that sort of cleanup can be easy, moderate, hard, or :amgry , depending on the product, and I am curious where 4000 falls on that scale. I have never yet removed anything that I bedded in it (I don't use it very often, but did bed one thing in it, and may use some on my rub rail repair).

Granted, one may not ever have to remove the entire hatch, but I just like to be able to remove any hardware..... just in case. Bedding failure, or some "fatal" breakage or whatever.
 
Sometimes it is easier to fix a problem your self and do it correctly than to trailer a boat over 1000 miles to the dealer or over 2000 miles to the factory. (Unless the dealer/factory would authorize the repair by an independent shop--if you could find a competent shop to do the work).
 
Also, presuming the warranty would put it back to how it would have been when new (i.e. not leaking), that still wouldn't address closing out the core (unless production methods have changed and we have not heard about it). So to my way of thinking, I'd rather just do it myself so I can take the extra steps to protect the core (vs. just stopping the leak into the boat).

Granted, it does seem a bit soon to be leaking, but sealing things isn't 100% black and white (meaning, you can't always tell if you made a slight error).

(Not that there is anything wrong with pointing out the possible warranty coverage.)
 
Thataway, is correct, I would like for the warranty to handle the problem but I purchased the boat from a dealer in Michigan which is 2000 miles round trip. The closest Dealer from my home is six hours round trip plus I would have to leave the boat for a period of time and then another six hours to retrieve it. I am disappointed that such a new boat already has core intrusion. On a positive note I love the boat and without the advice from fellow C-brats I would be driving to the nearest dealer and missing my boat and water for extended time. Today I removed the hatch and removed a small amount of wet wood. I filled the core with epoxy and will be reinstalling the hatch tomorrow hopefully. Total time at this point is around 2 hours and I anticipate less than 1 hour tomorrow and a total of 30 dollars for supplies. No fuel costs to dealer and less than 1/4 of drive time. I would like to think that either the dealer that I purchased the boat from or C-dory factory would reimburse my time and expense but I feel that this may be a stretch.
Thank you all again for the help.
 
Coach T":23wh1m21 said:
Today I removed the hatch and removed a small amount of wet wood. I filled the core with epoxy and will be reinstalling the hatch tomorrow hopefully. Total time at this point is around 2 hours and I anticipate less than 1 hour tomorrow and a total of 30 dollars for supplies.

And the boat will be literally better than new. Good on you! :thup
 
Hi Coach T. Glad you're getting it fixed. I'm surprised you found wood in the area of your hatch in a '13. My 2010 is all foam in the decks and transom. I was told during build that wood was out and mine had none. Not found wood in anything I've cut on my boat. Good luck with your cruising. George
 
I would try and see if you can recover at least material costs. You did a good job here pointing out why it was not practical to go to a dealer.

When I rebuilt the 25, the factory paid for all of the materials I used--that was after a complaint was filed by the first owner of the boat who I purchased the boat from--at my insistence. The material bill was about $3500. The issue was a bad core due to water intrusion--of course it was helped along by the boat not being shrink wrapped or covered in New Jersey for several winters, and then a crew member jumping into the cockpit and going thru the cockpit floor, as the rotted core broke further. (The transom repair was just that the boat was not built with enough glass in the splash well/transom joint, and the top of the transom/hull to deck not properly done…

Different owners of C Dory now--but a complaint might bring to their attention, as tar.pnw noted to the factory--that filling screw hole areas with epoxy should be a priority of the factory.
 
Ghome, I wish it didn't have wood. I'm not sure what a balsa core actually looks like but the wood I have seen in my boat looks like plywood. It is about 3/4 inch thick with 1/8th inch fiberglass on both sides. A few weeks ago I cut a hole for a surface mount rod holder in the area near the stern port side hatch. The hole I cut also had wood in it. I'm not sure if they reverted back to wood vs foam recently. Maybe a more knowledgeable c-brat can let us know. Oh and by the way the hatch has been replaced. I am going to wait a few days to water test with garden hose. I am keeping my fingers crossed.
 
Coach T":s9ffadbs said:
Ghome, I wish it didn't have wood.

I actually slightly prefer balsa core to foam. Or at least I don't consider it inferior. That doesn't mean you should feel the same, but I just thought I would mention it in case you feel you have an "inferior" boat by definition due to the core material, if it is balsa. Foam is more resistant to water intrusion but I think it should still be sealed off for a couple of reasons. One is that water in the core is never a good idea, no matter what the core material. Mold, de-bonding, and possibly damage from freezing can still occur. Also, from what I have seen, foam is possibly slightly more prone to de-bonding. Or to put it another way, balsa is a bit easier to bond to the fiberglass (when building). Two is that when tightening down deck hardware, any core can crush. Having solid material around the penetrations (such as thickened epoxy) gives you a non-crushable area to tighten down on (do you ever see cupped fender washers used as backing blocks? The cupping often comes from core crushing. It's a lot harder to keep hardware sealed and fasteners tight with this situation, where the deck essentially "changes size" in this location due to crushing).

Foam and balsa both have their place in cored construction (and both have stronger and weaker points), in my opinion. What does not have its place is a way for water to get in. However most production boats simply use caulk to "seal" the core.

Coach T":s9ffadbs said:
I'm not sure what a balsa core actually looks like but the wood I have seen in my boat looks like plywood.

Balsa should be a fairly light color (think "blonde" birch), and, when dry, makes a sort of "crispy" sound when you pull it apart. The grain isn't like we think if it when say, looking at a board, but it is there and is typically used in vertical formation. There is an allover pattern of very slight lines going vertically through the wood, which is the grain. When you pull it apart, it breaks off in little vertical columns due to this.

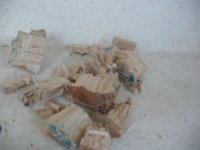
Here is a photo of dry, balsa core I cut out of my boat. Most of these pieces happen to be lying on their sides, relative to how they were positioned in the boat. You can make out the grain running sideways in many of them (would be vertically oriented in the boat) The darker or mesh surfaces are where they were bonded to the fiberglass.

4_some_of_the_core_removed_dry.jpg
 
The wood core in my boat (at least the areas that I have found) doesn't look like your picture. It looks to me like plywood, it has layers that are laminated together.
 
Plywood has been used by many boat builders for deck core. It will be a bit heavier than Balsa and foam. It is also subject to rot, so the same precautions need to be taken. Some boats which have balsa decks, there was plywood put where thru hulls or fittings were attached, to avoid the crush issue.
 
Back
Top