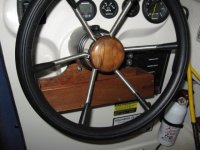
Helm Wheel Clearance Solutions

mcc272

New member
One drawback to our C-Dorys is that there is not a lot of space at the helm. If you modify the seat, you are likely to run into leg clearance problems.

One solution is a tilt helm hub ($$$$$) which also compounds the problem as it extends out further.

A second solution is shims or wedges to change the angle and open up the clearance. The problem with a home built wedge, in addition to the issue of cutting a wedge like that without a band saw, is that if the wedge is only on the front side, the helm mounting studs will not hit the backside of the helm at a 90 degree angle and there really should be a second, reversed wedge on the backside.

A third solution is to obtain a SeaStar back plate kit (HA-5418) which is a rear mounting kit. With the addition of some spacing blocks and longer bolts, I suspect you could move the hub forward more than the thickness of the mounting panel. It does not change the angle of the wheel but recesses the hub.

The final solution is that Teleflex sells a 20 degree wedge kit (Part HA-5419). Depending on the orientation of how it is mounted to the fiberglas of the helm, it will recess the helm hub a bit as well as increase the angle for a bit flatter helm wheel. The descriptions for this kit show it working for certain SeaStar helms but make no mention of the BayStar helm HH-4314 which so many of us have. I could see no dimensional reason why it would not work with the BayStar helm and have confirmed with TeleFlex technical support that it will indeed work with the BayStar helm. The current cost from www.go2marine is $63.40. After unbolting the helm hub and playing with it a bit with the wheel on, I decided that the flatter wheel will also be a benefit. This is the solution I decided upon and I have a 20 degree kit on the way. I will report on its installation but from everything I have seen, it looks like a simple and relatively inexpensive (it is all relative) solution to a common problem.

Jim
 
Good info Jim I'm looking forward to your report I have the problem you mention about clearance after modifing my seat. Hope it works out well for you.
 
I'll be watching for your report on the #HA5419 wedge. Been thinking about taking some action myself to resolve the "tight quarters"........other than radical surgery.

Also, Redden Marine offers this wedge for $57.+ for anyone interested.
 
mcc272-

There's at least one more solution I can think of, off hand, and that is go get a smaller diameter wheel.

Most are 13-1/5 to 15/1/2 inches in diameter, and wheels are made as small as 9", though that's probably too small for most folks, the very small ones being most suitable for a hydraulic second helm station in the cockpit at trolling speeds.

But a smaller wheel will often give some relief, perhaps enough, and can also be combined with one of the other methods to give the necessary clearance.

Just one more thing to add to the mix!

Joe. :teeth :thup
 
This is what I did:
After raising my seat took my zipsaw and moved the steering column up about 1.5 inches that was enough to allow my legs to easily slip under the wheel now. I didn’t have to disconnect the hydrolytic lines, just removed the built which allowed the steering column to hang down out of the way so I could extend the cutout with the zipsaw.

Since the bottom bolts for the wheel now extended into the opening were the column use to be I bridged the gap with a stout peace of stainless.

When I moved the steering column up this left a sizable gap under the column, so made something functional to cover the hole. After mounting my little catch-all using the same bolt holes that held the steering column decided the black knob had to go, made a replacement out of Sitka Spruce-after all she’s an Alaskan boat.
Now I have a place to toss my truck keys and cell phone and wallet, makes a great water bottle holder too.


IMG_1720.sized.jpg
 
Well, my 20 degree bevel wedge kit came today and I have installed it. The template is not perfect as after you cut the template precisely, you need to do some Dremel carving to be able to get a straight shot on the nuts on the helm studs with a long socket. That was the only quirk but an extremely easy one to deal with. I mounted it with the wedge pocket toward me as I sit at the helm and, of course, the thick end of the wedge down and bolted to the fiberglas helm console. Then, you stick the helm studs through it and put on the nuts and tighten things down. It makes a huge change in thigh clearance, perhaps 2-3 inches. The wheel feels right and at a very nice helm angle which I suspect will be very comfortable when I get the boat in the water. The wedge bevel is extremely nicely made. It is black powder coated as are the top ends of the carriage bolts that fasten it to the helm console. It appears to be a very nice casting, perhaps of aluminum by the weight and the casting is 1/8" thick or slightly more. All is all, it is extremely sturdy and well made and a great addition to the boat solving solving the clearance problem I had at a modest cost. It is easy to highly recommend it.

Jim
 
Jim,

Any chance of a couple of photo's posted here. One of the new wheel from the helm side and one from the V-Birth side, that shows how much changing you had to do on the back side of the helm bulkhead.

Thanks for the post and the find. I sounds like a nice solution.

Harvey
SleepyC
 
Jim, you are also going to be replacing the wheel as well, correct? What are the details on that wheel? I also hope you will post photos.

Thanks,
Warren
 
I will eventually get photos, get an album set up and capture the rebuild of this boat. However, the questions that Warren and Harvey asked are easily sorted out without photos. First, the wheel. I simple reused the stock wheel so there is no change in that regard. It works well and I have one of David's teak helm hubs that I was not going to do without! Also, there is no change to the V-berth side of the helm. The wedge is fastened to the cabin side of the helm console. The best way to envision the final result is to sit at your helm. Use your imagination to pull your wheel straight toward you toward you by about an inch and bend it forward (up) 20 degrees to increase the thigh clearance by 2-3 inches. The result is a wheel that is slightly flatter (more bus driverish!) but not markedly so.

Jim
 
I would like to find a flatter wheel so as to give my belly some more clearance! Did you locate any replacement wheels before deciding to stay with the stock wheel?

Warren
 
Warren --

I actually thought initially that a flatter wheel (technically, a wheel with less dish) would be the solution. I looked everywhere I could think of for such a wheel and could not find much to chose from. There are a few undished wheels that are black molded plastic that look sort of like an older auto steering wheel. To get an undished SS destroyer wheel, you have to go to sizes that are so large they will not fit. In the end. I concluded that the wedge would do more than an undished wheel and having completed the installation, I believe that it does in fact give more room than an undished wheel although an undished wheel would create additional clearance in another dimension.

Jim
 
Jim,
Just a wild thought: can the wheel be installed on the shaft backwards? That is, flip it over, creating a "negative" dish. The hydraulic fluid well holds things out a ways from the dashboard surface--is there any finger clearance left?
Rod
 
Don't know whether you could flip a wheel. There is a key in the shaft and I don't recall whether the slot for the key goes all the way through. I suspect not. Plus, I think it would be totally weird and would take some getting used to. If the 20 degree wedge is not enough to get acceptable clearance, then, perhaps one could combine the wedge with a tilt helm or wedge the wedge to get 40 degrees rather than 20 and a more "bus driver" wheel. The long and short of it is that there are answers but one needs to be creative.

Jim
 
mcc272":3emb6lss said:
I actually thought initially that a flatter wheel (technically, a wheel with less dish) would be the solution. I looked everywhere I could think of for such a wheel and could not find much to chose from. There are a few undished wheels that are black molded plastic that look sort of like an older auto steering wheel. To get an undished SS destroyer wheel, you have to go to sizes that are so large they will not fit.

Did you see these wheels? I went to the factory web page and it appears they have no dish.

Warren
 
rjmcnabb":18vxe24u said:
Jim,
Just a wild thought: can the wheel be installed on the shaft backwards? That is, flip it over, creating a "negative" dish. The hydraulic fluid well holds things out a ways from the dashboard surface--is there any finger clearance left?
Rod

In two of the newer boats (22 Cruiser) I looked at they had relocated the hydraulic fluid well behind the dash. The wheel was mounted right against the dash. This provided a good two or three inches more clearance and appeared to be ideal.

I don't know whether this would require a different model Baystar or what the mechanical differences are.

Also, in the boats I looked at the older models with wood interior seemed to have considerably more helm room than the newer fiberglass interior models. That may be why the company went with the behind dash hydraulic setup.

Unless I decide to upgrade the helm seat my 2006 stock setup works pretty well. Good topic though.

Harper
 
I have to check out that shim thing, it sounds like a shimdandy solution.

I had that cramped feeling also, so a few years back replaced the wheel with a smaller one from Boaters world and removed the seat and did a little rework, got some pics in the B~C innards album. I wanted to sit farther away from the wheel and the mods helped but I think the only real fix for me would be to remodel the galley and loose about 3" of counter space......or get a Tomcat :)
 
Warren --

I had not found those Vetus wheels and it sure does appear from the catalogue that there is 0 dish on most of them. Vetus makes very nice products so going to one of them would not only be a 0 dish wheel but likely a more nicely made wheel that the factory standard.

Harper --

The helm hub mounting arrangement to which you are referring is what is called "rear mounted." That is the back mount kit I referred to in my first post. The only drawback I see to that is that it would make checking the fluid level difficult and if I were doing that, I would likely add a dash mounted remote fill which allows you to see the fluid level and also to add fluid much more easily.

Jim
 
Just wanted to add, as a general comment, that my biggest issue with the room behind the wheel comes when I am using the spinner, particularly when it rotating through the bottom 90 degrees of wheel rotation. If anyone has suggestions for dealing with that particular situation (other than the mods discussed here) I sure would like to hear them.

Thanks,
Warren
 
Doryman":28apx90r said:
Just wanted to add, as a general comment, that my biggest issue with the room behind the wheel comes when I am using the spinner, particularly when it rotating through the bottom 90 degrees of wheel rotation. If anyone has suggestions for dealing with that particular situation (other than the mods discussed here) I sure would like to hear them.

Thanks,
Warren

Warren-

I don't know how or when you use the spinner knob, but I use mine mostly when backing up.

I stand in the middle of the aisle and use the knob with my left hand. This enables me to see the backward path directly, instead of over my shoulder with a mirror or two. It's just a lot simpler. (Kiss Principle, again.)

The knob isn't that much advantage when in forward gear, at least to me, IMHO.

I'd get one that folds down out of the way, and put it in the center top of the wheel.

Driving forward at high speeds, the knob could be left erect, if desired, as turns generally don't require that much rotation of the helm, or simply left folded away.

When turning more, at lower speeds, fold the knob away, and do the hand over hand routine.

Stand it up to drive in reverse as described above, if that works for you, or just leave it folded down, if necessary.

I don't know if this will fit your style of steering, but may help add some variables to the thought process, at least I hope so.

Too bad you don't have a '47 DeSoto! (At least I think that was the model I'll refer to.)

It had a two spoke wheel with a big circular section about two thirds of the way outward on one of the two spokes. The circular section had a crossbar that was free to rotate within the circle, so you just grabbed the crossbar and spun the wheel around with one hand!

I never drove one, but saw one in a wrecking yard in the late 1950's! Does anybody else remember one of these?

Joe :lol: :thup
 
Joe, thanks for your suggestion -- that is actually what I have ended up doing, but it makes for some awkwardness when I have to lean over to manipulate the engine controls at the same time.

I find that I need to use the spinner and the engine controls with much more gusto on a 22 than on my Tom Cat, because the 22 stern essentially slides over the water without much keel effect. Hence, I have to compensate with rapid changes in the engines' orientation. This is the way I have learned it from Tom, anyway.

Warren
 
Back
Top