Caulking Cockpit Floor - LifeCaulk over Butyl Tape?

All moot now. Just bought 4 large tubes of the 3M 4000. Pressure washed everything this morning and will change out the sender then put the floor back in.
 
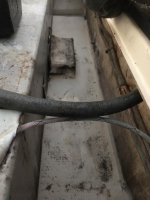
Everything actually looked pretty clean, once I pressure washed the mold and mildew off. I'll try to put a few more photos in C-Traveler's photo album later. The tank is not fastened down any way, but does have some "bumper stoppers" behind it to keep it from sliding back. The interesting thing is, there is a good 6 to 8" of space between the rear of the fuel tank, and the bulkhead. Has anyone tried putting in access plates to this space to use for storage of things like say a spare paddle, cleaning brush, boat hook, or even fishing poles? Sure seems like it would be a good space to store such items. Colby
 
Colby, did you set all of the screws in epoxy plugs, and take care of any core issues while you had it apart?

I don't know how easy it would be to access that area aft of the tank. I believe in my boat that aft bulkhead in the fuel compartment goes all of the way from bottom to top of the space.
 
Fortunately the only core issues I could see was with the side steps and I cleaned those out and filled in with epoxy or fiberglass. I’ll take care of the screw holes before putting it back together but a quick look earlier showed them to be ok. There is a small cutout in that back bulkhead for the fuel hose and some wiring along with the drain hole center bottom. Too bad it wouldn’t be easy to put a long rectangular hatch over that area tho for additional storage.
 
Double checked stuff today as I worked on cleaning off all the previous sealant. The only place I saw any wet/rotting core was a few spots around the edges of the side steps. It appeared there was some sort of protection around those edges, but it had come off in some spots, and that's where the core was wet. I dug that out, put some expanding foam in to fill in the larger areas, then used epoxy or fiberglass to finish out the fill. Regarding my fuel sender, I was having my fuel gauge read empty, when there was still 30 gals of fuel in the tank. When I pulled the old sender, it appeared that the problem was likely due to the length of the sender arm. It appeared a bit to short and would hit it's full stroke with about 30 gals still in the tank. I set up the new sender to be a little more accurate. Hope I got it right when I go to fill the tank back up in the spring. Also pulled the fuel pickup tube to check that. In the process of cleaning the fitting up, broke off the fuel line barbed fitting. That barbed fitting was an anti-siphon type. Seems like that adds a bit of restriction to the fuel pick up. Probably why the little electric auxiliary pump I have can't pull fuel out except at a trickle. The main and kicker seem to be able to pull enough fuel with out problem, but I wonder if the anti-siphon fitting is necessary. (I did replace it with another anti-siphon fitting.) Also, the bottom of the pickup tube had some wire screen on it. The new tube I purchased did not, and I elected not to try and install that screen on the new tube with the possibility it could come off in the tank. Still have a little more cleaning to do where the sealant will be applied, and tomorrow is only suppose to be 32 before warming up again this weekend. So I'll wait until this weekend to reinstall the floor. Maybe I was just lucky, but it really didn't seem like that hard of a job to do this. Hardest part was probably reaching inside the access plates on the side steps to remove the screws holding the side steps on. I didn't notice any hold downs on the fuel tank, and in fact I can move it around slightly. (It's empty right now.) I'm thinking it must just be it's weight and snug fit within the space that keeps it in place. Lastly, like a few others here, I built a bilge sucker system to suck out the little bit of remaining water that the bilge pump doesn't pull. After pulling the sponges out to see they were half or more dissolved, and then having some of that mess plug up the bilge drain hole, I decided to pull that system out rather than finish permanently installing it. I suspect there will always be some water in the bilge anyway, especially in the side chines, and the best way to dry that up, since it's on the trailer when I'm not on the water, is to keep the bow raised and drain plug out, and even leave the transom compartments open. I think most the bilge water, when sitting level, is going to be under the cockpit floor area anyway, and without routine access to maintain any bilge suckers in that area, it's not a maintainable system. JMHO. Colby
 
I agree with you Colby on there being some water near the cabin bulkhead. I can keep my aft bilge dry with the boat on the trailer, and slant back on.

A good reason not to have another hatch over the aft end of the tank, is that it would leak, just like the others do! I find plenty of storage aft of the cockpit under the splash well--I have a fender board there, and at least 6 "shoe boxes" full of spares, parts, extra electrical adaptors. Then I have two boxes on each side in the bulge (I have dry deck on the bottom of all of these compartments.
 
A good reason not to have another hatch over the aft end of the tank, is that it would leak, just like the others do! I find plenty of storage aft of the cockpit under the splash well--I have a fender board there, and at least 6 "shoe boxes" full of spares, parts, extra electrical adaptors. Then I have two boxes on each side in the bulge (I have dry deck on the bottom of all of these compartments.

I'm kind of thinking that also, about more leaking thru compartments. The other problem is the shape of the cockpit floor right there near the aft edge. There is about two thinner inches where the floor is over the "rim" holding it up. Then it is much thicker. As I think about it more, I suspect it would affect the structural strength of the floor to put a hatch in this area as well. Next place to put an opening or hatch, would be in that short bulkhead between the fuel tank and the aft compartments. But access thru those would be a pain. Where is your water tank located? Mine is under the splash well. Although I do have some room on top of it to put some stuff. I don't have quite as much room in the other area you mention, as I placed a small 3 gal fuel tank on the port side of the bilge to use as a spare tank with no ethanol (not sure I really need it), and the on the starboard side the trim tab pump and oil reservoir take up some space pretty much right in the middle. (Lousy placement. Maybe I should look at moving it.) Really just hate seeing that open space behind the tank, and not being able to use it. :lol: Colby
 
I'm looking at performing this same process of removing and re-sealing the cockpit steps/hatch over the fuel tank on our boat and have a few questions for those of you who have already completed it:
- Did you remove the fuel tank and check/clean under it also? If so, how heavy/unwieldy is the [empty] tank?
- Sounds as if 3M 4000 is the consensus sealer for this application. Are there any others I should consider?

Thanks in advance!

Les
 
I cleaned around it but did not remove it. I guess I didn’t see any reason too. If you do remove it, I’d suggest making sure you’ve drained it first. I imagine it would take some time removing the fill and vent hoses.
 
I only repaired our steps. I did not remove the main hatch nor fuel tank. So far I have no need to.

You'll probably find rotten balsa in the step/hose covers. Also take the time to back-cut and seal the balsa core for the deck itself where the round inspection hatches are installed. If it's like ours, the balsa core was exposed there too. I used West Systems epoxy and 3M 4000 as you noted.

Pics in our album.
 
I plan to pull the cockpit floor next year. Two ideas I was thinking about:

A rubber gasket with no adhesive, that could be tapped into place after the floor is in place. One that would compress when fit into the gap by tapping?

Also, could you apply wax to the two surfaces that any bonding agent my adhere to, thus reducing the strength of the bond significantly? Then you could use a product that would otherwise adhere and make a nice seal that could be peeled off with relatively less headache? Just some ideas...
 
LesR":3rbmo8al said:
I'm looking at performing this same process of removing and re-sealing the cockpit steps/hatch over the fuel tank on our boat and have a few questions for those of you who have already completed it:
- Did you remove the fuel tank and check/clean under it also? If so, how heavy/unwieldy is the [empty] tank?
- Sounds as if 3M 4000 is the consensus sealer for this application. Are there any others I should consider?

Thanks in advance!

Les

The removal of the cockpit steps/access to the fuel hoses is far different than removing the center floor. All C Dory 25's with these steps should have the stops removed and checked. It is not necessary to remove the floor, unless you have soft places and want to rebuild it--even then you can rebuild the floor without removing the "removable" part of the deck.

There seem to be few of these tanks replaced. But with a 18 year old boat and fuel tank, if the boat is used in salt water, then it would be prudent to at least look at the bottom of the tank. Ideally the tank should have been properly prepared, coal tar epoxy coated and then laid on fiberglass strips with 5200 holding both the strips and tank in place. No rubber containing any carbon should touch the tank. (Silicone rulers are OK for straps)
 
FWIW, my 2005 CD25 did have to have its fuel tank replaced (indeed there was gasoline in the bilge) in less than 10 years. Also, I used to get fresh water running down the inside of the hull and collecting on the cabin sole. The source of this water turned out to be (as Dr Bob suggests) leakage under the steps in the cockpit (from rain and wash downs). The steps had been poorly attached by the factory -- especially if you consider the flexing the steps are subject to as you use them. Removing the steps, cleaning up the old caulk, designing beefed up attachment hardware, reinstalling, and recaulking fixed the problem.
 
I took out the cockpit sole, mentioned somewhere before. I could not pull the tank because: one had to remove the fill and vent hoses, which are hard to get to; the tank is held in place by a rear stop (2x4) epoxied to the bottom and I felt if I removed those impediments, the tank would have a hard time coming out of the space allotted.

I did inspect the bottom of the tank with a inspection mirror to make sure that there were no obvious problems. Noticed the fuel tank cavity is open to the bilge and when there's water around the aft bilge pump, that water sloshes up around the tank.

Concentrated my efforts in preventing water from entering the bilge by installing watertight hatches and sealing the coaming pockets. Works well.

Boris
 
Back
Top