journey on
New member
- Joined
- Mar 3, 2005
- Messages
- 3,599
- Reaction score
- 2
- C Dory Year
- 2005
- C Dory Model
- 25 Cruiser
- Hull Identification Number
- TBD
- Vessel Name
- journey on
Judy's wiper (port side,) died on us last summer. Soaking it in silicone spray finally didn't work. I waited as long as I could, hoping for a miracle, none happened. So, here is the story of fixing a C-Dory 25 wiper, as in replacing the old with new. It's chronological, so one can read as far as one cares. Or one can just look at the pictures.
Removing the Wiper Arm

First, removing the old wiper arm. The first picture shows the setup as supplied by the factory, pantograph arm, drive arm and wiper blade. It's easy to remove the blade and separate the pantograph arm. Removing the drive arm is a bit more difficult, as has been discussed in several threads. There are 2 ea set screws as shown in the next pictures. They're at the top of the hub, so they're not immediately obvious, but they're there. If you can't find them, it may be that they're covered by a black plastic cap. See the pics. None of mine were tightened, but then, one can check. The next step is to pry the hub off the splined drive shaft. And there's the problem. That hub is pot metal (according to the importer, Marinco) and corrodes in salt water. I had removed both arms several years ago, so I knew they came off. Well, I lie, because they didn't this time. Ground a slot down the side and removed the arm. The pantograph arm is swaged to the joints , so it can't be removed, unless one removes the mount, which I did.
Actually I removed both arms to convert to single arm and get a clean windshield since the corroded joint prevented the hold down spring from holding the blade against the window as shown below. I can unequivocally state that not one set screw was tightened. Further, I suspect that no-one tightens them after installation, since they are a real bear to get to, under the cabin brow. That also prevents one from using a puller.


Removing the Old Wiper Drive
So, now I removed the windshield wiper drive , 2 bolts and it slid back through the mounting hole in the windshield. Removed the cover (4 screws) separated the motor and gears from the drive shaft.
The motor worked well, turning the gears with great abandon. The other end of the drive trail, the reciprocating shaft, with the knurled knob on the end, though, was stuck. It's a brass shaft supported by a brass tube as shown above. And the shaft bearing was stuck to the support shaft. So that drive was figmo.
Installing the New, Fancy, Cheaper Wiper Drive
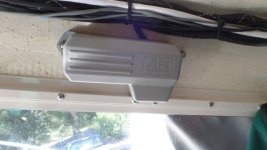
On to replacing the motor. C-Dory used a Marinco AFI 1000 Wiper Motor with a 1.5" shaft, P/N 36181, as shown below. The cheapest I could find that for was ~$160, so don't ever say C-Dory's were built with cheap parts. I bought an Schmitt Ongaro Waterproof Wiper Motor, P/N 33611. It has 2 speeds, twice the torque and a stainless output shaft all for $90. All I care about is the stainless shaft. The installation is shown in the next picture. It fits in the same place, I just rotated it 180 deg for better clearance. Note the SPDT switch above the motor, so Judy can run her wiper to please herself.


Installing the Single Arm
Next, I wanted an all stainless wiper arm. Not only are the original arms hard to get off due to the pot metal hub corroding, but the arm and hub joint corrodes and prevents the spring, inside the arm, from pushing the blade down on the window. Also the pantograph arm was wearing out at both the upper and lower ball joints. Replacement pantograph wipers started at ~$90 each, so I went to a single arm. I found a set of the correct length, 12 1/2”, all stainless AFI arms. Got the last 2 in captivity for $50 ea. Good stainless apparently isn't free but these were the only ones Marinco would guarantee all stainless. The external installation is shown below. The blades are the stock 15" blades.

Mans Best Friends
I can't remember how many times I've used the Dremel to remove corroded, bent and broke hardware. It was the only way those old arms were coming off, since one cannot get to them with a puller. Alas, they're stuck up under the cabin brow. So I just ground a slot with a rotary file and pulled them off. Since I didn't want to repeat the process with the new stainless arms, (actually since they are made of stainless, I can't,) I installed the arms with a liberal coating of silicone grease. Now most silicone grease these days comes from China, at least that's what it says on the tube. I found some good stuff that doesn't melt or wash off. Made by Dow-Corning, a tube costs $45 and should last the rest of my life.

Boris
Removing the Wiper Arm
First, removing the old wiper arm. The first picture shows the setup as supplied by the factory, pantograph arm, drive arm and wiper blade. It's easy to remove the blade and separate the pantograph arm. Removing the drive arm is a bit more difficult, as has been discussed in several threads. There are 2 ea set screws as shown in the next pictures. They're at the top of the hub, so they're not immediately obvious, but they're there. If you can't find them, it may be that they're covered by a black plastic cap. See the pics. None of mine were tightened, but then, one can check. The next step is to pry the hub off the splined drive shaft. And there's the problem. That hub is pot metal (according to the importer, Marinco) and corrodes in salt water. I had removed both arms several years ago, so I knew they came off. Well, I lie, because they didn't this time. Ground a slot down the side and removed the arm. The pantograph arm is swaged to the joints , so it can't be removed, unless one removes the mount, which I did.
Actually I removed both arms to convert to single arm and get a clean windshield since the corroded joint prevented the hold down spring from holding the blade against the window as shown below. I can unequivocally state that not one set screw was tightened. Further, I suspect that no-one tightens them after installation, since they are a real bear to get to, under the cabin brow. That also prevents one from using a puller.
Removing the Old Wiper Drive
So, now I removed the windshield wiper drive , 2 bolts and it slid back through the mounting hole in the windshield. Removed the cover (4 screws) separated the motor and gears from the drive shaft.
The motor worked well, turning the gears with great abandon. The other end of the drive trail, the reciprocating shaft, with the knurled knob on the end, though, was stuck. It's a brass shaft supported by a brass tube as shown above. And the shaft bearing was stuck to the support shaft. So that drive was figmo.
Installing the New, Fancy, Cheaper Wiper Drive
On to replacing the motor. C-Dory used a Marinco AFI 1000 Wiper Motor with a 1.5" shaft, P/N 36181, as shown below. The cheapest I could find that for was ~$160, so don't ever say C-Dory's were built with cheap parts. I bought an Schmitt Ongaro Waterproof Wiper Motor, P/N 33611. It has 2 speeds, twice the torque and a stainless output shaft all for $90. All I care about is the stainless shaft. The installation is shown in the next picture. It fits in the same place, I just rotated it 180 deg for better clearance. Note the SPDT switch above the motor, so Judy can run her wiper to please herself.
Installing the Single Arm
Next, I wanted an all stainless wiper arm. Not only are the original arms hard to get off due to the pot metal hub corroding, but the arm and hub joint corrodes and prevents the spring, inside the arm, from pushing the blade down on the window. Also the pantograph arm was wearing out at both the upper and lower ball joints. Replacement pantograph wipers started at ~$90 each, so I went to a single arm. I found a set of the correct length, 12 1/2”, all stainless AFI arms. Got the last 2 in captivity for $50 ea. Good stainless apparently isn't free but these were the only ones Marinco would guarantee all stainless. The external installation is shown below. The blades are the stock 15" blades.
Mans Best Friends
I can't remember how many times I've used the Dremel to remove corroded, bent and broke hardware. It was the only way those old arms were coming off, since one cannot get to them with a puller. Alas, they're stuck up under the cabin brow. So I just ground a slot with a rotary file and pulled them off. Since I didn't want to repeat the process with the new stainless arms, (actually since they are made of stainless, I can't,) I installed the arms with a liberal coating of silicone grease. Now most silicone grease these days comes from China, at least that's what it says on the tube. I found some good stuff that doesn't melt or wash off. Made by Dow-Corning, a tube costs $45 and should last the rest of my life.
Boris