journey on
New member
- Joined
- Mar 3, 2005
- Messages
- 3,599
- Reaction score
- 0
- C Dory Year
- 2005
- C Dory Model
- 25 Cruiser
- Hull Identification Number
- TBD
- Vessel Name
- journey on
C-Dory 25 Cockpit Step Repair
Well, here's the latest Boris' Folly. I hope it'll help or at the very least, serve as a lesson. Remember every C-Dory 25 has those. If you've kept your seams tidy, this missive is not for you.
Each C-Dory 25 has 2 ea cockpit steps, one on each side at the front. Actually, I think these were put there to cover up the hole they had to cut in the cockpit floor to install the tank fill hoses. When Journey On was new, the seams between the steps and the cockpit floor leaked and the factory re-caulked them (among other things.) Over the years, those seams cracked and the caulking around the tank access hatch (that plate that covers the whole cockpit floor,) appeared to be lifting and checking. So as one of my spring tasks, I resolved to fix both the steps and the tank cover caulking. Herein lies my tale.
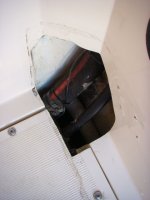
First, I removed the steps. C-Dory must have had a large interest in Bostic caulking, since the steps are held on via a aluminum angle, as shown, using about 8 sheet metal screws and copious amounts of caulking. A heat gun and putty knife with a couple of screwdrivers removed the step.Here's the hole the step covers. Note the towel, referenced later and important.
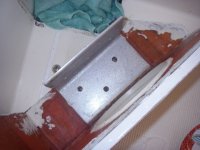
And here is the cover removed, with the aluminum bracket, the top screws still in:
I noticed that water had leaked between the step and cockpit floor, softening the steps end-grain balsa, as shown below.
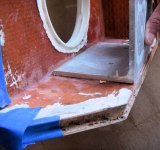
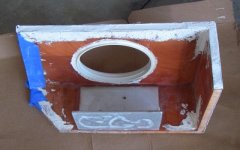
I dug the soft balsa out and removed as much of the caulking as I could. Apparently there is a difference between the caulking they used to fill the seams and the caulking they used to glue the steps on. I could remove the former, and bent my pick on the latter. Note that in the picture, there's a lot of caulking left on the inside of the steps; looks messy but it will not show.. I used 3M 5200 to fill the voids. It was cheaper than the epoxy at Home Depot. I did use epoxy to seal the edges where the balsa was still sound, since it bonds better when there's only a thin layer of sealant.
Then I went to work on the tank cover seam. As you can see, the caulking is cracked and looks like it's giving up.
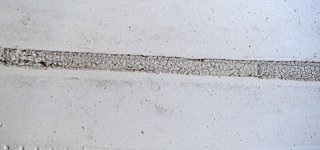
I removed the seam at the front of the cockpit, and my message is: live with the checking, that caulking is a good ½ inch thick and only the surface looks bad. I used 3M 4000 to reseal what I removed. Left the rest alone.
So now I had to remount the steps. Since I felt the seams cracked because the screws and bond allowed flexing, I removed the old caulking as best as I could and replaced the screws with ¼ bolts. As shown, I stuck the bolts from the backside and epoxy-ed the heads in place. It's a bear to put the steps on, put the screws in and then try to reach through and around to put the nuts on.
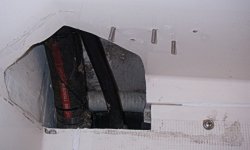
Also as you're working there, put a towel into the cutout so screws and tools don't fall in. As I gave the last nut on the port side the last turn, the socket fell of the ratchet and went down past the tank. Son-of-a-gun. Finally fished it out; don't forget the towel. Those steps looked good bolted in and felt solid.
Finally finished the job by re-caulking. Since the steps probably would flex somewhat when we stepped on them, I wanted to use a strong caulking, but provide something that was flexable: 3M 4200. This is the job finished:
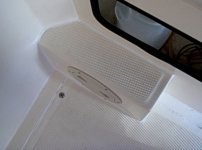
No more water leaking through the joints and down on the tank, halleluiah.
A few comments. In removing the old caulk, I used a product called Marine Formula by Debond to soften the caulk. It works on silicone, 5200 and whatever that Bostik is called. Not free but it gets the stuff off without attacking the gelcoat. Smells of oranges. I took off as much as I could with the heat gun and putty knife then finished with the Debond.
Also, I looked at the O-rings in the round hatches. They were gone. The replacement was a 4170-161, (70 A Durometer Black Nitrile, 5 1/2” ID, 3/32” cross section), according to the local supplier. Or you could order them from Tempress, the OEM supplier. I hope I got better ones than came with the hatch.
Boris
Well, here's the latest Boris' Folly. I hope it'll help or at the very least, serve as a lesson. Remember every C-Dory 25 has those. If you've kept your seams tidy, this missive is not for you.
Each C-Dory 25 has 2 ea cockpit steps, one on each side at the front. Actually, I think these were put there to cover up the hole they had to cut in the cockpit floor to install the tank fill hoses. When Journey On was new, the seams between the steps and the cockpit floor leaked and the factory re-caulked them (among other things.) Over the years, those seams cracked and the caulking around the tank access hatch (that plate that covers the whole cockpit floor,) appeared to be lifting and checking. So as one of my spring tasks, I resolved to fix both the steps and the tank cover caulking. Herein lies my tale.
First, I removed the steps. C-Dory must have had a large interest in Bostic caulking, since the steps are held on via a aluminum angle, as shown, using about 8 sheet metal screws and copious amounts of caulking. A heat gun and putty knife with a couple of screwdrivers removed the step.Here's the hole the step covers. Note the towel, referenced later and important.

And here is the cover removed, with the aluminum bracket, the top screws still in:

I noticed that water had leaked between the step and cockpit floor, softening the steps end-grain balsa, as shown below.

I dug the soft balsa out and removed as much of the caulking as I could. Apparently there is a difference between the caulking they used to fill the seams and the caulking they used to glue the steps on. I could remove the former, and bent my pick on the latter. Note that in the picture, there's a lot of caulking left on the inside of the steps; looks messy but it will not show.. I used 3M 5200 to fill the voids. It was cheaper than the epoxy at Home Depot. I did use epoxy to seal the edges where the balsa was still sound, since it bonds better when there's only a thin layer of sealant.

Then I went to work on the tank cover seam. As you can see, the caulking is cracked and looks like it's giving up.

I removed the seam at the front of the cockpit, and my message is: live with the checking, that caulking is a good ½ inch thick and only the surface looks bad. I used 3M 4000 to reseal what I removed. Left the rest alone.
So now I had to remount the steps. Since I felt the seams cracked because the screws and bond allowed flexing, I removed the old caulking as best as I could and replaced the screws with ¼ bolts. As shown, I stuck the bolts from the backside and epoxy-ed the heads in place. It's a bear to put the steps on, put the screws in and then try to reach through and around to put the nuts on.

Also as you're working there, put a towel into the cutout so screws and tools don't fall in. As I gave the last nut on the port side the last turn, the socket fell of the ratchet and went down past the tank. Son-of-a-gun. Finally fished it out; don't forget the towel. Those steps looked good bolted in and felt solid.
Finally finished the job by re-caulking. Since the steps probably would flex somewhat when we stepped on them, I wanted to use a strong caulking, but provide something that was flexable: 3M 4200. This is the job finished:

No more water leaking through the joints and down on the tank, halleluiah.
A few comments. In removing the old caulk, I used a product called Marine Formula by Debond to soften the caulk. It works on silicone, 5200 and whatever that Bostik is called. Not free but it gets the stuff off without attacking the gelcoat. Smells of oranges. I took off as much as I could with the heat gun and putty knife then finished with the Debond.
Also, I looked at the O-rings in the round hatches. They were gone. The replacement was a 4170-161, (70 A Durometer Black Nitrile, 5 1/2” ID, 3/32” cross section), according to the local supplier. Or you could order them from Tempress, the OEM supplier. I hope I got better ones than came with the hatch.
Boris
