Blue Sea Systems dual battery fuse issue

That is something I wondered about. My thoughts were when wired in parallel the voltage between the 2 batteries should equalize as one regardless of the size/group.

To avoid the potential of overcharging I will see If I can fit two group 31's in the lazarette. I only have the blue sea system switch and ACR in there and it looks like if i put the batteries in an L shape configuration it may work.
 
thataway":u96o5ymd said:
With an ACR and unbalanced batteries (24 engine start and group 31 house), there is some chance of overcharging the start battery. Battery charging is not always as simple as it may seem. Boiling off electrolyte, high temperatures can be issues.

That was my first thought as well. And, in the long run, it probably is not best for the starting battery. I was against it at first. But, then when I spoke with a few people who had run a system like this (plus Blue Sea), they said that in reality it seems to work out. i.e. nothing really bad happens and the life of the start battery is not unduly affected.

That said, I would presume it's still compromised somewhat. I decided it was worth it to me because I could then have a small start bank and a larger house bank. As long as I'm not having to replace the house bank prematurely, I'm okay with it (the start bank is smaller/cheaper).

I guess time will tell and I'm experimenting, in a sense. Although I don't think I'm the first to use this type of setup. However, I'm absolutely no expert, and I have made and corrected some mistakes. On the other hand what C-Dory (or the dealer) put in was worse! Jumble of wires, batteries improperly secured, major lack of overcurrent protection, etc.

I do have a question though, and I'm sure there's a logical answer that I am just missing: But for example when I was cruising we had much more unbalanced banks. IIRC we had one Group 24 starting battery, and around 400 amp hours of house bank (multiple batteries). And we weren't being renegades or anything - this was a fairly common setup. So why is that okay? I'm not challenging you, but rather trying to learn more. (One one boat we had an EchoCharge, and on the other just manual switches - I didn't wire either of them from scratch though, and I knew a lot less then than I know now.)

CDory23, I took some photos and will upload them after supper.
 
Here are a few photos, CDory23. It somewhat pains me to post these right now, as I have many wire ties and supports removed, which means wires dangling, and just a basic overall untidy mess (ugh!). I'm in the middle of making a few improvements, so "pardon the construction debris." Also, as Thataway noted, my system may not be one you want to emulate. You may prefer a "runabout" type system.

This photo shows the overall layout of the batteries. The blue battery is the house bank, a Group 31 AGM. The yellow is the start bank, and I'm not actually sure what "group" it is but it is a Full River HC44 AGM. It's a little smaller than a Group 24 in physical size, but larger than a U-1. Has 560 CCA.
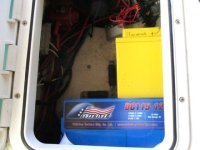
IMG_6965.sized.jpg

For comparison, here is how it looked when I got the boat. The setup was a "runabout style" system with two flooded-cell Group 24 batteries and a 1-2-Both-All switch (and precious little else). Many things attached right to the battery posts (no buses), no labels, little secured, etc.. Also the original (leaky) lazarette hatches.
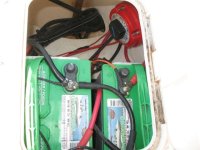
original_batteries_selector.sized.jpg

Back to now, these are the cleats made of fiberglass angle. They are secured with tapped machine screws that go into thickened epoxy plugs in the cored lazarette bottom. There are Weld Mount footman loops attached to them that hold battery straps. When the angles are removed, the locker bottom is completely flush so that I can slide the batteries in and out. There is some cork and gasket material between the angles and the battery case for padding.

The circle of epoxy you see is one of the original battery tray holes that went into the core, now plugged.
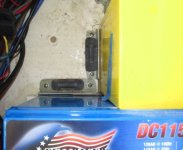
IMG_6949.sized.jpg

On the side where I don't have a strap, there is a Starboard cleat, also fastened with tapped machine screws.
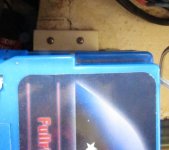
IMG_6950.sized.jpg

And on the end opposite that the locker wall is angled, and the battery didn't want to sit quite right. There I made a stainless "angle" (around 4" x 4") with a starboard piece attached to it where it contacts the battery (you can't see that part though with the battery in place). This photo shows the bottom of the angle, from the view you would have if you were lying on the sole looking straight up at the bottom of the lazarette shelf.
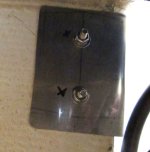
IMG_6971.sized.jpg

Next photo shows a Weld Mount footman loop adhered to lazarette side. These hold the top end of the battery straps.
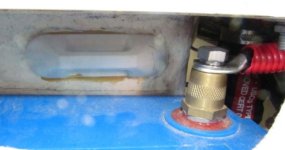
IMG_6954.sized.jpg

Moving around clockwise starting with the hull side just aft of the starboard fuel fill (in the lazarette). Negative bus.

IMG_6956.sized.jpg

Positive bus (this is between the house battery and the switch, electrically, and has loads I want to be constantly "live," such as bilge pumps and battery monitor.
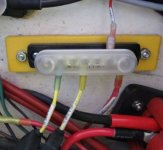
IMG_6957.sized.jpg

Then is the switch although I don't have a photo of it right now (is apart while I make a few mods).

Next, still on hull side is the shunt for the battery monitor. Electrically this is between the house battery negative and the loads (negative bus).
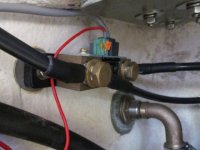
IMG_6961.sized.jpg

Next, looking straight aft you can see the bilge pump discharge hose, the trim tab relay, and the edge of the ACR, which is on the inside "wall" of the lazarette. Ugh, look at those wires/cables! It's going to be nice to have them cleaned up again.
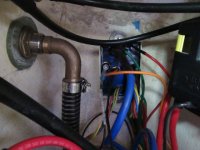
IMG_6959.sized.jpg

ACR. After this is the Safety Hub (has main fuses) and then you are back to the yellow start battery.
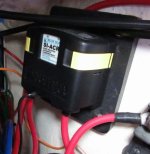
IMG_6958.sized.jpg

I will still need to find a home for the windlass breaker, plus autopilot pump (future). I also may move the house bank out of the lazarette (and add a second battery), but again that is future, because as it stands now I don't have a practical way to re-charge "more battery" than I have now. I'm already at around 5x the size of the engine's alternator.
 
Bill K":3bj57bim said:
Sunbeam,
What are you using to make your wire markers / ID tags ?

Hi Bill,

On the ones that I make up new, here is what I do (these are the longitudinal, heat shrunk ones; on some existing wires where I can't do that, I just made a "tag" out of the label and put in on that way).

1) Clean wire, and if possible, write on it with Sharpie just as a fail safe (ends up under label).

2) Use a Brother P-touch label maker with a specific tape that stands up to the heat gun: "TZ Tape Strong Adhesive."

3) Add clear heat shrink and shrink with heat gun. I use various sizes in one "family" of product from McMaster-Carr. Here is the part number for one size, which will get you to the rest of them: 7856K153
 
Thanks Sunbeam,
I copied the message and emailed it to myself so I can save the info.

Bill Kelleher


Sunbeam":8b68siyc said:
Bill K":8b68siyc said:
Sunbeam,
What are you using to make your wire markers / ID tags ?

Hi Bill,

On the ones that I make up new, here is what I do (these are the longitudinal, heat shrunk ones; on some existing wires where I can't do that, I just made a "tag" out of the label and put in on that way).

1) Clean wire, and if possible, write on it with Sharpie just as a fail safe (ends up under label).

2) Use a Brother P-touch label maker with a specific tape that stands up to the heat gun: "TZ Tape Strong Adhesive."

3) Add clear heat shrink and shrink with heat gun. I use various sizes in one "family" of product from McMaster-Carr. Here is the part number for one size, which will get you to the rest of them: 7856K153
 
Still crazy has twin Suzy 50's. The electrical consists of four blue star switches and a couple of ACR.s The switches only deal with one load each. I have three batteries. One start battery for starboard, one for port, each is a separate switch. A third switch if for the separate house battery. The fourth is a switch that when turned on combines all 3 batteries for emergency purposes only. The port and starboard lazaretts house the port and starboard engine start batteries. The larger house battery is between the fuel tanks. All electronics and lighting run off of the house battery. The ACR's will allow either engine to charge the house battery, and will allow either engine to charge the other engines start battery. I bought the boat used with this "delux" battery management system. If I were doing it over, I'd not go so complex. But the system has worked very well for 7 years, so it will stay the way it is. I literally don't have to think about power management with this setup. However, I do switch both engine batteries off when the engines aren't going to be run for the night, or for long engine off spells in the daytime. I really like having separate engine batteries because I'm concerned about one engine toasting another engine if they are tied to the same terminal on one batter.
 
Well, it broke the bank, but I finally found my battery solution. After buying and returning different combinations of batteries to fit the lazarette I was able to easily fit 2 group 27 Optima blue top batteries. These have a 140min reserve capacity and 800cca.

If size wasn't an issue and difficulty of maintaining I would have gone with standard lead/acid because you get the most bang for your buck. With that said I'm happy to have 2 great new batteries that will be maintenance free, fulfill my needs and last a very long time.

Question: When charging these batteries since the ACR is installed is there pros/cons to having my battery charger connect to both batteries individually?

Also if anybody is familiar with Optima batteries does there charger they recommend really make a difference?

I'm currently charging with A Promariner Pro tech 1240iPlus
 
I think it is old news that the optimas were having significant quality control problems at some time in the last few years. I've also heard a lot of good about them. I've chosen to stay away from them as the cheapo group 24's from wally world fit and work fine on Still c-razy...so far. It will be interesting to hear if you have good luck with the optimas over time and any others who've started using optimas again. I know the expectation bar was set very high for optimas from the first ones that were sold. Some who have had short life experience with them will probably be hard for optima to win back. I'm neutral.

Your charger is a three bank charger. I'd certainly keep the batteries on separate charge banks.

I don't know about your charger, but I do know that some RV type chargers to not like to have their outputs open without at battery on the receiving end.

Do you have one extra unused bank? If so, you might carefully read your manual to see what it says about running with one unused bank. I suspect it is a non-issue for a good marine charger, but it is something to check. I didn't notice if you had a third battery somewhere.

As far as the recommended charger, that may be something optima came out with to answer the issue of reliability, whenever that was the issue. If the battery takes a special charger, I'd send them back. It is only reasonable that any good state of the art charger would work fine if the optima is a robust battery.

However, if you read the FAQ on charging, there are a lot of if ands and but's. So, you have to go with your own analysis.

http://www.optimabatteries.com/en-us/support/faqs

Might be a way to sell nice new chargers to optima owners, or there may be a good reason to go with the charger.

Well, enough from a non-optima owner. I just like to follow the battery issues. Smarter folks than I will chime in.
 
I have heard the same about quality control with Optimas, and most of it was pointed towards their red top models. I'm not saying I will be fine with my blue top and don't like that they had any problems, but I am hoping I will be happy with my blue top. Time will tell.
 
The Promariner 1240i plus is a 40 amp charger--3 bank. Not using one bank should not be an issue. I would hook up to each bank--and I might consider turning the ACR off when on the battery charger.

I wouldn't ever let that battery get to anywhere near the 10.5 volts they speak of in the instructions. 12.2 is where I put the limit.

They speak of using 10 amps for charging. I charge my East Penn Group 31 (105 ah /68#)at 30 amps, but monitor the temperature. The Optima group 31 size is (75 ah/ 59#) is a smaller battery, so I would limit the charge. Don't toss that 40 charger however.
 
Well I've had the last few days off and finally going to stick with my last solution. After researching more about Optima I couldn't justify paying that kind of money with the quality control and the charging requirements. I returned them, and ended up barely fitting two standard lead/acid group 27 SuperStart (Johnson controls) deep cycles which have a RC of 180 and 600CCA and 750CA- a dual purpose battery.

What a headache all of this battery and wiring has been for me.

I will get all of my wiring labels done on Wednesday (proffesional labeler available at work), and connect everything to battery terminals. I have no room for any buses, but to me its not a big deal connecting everything to the battery terminals solely since I"m able to have the group 27s in place. I am putting a LED light on the control panel to view my ACR status. I am also putting a switch on my ACR ground to rid of parasitic load, and allow me to charge both batteries independently when out of water. I Also I bought a Diode that Blue sea systems recommended for my start isolation since I have twin outboards. Blue sea systems technical support was very helpful.

I could not find charging requirements for my Johnson 27's but I believe since they are the standard lead/acid my 1240i plus 40amp charger should be fine for them.

Thanks for all the help from everybody.
 
The one simple suggestion I would recommend is a battery voltage monitor (LCD)--and a $15 from WalMart, or $5 from Amazon will work fine, with a two way Bat 1, off, bat 2 switch--the simple voltage will allow a reasonable state of charge, and prevent overcharging etc.
 
Back
Top