Adding Tomcat Thru-Hull for Washdown

John S

New member
Hi guys,
My current marine head and wash-down intake thru-hull was mounted near the bow on my 24 Tomcat.
When underway the intake is out off the water.
I wash my boat and clean fish while underway. I need a working wash down pump. Years ago I was at the Seattle Boat Show and saw a brand new Tomcat with a rear mounted intake strainer on the inside of the port pontoon.
I’m going to drill a hole and put mine there too. I have some concerns about disrupting the water flow so close to my prop.

Does anyone else have a Tomcat with a rearward strainer thru-hull that could show me a picture???

Any other thoughts on any problems with this position?
I’m adding a “high speed” strainer with the grills pointed forward.
Thanks, John
 
John S":qy4koey4 said:
Hi guys,
My current marine head and wash-down intake thru-hull was mounted near the bow on my 24 Tomcat.
When underway the intake is out off the water.
I wash my boat and clean fish while underway. I need a working wash down pump. Years ago I was at the Seattle Boat Show and saw a brand new Tomcat with a rear mounted intake strainer on the inside of the port pontoon.
I’m going to drill a hole and put mine there too. I have some concerns about disrupting the water flow so close to my prop.

Does anyone else have a Tomcat with a rearward strainer thru-hull that could show me a picture???

Any other thoughts on any problems with this position?
I’m adding a “high speed” strainer with the grills pointed forward.
Thanks, John

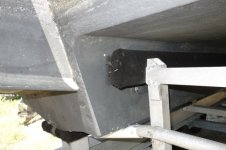
I have my through hull strainer on the port side sponson. My boat is about 200 miles away so no picture is possible for awhile. With the engines hanging off the bracket, the props are far enough away that the strainer has essentially zero impact on water flow at the prop.
 
Thanks Roger!
I have the 24 tomcat, with your 25 I think you have a mounting bracket on the back for your motors that puts them further away than mine from the hull.
Im assuming your intake is mounted on the tunnel side of the hull?

Thanks
 
John,
Yes, you want this through-hull to be on the tunnel side of the port sponson, (or opposite your CHIRP or depth sounder) and lower than your ‘inner cage’ trailer frame guide-on.

It can’t be on the bottom of the sponson because that would drag on the trailer supports.

Your boat and the TC255 differ only in the addition of an engine bracket, which doesn’t matter here. Both boats are ass heavy squatters, the TC255 more so.

I would suggest drilling from the outside sponson in, to be sure you miss the trailer cage etc, after making sure there is nothing in the way inside the sponson. Get a real Groco marine valve with a 500 lb sideways rating and glass it in per the experts (not me!).

If this pic doesn’t work, it’s on the last page of our album.

[/img]http://www.c-brats.com/albums/CAT-O-MINE/DSC03957.sized.jpg

Good Luck!
John
 
Thanks guys!

Unfortunately I got the response and photo about 10 minutes after I crawled out of my hull from drilling the hole. :-)

I installed a high speed bronze intake strainer. I put it it a little lower on the hull than the one in the picture. It is well below the center trailer guide.
I had already ordered and bought a bronze shut off valve manufactured from "Marine Hardware" that includes a bonding screw.

My intake strainer has the hole for the pipe and four screws around the perimeter. I will try to add a photo soon.

I made a pilot hole from the inside and then drilled with my hole saw from the outside.
Thanks
 
Don't know if you are finished. It is common to add a backing wood block or something like a fiberglass block on the inside just to spread the load out a little. I believe that the 255 is not cored at the point where you drilled the hole.

Good location, and should work well.
 
thataway":2ks6x3dm said:
Don't know if you are finished. It is common to add a backing wood block or something like a fiberglass block on the inside just to spread the load out a little. I believe that the 255 is not cored at the point where you drilled the hole.

Good location, and should work well.

Hi Bob., Thanks for reiterating the backing comment! I have not sealed this through hull in yet I was waiting to get some SS fender washers as backers to the perimeter screws.

Where I drilled my main 1/2” hole the fiberglass was about 1/4 inch thick. The perimeter screw holes below are even thicker and the two perimeter holes just above are surprisingly thin and only a little over 1/8“.
I like the idea of a backer but I have full access to the inside of the hull with the tanks out. I prefer her not to use wood. I have starboard material or I could even add a couple layers of 1708.
Very open to ideas and size.

All of my hardware associated with this through hull is bronze except that I can’t find bronze screws for those perimeter holes even at the largest ships chandlery in Alaska. In fact they even pointed out that they get packings with bronze and stainless mixed all the time and don’t have problems with it. Thoughts? I was going with stainless screws.

I added an image of the through hull to my album but not sure how to get the image HTML on my iPhone to post it here.

Thanks so much!
John
 
John
Sounds like you already placed your hole. I drilled mine on the bottom of the port hull toward the tunnel where the hull veers up at a slight angle as per Northwest Marines advice on a 2020 Tomcat. Can not tell you how well it works yet as I believe I have installed one of the check valves in wrong. Just took it out for the 1st time this last weekend and could not get it to prime.
I will let you know how it goes.
Did you install two check valves on yours?
I purchased the graco wash down kit which comes pre mounted on starboard with two check valves and a bronze thru hull.
 
ricka":gcfzioud said:
John
Sounds like you already placed your hole. I drilled mine on the bottom of the port hull toward the tunnel where the hull veers up at a slight angle as per Northwest Marines advice on a 2020 Tomcat. Can not tell you how well it works yet as I believe I have installed one of the check valves in wrong. Just took it out for the 1st time this last weekend and could not get it to prime.
I will let you know how it goes.
Did you install two check valves on yours?
I purchased the graco wash down kit which comes pre mounted on starboard with two check valves and a bronze thru hull.

Yes, my hole is drilled. Added a couple layers of fiberglass yesterday, trying to decide if that is enough to suffice for a backing plate.
I have two washdown systems on two different boats but there are no check valves installed anywhere inline like you stated. I wouldn’t be surprised If there was one integral to the pump, but that’s about it.

John
 
Check valves are notorious for failure. The reason for a check valve would be if there is difficulty priming the pump. Graco is an excellent brand; it is rated to be self priming at up to 36" (C80) and 24" (C60). It does have rigid vanes, vs the flexible vanes as in some wash down system. (The flexible will self prime at a higher elevation from the source.)
 
We have a factory installed washdown. There was Brass & Stainless mixed with no evident problems. The only problem was the pick up, It was not a high speed pick-up and was not satisfactory. I have since installed a high speed pick-up and works well even at speed. We clean fish on board and also fish albacore, which make a great mess on the boat.
 
I had everting installed in the correct direction, it took sticking a cut off hose in the bronze intake mushroom to get it primed. We took it down to Shasta again and had it working for a few minutes.
The issue I have now is the Blue Sea switch panel the factory installed on the transom which was prewired for a wash down pump is only rated for a max 20 amp fuse and the pump calls for a 30 amp. I have looked on the Blue Sea site to find a matching style waterproof switch panel that is rated to take a 30amp fuse. I cant find any brand that is rated for that.
Any Ideas?
 
thataway":zdiox6yg said:
Don't know if you are finished. It is common to add a backing wood block or something like a fiberglass block on the inside just to spread the load out a little. I believe that the 255 is not cored at the point where you drilled the hole.

Good location, and should work well.

Hi Bob, it is not cored at my hole location I added two layers of 1708 at the location do you think that might be sufficient or should I still add some other type of blocking?
Thanks,
John
 
Hi John,
If interested Groco has backing blocks which are made out of a kind of porous fiber so they soak up epoxy real well and they have the nut inserts to fit many bronze flanges. I just posted the pics of my install in my album.

Rick
 
ricka":3nma1g72 said:
Hi John,
If interested Groco has backing blocks which are made out of a kind of porous fiber so they soak up epoxy real well and they have the nut inserts to fit many bronze flanges. I just posted the pics of my install in my album.

Rick

Hey Rick went thru all your pics, very nice clean set up!
I went to the Groco site and the backing plates look great but are pretty specific to the Groco thru hull. It would be real interesting to know what that material is. I was thinking about using starboard but then there is the problem that 5200 doesn’t like to stick to it.
John
 
I added two layers of 1708 at the location do you think that might be sufficient or should I still add some other type of blocking?

It would probably be fine. I am a bit old school, and might go a little more, but the whole idea is to prevent flex or any issues with the mount. No one should be stepping down there!

Rick, nice looking setup.
 
thataway":8hdf6qge said:
I added two layers of 1708 at the location do you think that might be sufficient or should I still add some other type of blocking?

It would probably be fine. I am a bit old school, and might go a little more, but the whole idea is to prevent flex or any issues with the mount. No one should be stepping down there!

Rick, nice looking setup.

Thanks Bob, I needed the extra nudge, so it got two additional layers of 1708 and I just finished making a fiberglass backing plate out of 1/4” material. That ought to do it. I’m just a little overwhelmed right now, boat project wise and was hoping to do it a little easier, but more importantly I want it right.
With my tanks out I’m finally getting on some wet core too, as you can see if you go to my pictures.
Weather is beautiful in AK, it’s time to go fishing and the fuel tanks have shipped.
Thanks,
John
 
4 layers should be great! It looks as if you have had water intrusion from both window frames and the anchor locker. I have seen water migrate some distance from a leak--fortunately most of the windows in our boats are not into cored material- only the aft cabin bulkheads
 
John and Bob
Thanks for the nice comments on my install, I to like to do projects once the right way, unfortunately doesn't always work out that way! I have learned a lot just from all the great boaters on this website. Most everyone seems to be inclined to be DYI here.
I am not sure what the backing plate material was but it did seem to soak up the epoxy a bit.
We are very anxious to get the boat completely set up so we can do a trip up your way John.
Still need to buy and install Wallis stove/heater and make a decision on improving the stock house battery set up.
Doing my 20hr oil/gear lube change this weekend.

Rick
 
Back
Top