22 gas tank access

ferret30

New member
I had an unexpected day off from work yesterday, so I figured it was a good day to do a project while my wife worked from home. I've been planning on installing the swim step, and I don't really like the idea of lag bolts for the lower fasteners (the factory recommended lag bolts since it's difficult to get access behind the tanks).

But I was also going to do the epoxy plugging in the hull core where the tank straps are attached. It gets pretty nasty back there around the tanks and bilge. Anyway, I got the gas tank panels off (the fiberglass 'curtains' with the fuel level windows). Then I noticed the very sturdy hoses attached to the tank (fuel fill, tank vent, pick up). They're connected to barbed fittings, and probably aren't going to easy to remove, if at all.

I know a lot of people here have had to remove the tanks for various reasons, i.e. bedding the strap hardware, replacing fuel pickup lines, cleaning, etc. How should I get the tanks out? It seems like I can destroy the lines, but it's probably fairly difficult to install new ones (esp. fuel fill). I might be able to unscrew some of the brass fittings, but that won't work unless the barbed connection to the hose will spin. What have other people done?
 
I don't know if our 22's are exactly the same, but I removed the two 25-gallon tanks from mine a few weeks ago (I'm putting in new tanks, plus I wanted to re-do the cleats and strap attachments).

I removed the smaller hoses (vent, supply) just by loosening the clamps and taking them off the barbed fittings on the tanks. For the fill hoses, I'm trying to remember which way I did it. I'm pretty sure I loosened/removed the clamps from up at the fuel fill fittings and then rotated/twisted the tanks out into the cockpit, which also pulled the fill hoses off the deck-level fill fittings. So in other words I ended up with the tanks out and they had the fuel fill hoses still attached to them.

I removed the cleats around the bottom of the tanks, but if you have the newer, 23-gallon tanks I don't think you have to (and indeed you may not be able to). I noticed on the drawings for the 23-gallon tanks that at some point Moeller "reduced height by 1"." I imagine that was done either at the point in time when C-Dory started glassing in the cleats, or when the permanent sole came into play, because then the tanks had to be able to be slid in and out over these items (whereas on my boat the cleats were screwed in, and there is no permanent flat sole). Not sure if you will be able to do the same rotating/twisting if you have the permanent sole.

Sunbeam

PS: I found that the fasteners for the stainless footman loops aft of the tanks were not penetrating the core, but instead went into a combination of fiberglass and some blue filler material. I suppose that's because they're so close to the transom and the core had to stop somewhere. Nonetheless I enlarged the holes slightly, cleaned them up, and filled them with thickened epoxy. I'm going to use Weld-Mount footman loops in their place (although actually on the transom near the top of the tanks), so no new screws.
 
Over the weekend I got the gas tanks out and cleaned up the tank/bilge area (it was nasty!). I undercut and epoxied the screw holes where the strap anchors attach to the floor. I still don't really like having screws into the balsa core, so I'm thinking of alternatives.

I also figured out a way to install the swim step without taking the boat out of the water. I turned the boat around and walked it down the marina dock with the motor up until it was in about 1' of water at the stern. I sat on a milk container in the water and used the cordless drill. I didn't use any AC power tools while in the water, of course.

I'm thinking of Dri-Dek for under the tanks and the bilge area. Also, it looks like the hull sides around the bilge/lazarette drain through hulls is thicker. Is the hull cored part way up the sides in the aft area? It looks like it gets maybe 3/4" thicker in some areas, and maybe the straps could run laterally from the cleats to the hull walls.

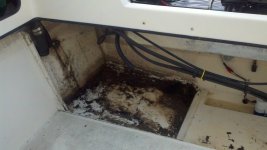
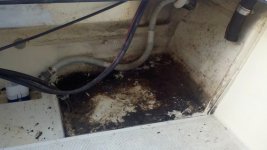
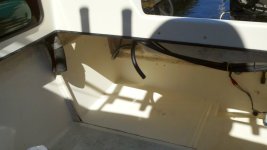
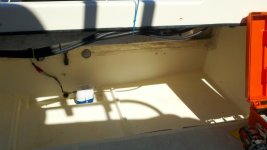
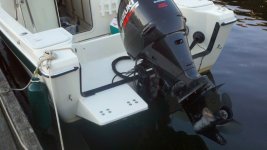
Anyway, here's the pictures of the bilge/tank area before and after, and the step install. The step is kind of high compared to some I've seen, but it's got 3 rungs so it seems fine.

Before cleanup:
2012_09_05_17_37_35_539.jpg

2012_09_05_17_37_41_505.jpg

After cleanup:
2012_09_07_12_42_47_276.jpg

2012_09_07_12_42_52_327.jpg

Swim step:
2012_09_08_17_59_03_945.jpg

[/b]
 
ferret30":708l0jws said:
Also, it looks like the hull sides around the bilge/lazarette drain through hulls is thicker. Is the hull cored part way up the sides in the aft area? It looks like it gets maybe 3/4" thicker in some areas...

I have the four through hulls out of my boat right now. The hull is solid glass in the way of all four (port laz drain, stbd after bilge pump drain, galley sink drain, 'midships bilge pump drain). That said, I don't think my boat looks thicker there either (I'll have a look at that later on in case I just missed it).
 
I think that even though our boats are the same year we've got ones from different manufacturers. I'd be interested to see more photos of your tank/bilge area since it sounds different than mine. Bob's also sounds different since I only have cleats/rails on one side of each tank, and my floor boards are definitely permanent.
 
ferret30":3qpmstvr said:
I think that even though our boats are the same year we've got ones from different manufacturers.

Actually, mine is a 2002, so older than yours. It was built in late 2001, in Kent, by the post-Toland C-Dory group (but before they upped production/moved to Auburn).
 
Same manufacture--just different time of the year, and probably different crew members building the boats. There are a number of variations.

Looks great after clean up. If the cleats are high enough they will hold the tanks in place--putting dry deck under the tanks, will raise them, and perhaps will not be as secure.
 
what holds down bilge pump to floor? I didn't want screws in bilge area,(lowest point of hull)so i just glued base with 5200,any other suggestions for this?
 
chucko":n0c7ims8 said:
what holds down bilge pump to floor? I didn't want screws in bilge area,(lowest point of hull)so i just glued base with 5200,any other suggestions for this?

On my boat it looks like they put down a couple of blobs of epoxy and then smooshed the bilge pump basket/base into it. The epoxy got forced through the little mesh holes, so it's pretty secure.
 
chucko":7s09sy5k said:
what holds down bilge pump to floor? I didn't want screws in bilge area,(lowest point of hull)so i just glued base with 5200,any other suggestions for this?

If you stuck it down with 5200 before you posted at 1000 this morning, it's there forever,unless you chip it out. It's good.

Charlie
 
My pump is put in similarly to Ferret 30's. But if the pumps are in depressions, then there should be solid laminate--just use short screws if you must. But sealants will hold them in place.

I don't agree that 5200 is forever--I have removed it from a number of installations--but it is a bit of work. Look at the spec sheets for sheer and torsion strength of the various 3 M adhesive/sealants. Some are better than others.
 
One question regarding the swim step install. For the upper connection I installed 2 3/8" bolts through the transom with 1.5" fender washers on both sides and a nyloc nut. I did not (yet) drill lower holes since it wasn't going to be practical while the boat was in the water.

The question is, how necessary are the lower bolts for the swim step? When standing on it, it seems like the uppers bolts are under a lot of tension, but the only sort of force the lower ones would experience is shear. I tried pulling up on the step and it seems solid. So are the lower bolts (factory uses lag bolts I guess) there to prevent the step from bending/breaking upward in the case of a wave hitting the transom and pushing up on the step? Could I use generous 4200 across the bottom of the mating surfaces instead?
 
We really ought to be working on our boats together :mrgreen: I just had the same thoughts as you, because I recently removed all of the fasteners from my swim platform in order to overdrill/fill with epoxy/re-drill/go back in with 316 stainless fasteners. Mine had the two through-bolts in the top (above the splashwell), and then three lag bolts below. (Your platform, being newer, may have the "U-shaped" cutout in the lower edge and so no place for a center/third lag bolt.)

I too, first thought, well, no upward force on this platform from human users..... but then realized that waves could likely put a good amount of upward pressure on it. I decided to put the two outer lag bolts back, but just fill in the center one (since many platforms have no center there, and are still fine). I could see the upper trim tab mount would come out pretty close to that fastener, so just decided to get it out of the way ( could always change my mind and drill for a fastener there since it's filled with epoxy now).

Side note: I had been thinking I might just remove the platform to do this job but..... it is Really On There with just the caulking, so I decided to leave it on and work around it. So.... I believe the caulking (at least on mine) is pretty darned adhesive on its own.

Sunbeam
 
Back
Top