V-Berth Storage

mcc272

New member
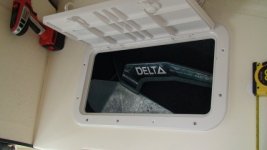
C-Daisy posted photos of the installation of hatches in the V-Berth on a CD22. The incremental storage is of extreme interest to us so I ordered hatches and today tackled the first part of the project. Here are some details in case anyone else is tempted by the photos in the C-Daisy sub album.

The hatch is a So-Pac Access Hatch SPA-30205 with 9 3/4" x 19 1/2" inside dimensions and 13 3/4" x 23 2/4" outside dimensions. I ordered hatches from Defender which stocks them.

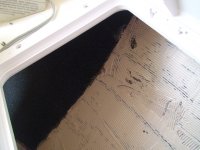
Cutting out the top of the V-Berths is easy. Digging out the foam is a bit more of a production. Crow bar, chisel and putty knife are good tools along with a long Sawzall blade in a handle. The Sawzall blade allows the foam in place to be divided up into sections making removal easier. However, it is still a fairly big task to get the foam out and you fill the V-Berth area with large and small chunks of foam. It developes static electricity and clings to everything. I put it in a bucket to transfer it to a large garbage bag and when you pour it into the garbage bag, all the tiny pieces fly back upwards and cling to the bucket. I was a bit worried that the foam would be a chore to scrape from the inside of the hull but it comes off easily with a flat tool like a putty knife.

I think that when I finish cleaning out the foam, I will fillet the inner vertical side of the V berth to the hull and tape it with some fiberglas tape epoxied into place. Further, the forward end on my boat is foam that continued across the forward end of the V-Berth. My plan is to grind the forward end smooth and then to seal it with epoxy and fiberglas cloth to provide a smooth surface and to keep the foam from continuing to crumble with abrasion. When I am all done, I will paint the interior white with Interlux Brightside so it is light and easy to clean.

All in all, a very useful addition to the boat. Thanks to all who have discussed the pros and cons over time and especially to C-Daisy for posting the pictures which inspired me to proceed.
 
As we plan and make modifications in preparation for our first longer trip in remote waters, the items in need of storage include two downriggers and 2nd anchor. The thought of first digging out the factory foam, as you are doing, adding a hatch and then reinstalling some foam under a liner is of interest. The old hard sided 35mm camera cases had cut outs to fit your lenses and it is this idea I would be interested in borrowing from. This would gain a storage location for a few odd shaped items and create a secure place for them, free from shift and rattling around.
I look forward to your photos.
 
The C-Daisy pictures show the process very nicely. As to your thought about making "camera case cutouts" that might be possible but I suspect it would not be easy. The foam is hard, open cell spray or pour in place foam that then expanded as it set up. It does not completely fill the space and the top of it is totally uneven. It does not go to the corners in some places. perhaps you could remove a bit of it and grind a smooth surface in the top. Then, with a rasp chucked in a drill, you might be able to cut out reasonable cavities. The other possibility is to remove the foam entirely. You might then epoxy plywood blocks to the inside of the hull and screw "footman's loops" (See the webbing section of the West Marine catalogue) to the blocks and then strap the the downriggers and anchor in place with webbing. Also, before you start, it might make sense to mock up the hole in a large piece of cardboard and make sure that the items that you want to store will fit through the hole.

Jim
 
Hi All,

Just getting ready to do some more work on the new storage area. Thought I might share what I intend to do. We considered reserving the forward portion of the underbunk area for foam but have decided to install a third hatch and remove it all. Then sand smooth and line the entire area with marine carpet. Hoping this will provide noise insulation and enough traction to keep things from sliding around. I would be very interested in seeing how your projects turn out.

Here is a link to my album.

http://www.c-brats.com/modules.php?...ame=gallery&file=index&include=view_album.php

I will post more pictures as it comes together.

Karl on C-Daisy
 
Can post what type of hatches you're using? I want to do this modification to our 22, but I'd like to use a low profile hatch, and I'll need to order them online, sight unseen.

Thanks!

Oooops!...I see that you've listed the hatch covers, are they low profile? At least low enough that you won't likely "feel" them under the bow cushion?
 
The port and starboard side hatches are the same as listed in Jim's post (So-Pac 30205). Purchased from Fisheries Supply in Seattle. The forward hatch is from Innovative Product Solutions (500135) and has an outside diameter of 13"x17". Purchased from Boaters World in Tacoma.

Both retailers are online as well.

Hope that helps.

Karl
 
The So-Pac hatches are low profile. I have not measured them but they stick up between 1/4 and 3/8" and I don't believe that they will be particularly noticeable under the cushions. If you need an exact measurement, let me know and I will go grab it.

Jim
 
I was also planning a similar project on my 22 and am very grateful for your photos. I was one of the many beneficiaries of SEA3PO's lazarette hatch endeavor. So I had two extra hatches which got me thinking. Then, right after I put the boat away for the winter, I bought a 13 x 30 hatch and liner. The liner is like the liner of a cooler but it tapers toward the bottom. At the bottom it is only 9 inches wide and and it is about 10 /12 wide at the top. The liner is about 11 inches deep and 27 long. I thought to put this large hatch and liner athwartships in front of the porta-potti area. But with the liner you don't get that much storage for such a big hole. I think Steve meant he would cut out foam so it would support the liner, n ot individual items. That was my thought also so I could put some heavier stuff in there if needed. Now I am leaning more toward three hatches (using the old lazarette hatches) and cleaning out all the foam as you have shown. I need to get to the boat and actually measure how the large hatch will fit.

Thanks for sharing!

Mark
 
amy and karl":2oyx5jwg said:
Hi All,

Just getting ready to do some more work on the new storage area. Thought I might share what I intend to do. We considered reserving the forward portion of the underbunk area for foam but have decided to install a third hatch and remove it all. Then sand smooth and line the entire area with marine carpet. Hoping this will provide noise insulation and enough traction to keep things from sliding around. I would be very interested in seeing how your projects turn out.

Here is a link to my album.

http://www.c-brats.com/modules.php?...ame=gallery&file=index&include=view_album.php

I will post more pictures as it comes together.

Karl on C-Daisy

Wow, judging from your pics, they sure do a sloppy job of putting in the foam. Or is that an average quality job? Seems like its filled about 50%.
 
Karl;
Is there any concern with mold collecting in the forward compartment's carpeting?

Have you also considered the abrasion the anchor(s) may cause on the inner hull?

I have found some rubber/foam door matts at places like 'Bed Bath & Beyond' to work very well in protecting my hull from my second anchor bouncing around below deck. They aren't too expensive either and when you thru with them you can use them as anti-fatigue matts at the work bench, etc..

Art
 
When that foam goes off its mighty powerful stuff in a confined space. The added storage is more valuable than the foam in my opinion . You got much bigger problems than keeping the bow a few inches higher in the air if the worst case scenario comes to pass .......
Marc
 
Marc: Those are our thoughts exactly. If the water is that rough I think it would be pretty hard to hang on to without getting knocked out. Better to always wear a pfd and hope for a speedy rescue.

Art: Thanks for the tip on the foam mat. Not sure about mold becoming an issue. Certainly something to watch for.

Karl
 
I am waiting to start this project. Still sub-zero F this AM. I have three hatches available but want to get to my boat to see if these three are suitable sizes. Probably can't start until April. One of the advantages I see is ability to inspect and access the inside of the hull. Yet I want noise deadening and abrasion protection also. So I would rather not glue the carpeting or other covering down but how else to get it to stick on assorted vertical and etc. surfaces? Another Brat is pondering using three hatches but with hatch liners to have thee smaller storage compartments yet still have all the foam, maybe even add foam as C-Daisy pondered. So what would make a good liner up forward? Do you think that truck liners stuff might work?

Regards,

Mark
 
My BF (Cal-the Deckhand) has been following this thread from the time I started talking about buying a CD-22 (July/August) to actually getting one last month. He was figuring on eventually making this modification.

We were surprised to discover my 2009 CD-22 Cruiser came with 3 factory-installed hatches in the V-berth. Cal tells me that the texture of the 3 compartments is similar to that of the interior hull bulkheads. Cal also told me he was planning to use a spray adhesive to install rubberized shelf/tool box liner to deaden any sound problems and alleviate things sliding about the compartments.

He also found an "extra" small cushion which is simliar to the dinette cushions. With a "little help" the cushion will fit in the notch in the V-berth. All we need to do now is install a board to span the notch and support the cushion.

Guess Santa came early to Eastern NC.

Will post photos of the above, as well as the new camperback and a few interior "creature comforts", shortly.
 
At some point -- this year -- I also am going to install v-berth hatches to create storage on our 25. Since we sleep on the boat six months a year, I have two concerns leading to a question that I hope does not seem slap-my-head stupid when I see the responses.

Comfort -- hatches with a low enough profile certainly take care of this. Convenience -- with the bed made up all the time, we could store only little-used items. Why couldn't the hatches -- one or two or even all three -- be installed vertically in the v-berth's access well. I realize structural support would be an issue and that plenty of vertical glass would have to be left. And I do realize I would be trading off the advantage of better visual access. Thoughts???

Regards to all,

Greg
 
I installed one and it has worked very well, but I would advise a smaller hatch installed in the more accesable PP space so you can vent the storage space easier, A smaller hatch just forward is more aceessable for smaller items, as you don't have to lift the bedding,etc.. I lined it with carpet. Made a very nice storage area.

michael
 
Back
Top