Solar Panel Basics

Oh, forgot to add, I plan to make my own brackets. They will mount directly to the roof, but allow the panels to be tilted up on one end for cleaning the roof underneath, or for wiring work. And perhaps for a bit of sun aiming if the boat is stationary. Colby
 
To learn more about all-things-solar, I recommend a super-site:
www.oceanplanetenergy.com

Up to date info available here on:
Battery systems (Lithium v AGM)
Solar power (Solbian v Solara)
Battery charging/monitoring
Charge controllers
System design
Regional dealers

I purchased 2 Solara semi flexible panels and charge controllers
to help repower my 3 paralleled Group 31 house batteries on a
post C-Dory powerboat circa 2010. Very knowledgeable and helpful
website to check out quality top end equipment and get current information.

Aye.
 
colbysmith":1oz4p2pc said:
Power considerations. Using my Victron battery monitor, I checked my actual current use. I'll have to try and figure out where the leak is later, but with battery 1 (my house batteries) selected, and everything turned off I'm showing .17amps going somewhere. (With the main battery switch off, or in position 2-starter battery, I show zero amps.) ....

I had the same issue with my Victron system. If you don't recalibrate it from time to time as the batteries age you can end up showing small draws or charges even though everything is off. Once the Victron decides there is a discharge (even a small one) it will use that in the calculations of remaining battery capacity again, even if there is no actual discharging taking place. There are lots of parameters in the Victron system you can adjust to increase accuracy if you know what you are doing. I replaced my Victron with the Balmar SG200 which seems to work better in this regard.
 
ssobol":2h8bd8bs said:
colbysmith":2h8bd8bs said:
Power considerations. Using my Victron battery monitor, I checked my actual current use. I'll have to try and figure out where the leak is later, but with battery 1 (my house batteries) selected, and everything turned off I'm showing .17amps going somewhere. (With the main battery switch off, or in position 2-starter battery, I show zero amps.) ....

I had the same issue with my Victron system. If you don't recalibrate it from time to time as the batteries age you can end up showing small draws or charges even though everything is off. Once the Victron decides there is a discharge (even a small one) it will use that in the calculations of remaining battery capacity again, even if there is no actual discharging taking place. There are lots of parameters in the Victron system you can adjust to increase accuracy if you know what you are doing. I replaced my Victron with the Balmar SG200 which seems to work better in this regard.

Thanks, I'll have to look into how to recalibrate it.

Regarding the switch I mentioned earlier, I decided to go with this one instead: https://www.amazon.com/gp/product/B000M ... UTF8&psc=1

This one will actually be a little nicer than the previous one. Colby
 
I think the easiest way to recalibrate the Victon is to disconnect the negative cable that runs from the Victon shunt to the batteries. then zero current can flow thru the Victon. Reset the Victon to zero. Reconnect the cable.

Colby, I have seen this small draw too, I've chalked it up to the VSR which always draws a small current unless you installed it with a off/on switch (using a little red wire on my BEP 710-140A).
 
smckean (Tosca)":muu1gsjt said:
I think the easiest way to recalibrate the Victon is to disconnect the negative cable that runs from the Victon shunt to the batteries. then zero current can flow thru the Victon. Reset the Victon to zero. Reconnect the cable.

Colby, I have seen this small draw too, I've chalked it up to the VSR which always draws a small current unless you installed it with a off/on switch (using a little red wire on my BEP 710-140A).

I kind of suspected it had something to do with the way the victron meter is set up.


Got my wiring ran today between the batteries and where the solar controller will go in the closet. I also ran some new wire to the house batteries from the main battery charger (under the port aft dinette seat). The original wire runs across the cabin under the step, under the shower, and then inside the starboard gunnel, before being hooked into the main battery switch in the starboard aft bilge compartment, where the port side house batteries connect. Then cleaned up the rest of the battery charger wiring. (All the ground wires were spliced into one main wire hooked up at the battery charger. I made a wire stud to connect them all to.) The new wire runs for the battery charger and the solar controller, to the house batteries, now run through the port gunnel, allowing for a much shorter run. Colby
 
Colby,

Now that you are wiring for your new solar system you may want to consider installing a pigtail connector or two on your wires. I have done this on my system. I have two small fixed panels on the radar arch, but the main power comes from two flexible panels that I tie onto the top of our kayaks. These can be removed completely or tied on top of the roof or bimini. You may want to consider adding a flexible panel or two to your system for when you have your kayaks stored on top or to give you more power capacity when you are stuck out in poor weather, but still want your ice cream to stay frozen.
 
Peter & Judy":1bryy92v said:
Colby,

Now that you are wiring for your new solar system you may want to consider installing a pigtail connector or two on your wires. I have done this on my system. I have two small fixed panels on the radar arch, but the main power comes from two flexible panels that I tie onto the top of our kayaks. These can be removed completely or tied on top of the roof or bimini. You may want to consider adding a flexible panel or two to your system for when you have your kayaks stored on top or to give you more power capacity when you are stuck out in poor weather, but still want your ice cream to stay frozen.

Definitely need the ice cream to stay frozen! lol. For right now, I'm just concentrating on the two solid panels. Seeing how that goes, someday I may or may not add to the system. I can always add in pigtails then, as I'll have easy access to all the wiring. (I'm making brackets that will allow the panels to be tilted to get under them for roof cleaning, and wiring access. :) )
 
Peter & Judy":3q2rtaoo said:
Colby,

Now that you are wiring for your new solar system you may want to consider installing a pigtail connector or two on your wires. I have done this on my system. I have two small fixed panels on the radar arch, but the main power comes from two flexible panels that I tie onto the top of our kayaks. These can be removed completely or tied on top of the roof or bimini. You may want to consider adding a flexible panel or two to your system for when you have your kayaks stored on top or to give you more power capacity when you are stuck out in poor weather, but still want your ice cream to stay frozen.

One thing to keep in mind if you want to increase the watts later is that some charge controllers don’t work at high voltage (i.e. panels in series). For instance, the Renogy DCC50S, which integrates the solar with the alternator and even keeps the starting battery charged as well, only uses 12 volt inputs. This appears to be a down side of the panel/alternator integration, which is otherwise great. You can’t just hook in series if you calculated your cables and voltage drop from smaller panels. Since you must use 12 volt panels and hook panels in parallel, your original cables might not be adequate if you expand, permanently or temporarily. Calculate your cable sizes on the basis of the load you MIGHT be using later. Also, many systems have amp limits to inputs as well, the DCC50S is 50 amps, so about 600 watts nominal.
 
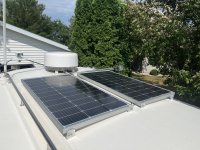
So, two weeks later, with a week away boating in Door County, I managed to get the project completed.
015SolarInstalled.jpg
This is the completed panel installation. Nice fit on both sides of my mast light, allowing me to still fold it down (aft). And I still have some room on the back of the roof to store my un-inflated kayaks, or while no desire now, possibly another solar panel.
010PanelBracketsInstalled.jpg
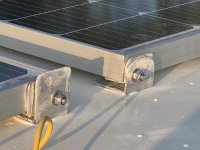
This is a closeup of the inner panel brackets. Because the roof is canted somewhat, these brackets place the panels closer to the roof. I initially wanted to pass the bolt through from the outside, but it was too much of a PITA to get a nut on the inside. So I put the bolt through the inside. Worked out much easier. The one roof bracket has a higher side, by accident. Forgot to cut it while making the brackets. I'll cut it or grind it off later.

[img]http://www.c-brats.com/albums/Solar-Installation/011PanelBracketsInstalled.jpg
This is a close up of one of the outer edge brackets. It sits a little taller to keep the solar panel level with the other one. I have a hinch pin to keep the brackets together. I can pull the pin, and then tilt the panel up to clean the roof under it, or if I need to do any wiring work.
As you can see, the brackets are held down to the roof with a 1/4" ss machine screw. I pre-drilled the holes at the exact positions, and then over drilled with a 1/2" bit. Filled in the hole with epoxy, and the re-drilled the 1/4" final hole through the epoxy. I also spread some 4000 adhesive between the bracket and the roof.
012ControllerSwitch.jpg
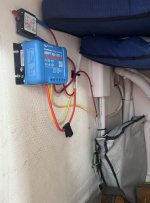
This is the solar controller and main switch. The switch is between the controller and the panels. Then there is a fuse between the controller and the battery. I located this in the closet. (Aft compartment just in front of the cabin aft bulkhead.)


018BothPanelsUp.sized.jpg
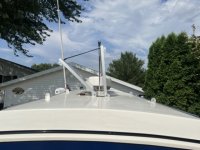
This photo shows the panels both tilted up.
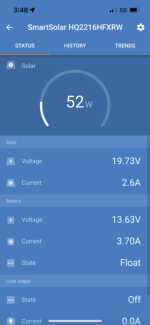

013SolarWorking.sized.png
The controller works well with the Victron smart phone app. Looks like it's all working as it should.

So far I've been impressed. I've had the refrigerator going as I'm getting ready to head up to Isle Royale this week. Every day, an hour or two after sunrise, my battery is back up to 100%. It'll be interesting to see how it does with the freezer on board. Colby
 
Looking good and I like the tip-up feature you added. Our dory is gone of course (now in Anchorage), but I added a 100watt flex panel and victron controller to our Bullfrog pilothouse for self-recharge of the trolling motor/downrigger/pot puller group 27 battery

This boat will live out most of it's life afloat and towed behind a trawler so it needs to take care of its own power requirements. There is also a combiner to share that charge with the start battery as needed, but I doubt it will ever sit still long enough to need that.

Greg
 
I installed a very basic system a few years ago. One 110 watt "semi-flexible" panel that is stored standing up in the head. I employ the "curtain" to hold it up.

This year I added an acrylic "green house" panel to the rear of it to help with cooling. The panel consists of myriad small channels about 1/4" square all attached to one another. It creates a space that allows air to flow between the solar panel and the (gelcoat) cabin top; those panels get hot in the sun. When in use, it's held down by six 1" wide webbing straps with snaps that go around the grab rails. Just something so a gust of wind won't lift it all. I don't trailer with it up there but being under way is fine. If it's a long trip, the dinghy is up on the roof so the panel is stored.

Keeps our group 31 house battery topped off during the day. Our only big draw is out refer, but I just bought a counter top ice maker so we'll see what that does to battery draw. Pulls 160-180 watts. Under good sun conditions the panel will put out 6 amps and 14+volts. Under less than ideal conditions it can be only 1-2 amps. I bought a better quality panel a couple of years ago, so I have two actually. But we only currently use one. That may change depending on the ice maker experiment.
 
After spending two weeks in Isle Royale National Park, I have to say my solar panel installation met all my expectations, and then some. It managed to handle not only the refrigerator, freezer and airhead fan loads, but also charged my batteries back up from the previous night, and allowed me to also charge up my pc (via an inverter) and my cell phone and ipad. Even if a few clouds passed over. Total cost was $430. That included a tool kit for adding connectors, and extra duplex wire. (You can see everything I ordered via links I posted earlier in this thread.) Colby
 
Back
Top