Seastar Hydraulic Cylinder Repair

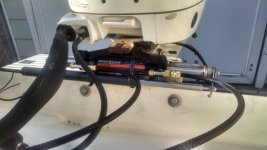
Thanks Jack. Here's a picture of the end that's leaking.

Let me ask a noob question: Is there some clever way to replace the wiper and shaft seal WITHOUT taking the entire end gland apart from the cylinder?

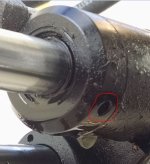
I ask because there's a tiny hole in the bottom of the end gland, opposite the side where the hydraulic fitting threads in. You can see it in this picture:

Baystar_HC4600_end_gland_detail.sized.jpg

What's that for? No magic shortcut for me there, perchance?
 
I believe those holes are for the spanner wrench used to remove the end cap. The spanner wrench circles the cap and a pin on the wrench fits into those holes.
If you buy the whole kit for approx. $100 a wrench is included along with the seals and "o" rings as well as the tapered sleeve that allows you to slide the seals/rings on w/o damaging them.
My thought for you is to buy the kit this time and learn how to do the job. Then next time you can just buy the new seals/rings and do it yourself. I used my old end caps as spares by installing new seals/rings on them and putting them in a safe place for next time.
I hope I helped.
 
Last year I found one end of my SeaStar ram was leaking fluid onto the splash well. Disappointing for a boat with only 80 hours on it (2008 model). Both shafts looked very shiny and like new and the seals looked very new also. I contacted SeaStar Solutions technical help and they were very helpful. They said seal failure is often caused by corrosion on the shaft, due to salt water caught around the seal by surface tension, and the boat sitting idle for long periods. Then when the boat is used, the corroded area makes tiny cuts in the seal. They advised that replacing only the seals may be a very temporary solution if there is shaft corrosion. Would need all new or rebuilt ram.

In my case (shaft looked great), they advised me to very closely inspect the shaft for any tiny bits of corrosion, feeling for sharp points with finger or a piece of nylon stocking. Tiny areas of corrosion can be smoothed by gently working a very fine file, and you might not have to buy a whole new ram. Don't over-file. Sure enough, I found a single sharp point on each side of the ram, which could be felt but barely visible to the eye. I bought new glands with the special tool for about $80, smoothed the 2 sharp points, and so far so good.

They told me, after each saltwater use, good to rinse the ram while turning the wheel side to side, to minimize salt water left on the shafts. Also while boat is in storage periodically turn the steering wheel side to side.
 
OK, so there ARE some little hairline scratches in the chrome surface of the ram. Everybody says my seal replacement will be a short-term fix.

And not cost effective when the "seal kit" cost me almost $100 and a brand new entire cylinder assembly is only about $300. I'm going to replace the entire cylinder.

My big question now is: Can I replace my HC4600 with its designated replacement, HC4645H? Seems like that's the route, but I sure would love to hear from somebody who has made this upgrade.

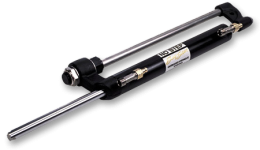
Clarity: I'm replacing this...
BayStar-cylinder2.png

with this...

BayStar-cylinder.png

Also, has anybody dealt with Fred Warner of Marysville, WA? He sells on eBay and has a website at http://www.fredwarner1.net/. Good price, and nearby, but I've never done business with him.
 
Part is ordered. Disassembly proceeding well.
By the way, there sure are a LOT of ways to sprinkle hydraulic fluid onto the clothing one's wife warned one not to wear while working on the boat.

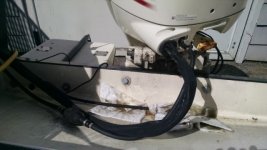
Look ma! No steering!

IMG_20160421_145942240.sized.jpg
 
If you have miles of tubing you can run your bleed hoses back to your helm and don't have to worry about the hydro fluid dropping too low in your funnel as you bleed. Just don't go so fast that the bubbles in the bled fluid can't rise before pulled into the helm. Also if you have old fluid that needs replacement, don't do this!
 
Thanks for the support, folks. I got the new cylinder today, and test-fit it. I LIKE the compact format they've adopted. The cylinder is exactly the right length, with about 1/4 leftover on each end when the engine pivots to it's mechanical stops. The instructions for my engine specify inverting the pivot plate, which was easily accomplished and helps maintain generous clearances at all engine tilt angles.

Anyway, this is proceeding well, so far. My next challenge is new tubing without spending $100 on the "kit" with a pair of 20' hoses. I need about 6-foot lengths to get to my autopilot pump. I'm going to drop by my local hydraulic shop with the cylinder tomorrow and ask how much to cut mine to length and put the proper fittings on the ends. Hard to imagine it would cost $100.
 
So I need to bleed my SeaStar Hydraulic Steering system. Having read the various threads and not having done so myself, I have a (dumb) question. Do I have to buy a 3/8" compression fitting with a bleed nipple in order to bleed the system or should it already be on my system. I don't recall seeing any bleed nipples. If I need to purchase, where do you recommend I buy from?

Peter
 
If you're talking about the fittings at each end of the steering cylinder, they should be there. If not there should be caps, but I don't know why. If there are no caps there are no holes into the cylinder and I don't know that you can bleed the cylinder.

Any where they have the fittings is a good place to buy. A hydraulic shop is a good place to buy. Or you could try Teleflex.

Boris
 
journey on":2b3qfrhw said:
If you're talking about the fittings at each end of the steering cylinder, they should be there. If not there should be caps, but I don't know why. If there are no caps there are no holes into the cylinder and I don't know that you can bleed the cylinder.

Any where they have the fittings is a good place to buy. A hydraulic shop is a good place to buy. Or you could try Teleflex.

Boris
Thanks for the quick reply Boris. I'm pretty sure there are caps. I'm not so certain about the bleeder nipples. I'll pull them off and look at at them this weekend.

So many projects, so little time...

Peter
 
Progress! I've got all the plumbing hooked up, and I'm ready to charge the system with fluid, bleed out the air, and check for leaks. Got a friend coming over for that. He has a sailboat, but don't worry, he's really an OK guy. :-)

IMG_20160505_175846722_HDR.sized.jpg

Some notes on issues I encountered:

There is no reasonable alternative to buying a $100 pair of 20' hoses to complete this installation. The magic BayStar tubing was so easy to install that it obviated any effort to save money putting together the tubing and fittings myself. I couldn't re-use the old hoses because (1) they changed the fitting and (2) they aren't nearly long enough for the new cylinder geometry, which moves with the engine as you steer. The old cylinder was static during steering, and the hoses were cut to length.

The BayStar/SeaStar folks are GOOD PEOPLE. I had trouble with the largest nuts, the "Mount Nut, support bracket". It became unreasonably difficult to turn, and I was certain it was not cross-threaded, but I was also sure it wasn't on all the way. There was still side-to-side play in the suport rod, which would create slop in the steering. It turned out that the nylon insert was either defective or not seated properly...impossible to know which after I had mangled it by forcing it to continue turning! I described the problem in email, and they just sent me a replacement. No paperwork, no "ship us the defective part first", no trouble at all.

The linear rudder position sensor for my autopilot (black cylinder mounted below the BayStar unit with hose clamps) works fine, but has to be mounted way off to one side to index the center position with the centered engine. ALSO, it initially read the rudder position IN REVERSE. Full right showed full left, and vice-versa. Because why? Because the new cylinder's geometry works in reverse. Ram is static, cylinder moves, rather than cylinder static/ram moves. The solution was extremely simple, but I had to read the manual to realize how easy it would be: Swap the red and green wires where they enter the autopilot computer.

Hope these details are helpful to someone down the line!
 
Tim,

Glad to see you made such great progress. The wire swap was a jewel.

Gotta watch those sail guys though, Could just be another "blow hard" :wink:

I'm anxious to see how this compares to my system when we get to Friday Harbor.

Harvey
SleepyC :moon

JC_Lately_SleepyC_Flat_Blue_070.thumb.jpg
 
journey on":1c6gzw6i said:
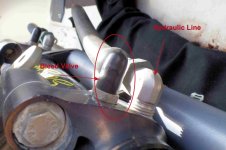
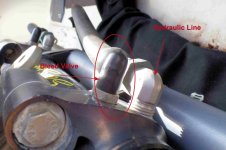
Here's a photo. One bleed valve per end. I think they're a propitiatory item for SeaStar.

bleed_valve.jpg

Boris

Just to follow-up. I checked today and yes Boris, the bleed valves are under the plastic cap, just as you said.. :thup

Peter
 
Just discovered a leak in my Seastar cylinder. Ordered the HS5157 kit and I'm going to replace the seals this weekend. Probably a dumb question but how do I purge the remaining oil before removing the cylinder cap? Do I hook up a collector line to the purge nipple and turn the steering wheel each way? I'm hoping to avoid spilling oil into splash well when I remove the cap.
 
Back
Top