R-25 El Cheapo Water Tank Gauge

henrym

New member
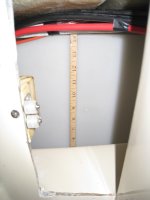
Andrew told me how to install $135 water tank gauge and sensors on the R-25. However, after cutting the hole I thought why install an expensive gauge system when you can see how much water is in the tank? Remove port side teak trim strip, cut hole larger to fit new teak trim cover plate, glue wood measure onto tank, install access door stainless steel spring pressure latch. To check the of water in the tank, pop the teak trim plate off, and use flashlight to see how many inches of water are in the tank... (See Little Toot's photos)
Henry
 
Sounds like an excellent idea bit I am having difficulty understanding exactly where you are talking about cutting the hole. Guess I am dense & have no idea where the tank is. Would it be possible for you to post photo of your mod with adequate reference to identify exact location.
 
That's a great idea. If you can see the side of the H2O tank, you've got it made. Those are translucent tanks on a C-25 and show the water level well. What I did was pour a gallon in at a time and mark where appropriate with a felt tip pen. Dora-Jean did this and I just copied him, with a smaller hole. Also, leave the teak off, because you'll want to see the level every day. The marking I made goes from 2 gal to 15 gal. Didn't figure I needed to know when it's full

On our trip to the Channel Islands, we used ~5 gel/day (no showers.)

Boris
 
commander bill":3dm6alum said:
Sounds like an excellent idea bit I am having difficulty understanding exactly where you are talking about cutting the hole. Guess I am dense & have no idea where the tank is. Would it be possible for you to post photo of your mod with adequate reference to identify exact location.

Commander Bill-

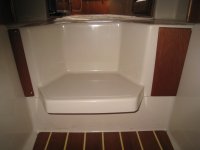
Does having these two photos lined up help you visualize the tank location?

water_tank_access.jpg
New teak cover on right, right?

water_tank_gauge.jpg
Cover removed showing tank behind new cover.

(I did this to help out as some folks don't know how to post photos, so just thought I'd try to help. Hope I didn't intrude!

Joe. :teeth :thup
 
If you remove the port side teak trim strip that is held in place with 2 screws, you will notice that to make the hole bigger you have to make 2 horizontal cuts and 1 vertical cut. The reason for making the hole larger is that you can't really see too much with the narrow slit that is already there.
Henry
 
CORRECTION:


In the second post above with the photos, I was wrong about the tank gauge improvement being on the right side. It is on the narrow left side facing forward (port side). (Can't edit the old post after 30 minutes.)

Joe. :teeth :thup
 
For perspective buyers of the tug, this is the great reason to have a conversation with the factory while your boat is being built. We provided the factory with tank sensors and a gauge and they graciously installed it for us.
 
Now that these picture are handy........Have any of you had bilge water come into the V-berth from under the step? When on the trailer and moving the boat, hitting the brakes would cause as much as three inches of water to rush forward and come in from under the step. Always had to dip it out and mop it up.
I wonder if that problem has been solved.

I like this water tank gauge set up. Soon as the Ranger Tug Factory gives birth to the LUCKY FIN and I get it in my possession, Water gauge along with a lot of these new improvements will be done. Thanks you guys.
captd
 
I had this problem and it was caused by water in the bilge-a lot of it-and it went through the "weeping" channels that are built in to drain. Once the source of the bilge water was solved, the v-berth water went away.

If that is not the source of the problem, then I would look at the joints of the water pressure system and the fresh water system. Is the water in your v-berth fresh or salt water? That answer will point you in the direction to take.

Hose clamps do need looking at and adjusting. We do not leave the water pressure system on when we are not using it.

Keep us informed of your progress on this.
 
Back
Top