Sunbeam
Active member
- Joined
- Feb 23, 2012
- Messages
- 3,990
- Reaction score
- 0
- C Dory Year
- 2002
- C Dory Model
- 22 Cruiser
I could use a little outboard mechanicin' help on my Yamaha F80.
After talking to Chris (Rana Verde) last year at Powell, and reading a bit on the forum/web, I decided it would be a good idea to pre-emptively change the rectifier on my engine, a Yamaha F80. The original rectifier had burned out on not only Chris's engine, but Roy & Dixie's and one of Dora~Jean's. There is a newer rectifier that supersedes the original one and that is beefier -- this is what all three of the other Brats installed after theirs went out. I planned to fit the new one and keep my not-burned-out-yet original as a spare.
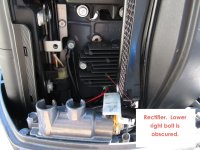
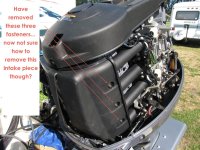
So, the new rectifier arrived yesterday, and it looks like it should be an easy change-out... once I get to it! :cry Getting to it is why I'm writing here. For those who have done it, what did you have to take apart to get to the fasteners on the rectifier? I have removed the plastic covering to the left (starboard side), but the one on the right didn't come off after removing the three obvious bolts, and looking at the parts diagram it almost looks like I'd have to remove the whole intake manifold, but.... from casual conversation with Chris and from reading the other thread I just got the sense that they would have mentioned that if it were required.
Here are a couple of parts diagrams which may help someone to help me.
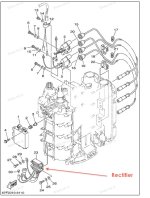
1) This is an electrical diagram - the rectifier is part #23, at the bottom/forward of the engine. I can see how this removes/replaces, but there are other parts in front of it which I'm not sure how to remove.
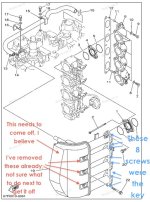
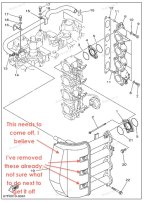
2) Here is the intake diagram. Part #19 needs to come off to access the rectifier, from what I can tell. I have removed the three bolts on the right (port) side, but... there seems to be more holding it on. Looking at the parts diagram, "more" seems like it might get into the intake manifold/gaskets.... and that just doesn't seem right. I'm hoping one of the folks who has done this before might have a memory jog looking at this diagram. You know how it's scary to "force" something (plastic) when you aren't sure if you are doing it right...
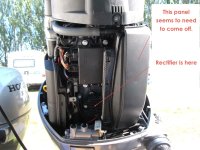
Here are photos of my engine. This is probably something super-obvious, but I'm not outboard-mechanics savvy (probably obvious by now) :embarrased
Thanks!
Sunbeam :hot
After talking to Chris (Rana Verde) last year at Powell, and reading a bit on the forum/web, I decided it would be a good idea to pre-emptively change the rectifier on my engine, a Yamaha F80. The original rectifier had burned out on not only Chris's engine, but Roy & Dixie's and one of Dora~Jean's. There is a newer rectifier that supersedes the original one and that is beefier -- this is what all three of the other Brats installed after theirs went out. I planned to fit the new one and keep my not-burned-out-yet original as a spare.
So, the new rectifier arrived yesterday, and it looks like it should be an easy change-out... once I get to it! :cry Getting to it is why I'm writing here. For those who have done it, what did you have to take apart to get to the fasteners on the rectifier? I have removed the plastic covering to the left (starboard side), but the one on the right didn't come off after removing the three obvious bolts, and looking at the parts diagram it almost looks like I'd have to remove the whole intake manifold, but.... from casual conversation with Chris and from reading the other thread I just got the sense that they would have mentioned that if it were required.
Here are a couple of parts diagrams which may help someone to help me.
1) This is an electrical diagram - the rectifier is part #23, at the bottom/forward of the engine. I can see how this removes/replaces, but there are other parts in front of it which I'm not sure how to remove.

2) Here is the intake diagram. Part #19 needs to come off to access the rectifier, from what I can tell. I have removed the three bolts on the right (port) side, but... there seems to be more holding it on. Looking at the parts diagram, "more" seems like it might get into the intake manifold/gaskets.... and that just doesn't seem right. I'm hoping one of the folks who has done this before might have a memory jog looking at this diagram. You know how it's scary to "force" something (plastic) when you aren't sure if you are doing it right...

Here are photos of my engine. This is probably something super-obvious, but I'm not outboard-mechanics savvy (probably obvious by now) :embarrased


Thanks!
Sunbeam :hot

