Overhead storage closure

matt_unique

New member
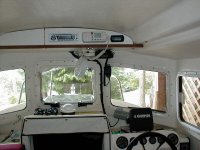
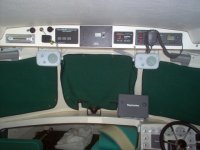
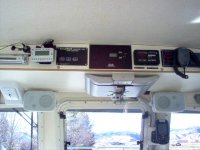
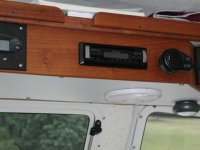
I found some great pictures over the last few months but for the life of me can't find the owners....I want to add a piece of wood in the overhead chart storage area (for lack of a better description). This essentially closes the overhead storage area and provides a great area to mount brass fixtures like clocks, barometer, radio, etc.

With that, who has closed off the overhead storage area with a piece of wood? I would like to look at your pictures and bounce some ideas off you.

Thanks!
 
On Valkyrie, I put a piece of teak (a fiddle, to some) across the shelf to keep charts, chart books and so on in place in a seaway. It is not completely closed.

Picture in our album.

Nick
"Valkyrie"
 
That looks great.

I want to do that but with a full enclosure so I can put in some gauges, music radio, etc. I also might want a small portion to store charts if I can make it look good.
 
This is what I did on the 25.
Dash_004.sized.jpg


This is what I did on the 22.
Electronics_shelf.jpg
 
Matt,

Those enclosure ideas really look great, but when we were up there on Puget Sound in December, we had alot of condensation drip coming from around the ceiling bolts/nuts up on that shelf and finally had to put towels up there to contain it. It condensed less with air moving around that shelf area with a fan.

So, I am wondering - How do the ppl who have enclosed that area handle the condensation up there?

John
 
Those all look great! I planned to put my radar and other electronics forward on the roof, so it would be great to have that area visually closed off where the cables come into the cabin. Plus of course the extra space to mount barometer, radio, clock, etc. I would love it if I could also somehow setup a box that could stow my nautical charts....

Great point Dr. John about the condensation. It does seem like a lot of condensation to be dripping from your bolts no?

Thanks for the great tips.

Perhaps a stupid question, but how do you go about measuring/cutting a board that fits perfectly flush with the curved ceiling? I have a picture saved (from a C-Brat) who used an oak board and it looks perfectly flush. Also, how do you guys fasten the board? To the "floor" of the overhead storage area or into the roof? Screws?

Thanks
 
Matt,

Yes, that is what I thought... how could that much dripping come from condensation? But, it was cold and rainy all the time we were there, and I've had no leaks or similar problems since being down MidWest and South. Now, maybe this winter in Oklahoma, the problem will re surface.

I think you're on the right direction regarding some way to block off the front of that shelf since it is primarily a "Launch Site" for whatever you've stored up there in rough weather!

John
 
drjohn71a":3vsplqk1 said:
....

I think you're on the right direction regarding some way to block off the front of that shelf since it is primarily a "Launch Site" for whatever you've stored up there in rough weather!

John

Ha ha - no doubt! Perfectly aligned departure point for something to hit your head if you launch off a swell or such.
 
Boat builders use an object known as a "tic" board" and templets.

The Tic board is often a piece of light plywood or cardboard. It is put on a square, or otherwise reproducable part of the boat, and measurements taken from points on it with battons or a ruler. These measurements are then used to make a templet out of cardboard or door skins. The templet is then put in place, and trimed exactly. To get the exact fit, a compass (not the nautical time, but the divider type with a lead in one arm) is used to scribe the surface line on the templet.

This process is easier to do than to describe. If there is enough question about how the process works, I could illustrate it--or perhaps some other boat builders have photos from their projects.

The "Butt Scriber does about the same thing as the compass, but the compass can work to closer tollerances.
 
thataway":2lzbk8fz said:
The Tic board is often a piece of light plywood or cardboard. It is put on a square, or otherwise reproducable part of the boat, and measurements taken from points on it with battons or a ruler. These measurements are then used to make a templet out of cardboard or door skins. The templet is then put in place, and trimed exactly. To get the exact fit, a compass (not the nautical time, but the divider type with a lead in one arm) is used to scribe the surface line on the templet.

Bob,

1. What is a door skin?

2. If you have already cut the template to fit, why do you need to scribe with aa compass?

Thanks,
Warren
 
On my 22 I just made a template out of cardboard and kept trimming until it was a perfect fit. SS screws with finish washers attached from the bottom of the existing shelf up into the bottom of the face plate. This also makes it very easy to remove in the event you need to get in there in the future. The face on the 22 was only about 3 1/2 inches high to the roof as I remember, so four 1 3/4 screws held it in very securely.

As for condensation, I have never experienced it anywhere other than in the cuddy cabin and only then when I haven't left a window cracked so the exhaled moist air can escape. If you have 3-4 people in there it could be a problem.
 
Door skins are 1/8 inch plywood--often Luan (A soft Phillipine Mahogany) which are the size of a door--often 6'6" x 32" etc. many times they have blemishes and can be obtained for a reasonable price.

As you make a template with a tick board--or even the device noted above, it will not be "perfect"---that is reflect every dip and valley in the interior fiberglass laminate. Scribing with the comapss, is using a point which is lead pencil thick--so it will follow very dip and hump--thus giving a perfect fit.

Using the tic board and compass, is much faster than the trial and error method of making a template. This is used in all types of boat construction: glass, wood, metal, and ferrocement---never built a reed boat--but I suspose it could be done there too...
 
I have some photos in my album. I made a template, but because I used
3/4" brazillian cherry, I found that I had to relieve the backside considerably.
That 's because the pilot house roof curves down towards the bow of the
boat right over the shelf. In other words, the cut is not 90 deg to the
face, it drops back significantly.

I also specifically did not try to achieve a perfect fit. If you are trying for a
perfect fit, then any imperfections are going to show. Leave a 1/8" gap, and
no one can tell if the gap varies by a 1/32" here and there. It works well.
I needed a gap in order to allow the opening to drop down anyhow.

One switch is for turning off the radio, but leaving the "memory"
wire with power. I did this because the radio display is lit up all the time
if you do not. The other switch turns the radio display to a "night light"
level. The third spot was for an aux iPod input, but it did not work well.
I ended up buying a better one from West Marine and mounting it behind
one of the speakers.

Mike
 
Matt, Here's my solution. A 2" fiddle to limit sliding items and a console below the shelf for electronics. Radar arch is mounted forward as you suggest.
(see album)
P7180003.sized.jpg
Good luck on your installations. PM me with any questions.

Dr. Bob, I'm amazed you never built a reed boat! :lol:
 
Thanks for the tips and pictures. I will explore the under carriage box addition as well.

I'm back to work and found the picture I was looking for. I posted it in my album. I'm trying to find the Brat who did that work. I came across the picture a few weeks ago but did not write down the members name.

Thanks!
 
Not sure who that boat is, but they have a nice wood helm hub. I guess I could look through my list of boats that bought one and narrow it down. I appears to be a green boat also, by the interior.

The shelf looks very similar to how I did my 22, just different wood and placement of the electronics is a little different.
 
Back
Top