Sunbeam
Active member
- Joined
- Feb 23, 2012
- Messages
- 3,990
- Reaction score
- 0
- C Dory Year
- 2002
- C Dory Model
- 22 Cruiser
Sounds like you are well on your way to a deck you can not worry about. Good you caught it when you did.
On the windlass: I've never been completely comfortable with things mounted on non-skid, and even more when they are partially on and partially off.
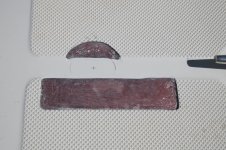
One good solution can be seen in "Voyager's" album (a lot of good photos of his windlass install). What he did is grind off the non-skid in the areas that end up under the windlass pad, so that it's all one level (the level of the non-non-skid). Here is a link and one photo (but there are more of the process at the link):

http://www.c-brats.com/modules.php?...ame=gallery&file=index&include=view_album.php
Because I like to try stuff, I have done a test patch of a different method. Totally unnecessary of course, it works fine the other way, etc. Anyway, first thing was that I wanted my windlass up on a little "pad." I like to mount things this way when possible, and also that little bit of more height would make it so that I could bring a line around the base to the cleat with a little nicer lead (this is a Lewmar 700 horizontal). So I made a pad out of, IIRC, 3/8" fiberglass board. Rounded on the edges, etc.
Then my idea was why not cast epoxy on the bottom to match the non-skid, and I could have an installation that was like a "flat" deck, only without grinding off the non-skid. I'd just bed this "keyed" pad as I would anything else.
I waxed the non-skid in the area in question, then "buttered" a test piece of fiberglass (to simulate the pad), pressed it in place until the "points" of the nonskid just touched the pad, and then let it cure to a fairly solid but slightly green stage. Then popped it off, trimmed the edges with a utility knife, and let it cure completely. When I then set it on the deck it "locked in" perfectly.
So, I think that's probably what I will do to mount the windlass. I realize this isn't what most people (or maybe anyone else) would do, and it's not necessary or maybe even ideal, but I like it. Just figured I'd mention it since we're tossing around ideas.
I ended up deciding not to mount the windlass (yet) since my near-future cruising was going to be mostly shallow water cruising, but I imagine I will mount it before anything "deep" where I'm putting out/bringing in tons of rode.
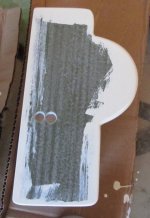
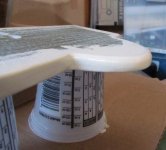
I don't have any photos of my test "reverse non-skid" piece, but here are two of the pad while I was making it. The fiberglass board is from McMaster-Carr.


Anyway, in summary, I prefer not to bed to non-skid, so I'd either remove it or do a "reverse non-skid" pad like I tried out. Of course, once you remove the core and fill with thickened epoxy, leaks won't be so much of a concern.
On the windlass: I've never been completely comfortable with things mounted on non-skid, and even more when they are partially on and partially off.
One good solution can be seen in "Voyager's" album (a lot of good photos of his windlass install). What he did is grind off the non-skid in the areas that end up under the windlass pad, so that it's all one level (the level of the non-non-skid). Here is a link and one photo (but there are more of the process at the link):

http://www.c-brats.com/modules.php?...ame=gallery&file=index&include=view_album.php
Because I like to try stuff, I have done a test patch of a different method. Totally unnecessary of course, it works fine the other way, etc. Anyway, first thing was that I wanted my windlass up on a little "pad." I like to mount things this way when possible, and also that little bit of more height would make it so that I could bring a line around the base to the cleat with a little nicer lead (this is a Lewmar 700 horizontal). So I made a pad out of, IIRC, 3/8" fiberglass board. Rounded on the edges, etc.
Then my idea was why not cast epoxy on the bottom to match the non-skid, and I could have an installation that was like a "flat" deck, only without grinding off the non-skid. I'd just bed this "keyed" pad as I would anything else.
I waxed the non-skid in the area in question, then "buttered" a test piece of fiberglass (to simulate the pad), pressed it in place until the "points" of the nonskid just touched the pad, and then let it cure to a fairly solid but slightly green stage. Then popped it off, trimmed the edges with a utility knife, and let it cure completely. When I then set it on the deck it "locked in" perfectly.
So, I think that's probably what I will do to mount the windlass. I realize this isn't what most people (or maybe anyone else) would do, and it's not necessary or maybe even ideal, but I like it. Just figured I'd mention it since we're tossing around ideas.
I ended up deciding not to mount the windlass (yet) since my near-future cruising was going to be mostly shallow water cruising, but I imagine I will mount it before anything "deep" where I'm putting out/bringing in tons of rode.
I don't have any photos of my test "reverse non-skid" piece, but here are two of the pad while I was making it. The fiberglass board is from McMaster-Carr.


Anyway, in summary, I prefer not to bed to non-skid, so I'd either remove it or do a "reverse non-skid" pad like I tried out. Of course, once you remove the core and fill with thickened epoxy, leaks won't be so much of a concern.
