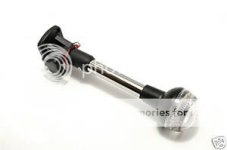
We have occasionally noted a rare drop or two from the place where the wiring to the 360 degree "steaming/anchor" light, when we have a heavy rain. On the Tom Cat this is put on the aft top of the roof, which is cored with end grain balsa.
Today, we decided to eliminate this minor leak. No surprises here:
1. Bostic sealant was used to seal this--it was not effective.
2 The balsa Core had rot in it, both around the large hole, and the screw holes.
3. There is a hole in the bottom of the Perko fitting, which allows water to go into the area sealed off.
4. There was no epoxy sealant around the 3/4" hole (only 1/4" hole was necessary)--or around the screw holes.
The Bostic was still elastic, and it took a fair amount of pressure to break the Perko fitting free. I removed the screws holding the wires in the cabin roof inside, to free up the wiring. I removed the "vent" cap on the underside of the cabin, which hid the wiring exit and sealant.
There was rot in the balsa core--with wetness to the screw holes. I used knife blades, dremel tool bits and removed all of the wet and rot balsa core (about 1/2 to 5/8" beyond the center hole). I used a heat gun to be sure that there was no residual water. I then ground out the screw holes to 1/4", and undercut the balsa, with grinding a fresh edge on the fiberglass layers. Then I mixed medium density filler and cabosil with eopxy, and filled all of the area where there had been rot (I actually narrowed down the hole, to about 1/4", in the center.) After I let this epoxy set up, then I drilled out the center of these screw holes. The area was filled with fast set 4200, and then the plate put back in place. I also filled the "drain hole" with 4200--and probably will drill out a hole to the outside, when the sealant sets up.
Hopefully this will resolve this only leak in the Tom Cat 255. I suggest that all Tom Cat owners, or any one who has a cored center top, where the light fixture goes through this cored top, check it. If it is OK--then rebed with 5200, and seal the edges with epoxy. If it has water intrustion--then do the complete repair.

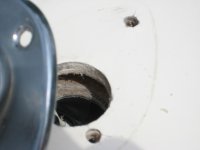
The photos shows the large hole, with glass on top and bottom, void where rottena and wet balsa removed. There is also a screw hole, before it is drilled out and filled.
Today, we decided to eliminate this minor leak. No surprises here:
1. Bostic sealant was used to seal this--it was not effective.
2 The balsa Core had rot in it, both around the large hole, and the screw holes.
3. There is a hole in the bottom of the Perko fitting, which allows water to go into the area sealed off.
4. There was no epoxy sealant around the 3/4" hole (only 1/4" hole was necessary)--or around the screw holes.
The Bostic was still elastic, and it took a fair amount of pressure to break the Perko fitting free. I removed the screws holding the wires in the cabin roof inside, to free up the wiring. I removed the "vent" cap on the underside of the cabin, which hid the wiring exit and sealant.
There was rot in the balsa core--with wetness to the screw holes. I used knife blades, dremel tool bits and removed all of the wet and rot balsa core (about 1/2 to 5/8" beyond the center hole). I used a heat gun to be sure that there was no residual water. I then ground out the screw holes to 1/4", and undercut the balsa, with grinding a fresh edge on the fiberglass layers. Then I mixed medium density filler and cabosil with eopxy, and filled all of the area where there had been rot (I actually narrowed down the hole, to about 1/4", in the center.) After I let this epoxy set up, then I drilled out the center of these screw holes. The area was filled with fast set 4200, and then the plate put back in place. I also filled the "drain hole" with 4200--and probably will drill out a hole to the outside, when the sealant sets up.
Hopefully this will resolve this only leak in the Tom Cat 255. I suggest that all Tom Cat owners, or any one who has a cored center top, where the light fixture goes through this cored top, check it. If it is OK--then rebed with 5200, and seal the edges with epoxy. If it has water intrustion--then do the complete repair.

The photos shows the large hole, with glass on top and bottom, void where rottena and wet balsa removed. There is also a screw hole, before it is drilled out and filled.


