All right, I spent a month doing this so I'm gonna post it.
Boris
When I read about Anna Marie's adventures in finding and fixing their C-25 gas tank, my first reaction was that their boat was the same age as Journey On and we also boat in salt water. And the last thing we needed was to find gas in the bilge when we're 20 miles from land on the way to Catalina.
So any way, I pulled the cockpit floor, and checked what I could see of the tank. Here's my comments. Note they're my comments, and there are probably different opinions.
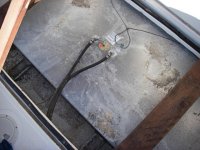
First, the tank. The tank was covered with algae/crud, indicating that water had been in the tank compartment. Indeed there is a drain hole at the center of the bilge/tank bulkhead. I looked at the tank seams after cleaning, at the rear and using a mirror, as far as possible under the tank. I saw no evidence of corrosion. Even sanded some spots and they came up clean.
Next, how corrosion can happen. If the boat is down by the bow, water in the bilge goes into the tank compartment. That's a given. The tank is ~1/2 inch off the hull, due to the strips C-dory puts in there to support the tank. And from the algae covering, the water certainly gets up over 6” back there. Now, in Journey On's bilge there is always water in the bilge when I wash the boat, when it rains, etc; but it's fresh water, I assume. We do have the boat in the water for several months at a time, so I suppose salt water can be in the bilge. However, when we haul Journey On out, I pull the plug and drain the bilge, and that takes a long time, longer than just to drain the bilge. So water must also be draining from underneath the tank. Also, the driveway is a 17% grade, which also drains some water. and I found that if I crank the trailer all the way up at the front, the tank compartment stays dry. As far a Journey On goes this must keep the tank and environs dry enough that there isn't any preceptable corrosion. An advantage of trailering.
Note that there are 2 separate fuel pickups, both going to the filter. So whichever one uncovers first stops fuel suction. The parking slab tilts downhill so with the shallow tank, I can't drain the last 5 gal out.
And now tank installation. Talked to the C-dory factory (Scott Boysen) and he said that the tank is installed after the cockpit molding is installed. It's easy to see how that's done. One side of the tank is slid down and as far over as (port or starboard) as possible. It's then slid forward through cutouts for the fill and vent bosses, the retaining blocks are fibreglassed into place and the tank is home. The front is held in place by the fill hoses. The problem with removal is that it starts with cutting out the retaining blocks, which I certainly don't want to do just for an inspection. If the tank is corroded and FIGMO, cutting it out is the easiest way. As to why they chose that shape, I don't know, but when you have to get 100 gal into a shallow but wide space you may pick that shape. And It works well for them, though it's not too handy if you want to remove the tank.
Also, Coastline Equipment made the one in Journey On (2005) and still makes the C-dory tanks. I talked to Kevin at the tank department, asked him to send me a new gasket for the sensor plate, which he nicely did. Thanks, Kevin. He also commented that if the tank is painted and the paint peels, water may be retained behind the peeling. So there are pros and cons about everything.
What did I do? Put some neoprene rubber between the tank and the restraining blocks. Drilled weep holes in the aft bulkhead port and starboard, so that water can drain out of the tank compartment skeg indentation into the bilge.
And sealed it up. Wiser and happier that I didn't see any incipient corrosion. and (sorry) glad that I trailer.
Here are some free comments on doing the work. You start by removing, or at least cutting all the caulking around the cockpit steps and the floor insert. Which was new last year, by the way. That was the hardest part of the job. 3M 4000 is tough and those seams are deep. Used a utility knife and replaced the blades frequently. Once you get past that, the floor comes right up. It's held in place by 8 screw, and then you pry it. I left it on the front edge in the cockpit, because it isn't light.
Pressure washed the crud out . The tank is raised about ½ inch off the bottom of the compartment; I assume that the same strips are used under Journey On's tank as shown in Anna Marie's compartment.
So where did I go from there. Well, I lifted the tank up as far as I could, sanded down what I could see and found no corrosion. You can't lift it up high enough to clear the restraining blocks, so I didn't slide it back. Since there was no corrosion at the rear where the tank meets the blocks, or at the side/bottom that I could see, I'm thrilled. Stuffed some neoprene between the tank and blocks and lowered the tank back down.
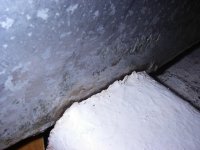
One of the places water doesn't drain from are the bottom strakes on the hull, on each side. As you can see if you look at the bottom outside of boat under the sink, those are depressions running almost the whole length of the hull. In the cabin, they're great for catching any water that is spilled; yes it happens. In the tank compartment they do the same, so I drilled drain holes in the dividing bulkhead (between the aft and tank compartments) at the strake depressions. I also installed a 6” inspection port in the aft of the removable floor
Now, just as hard as cutting the caulk bond is removing the old caulk. Just as a reminder, using Marine Formula by Debond is the only way to remove old caulking. And 3M 4000 is strong and stays white. Search the Internet, DeBond and 3M4000 is a lot cheaper a lot cheaper.
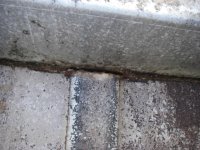
So here are some pictures. First, the fuel tank installation after the cover is lifted. Second the algae before I washed it. Next, the aft retaining block, where Anna Leigh found corrosion, starboard only shown. Next, fill, vent installation and cockpit sole cutout. Next, tank stop after cleaning, no corrosion. Next water in aft tank compartment skeg depression, where new drain hole was drilled, sealed.