You are using an out of date browser. It may not display this or other websites correctly.
You should upgrade or use an alternative browser.
You should upgrade or use an alternative browser.
Garelick motor mount for kicker
- Thread starter Plan C
- Start date
flapbreaker
New member
I think it depends on where you mount it. Wether you have trim tabs ect. My kicker is mounted to a stationary motor mount called a mini jacker. It's a bit close to the main motor but it works. The lift type mounts work good but I've heard some people complain that over time they can fail. Especially from trailering if they are not tied down tight.
You can look in my album at the motor placement.
http://www.c-brats.com/modules.php?set_ ... _album.php
You can look in my album at the motor placement.
http://www.c-brats.com/modules.php?set_ ... _album.php
amy and karl
New member
Here are a couple pics of a Garelick 71090 on a 22 with twins. This mount is rated for up to 30 hp and 169 lbs.


I just finished the install last weekend and have not tested it yet. I did put my kicker on it and it all feels very solid. As for towing Garelick says not to tow with the motor on the bracket. I will be towing with the motor on and have a tiedown holding the bracket in the full upright position. It's really not as tight to the starboard main as it appears.
karl on C-Daisy
Jack in Alaska
New member
IMHO you have too many motors on a 22' C-Dory. Why do you need a kicker when you have twins already. Just asking.........it is your boat.
I used a Fulton adjustable mount and a quick mount bracket so the motor mount was not permanently attached. See Swee Pea photo album, page 4. It worked out well. We used a Nissan 6HP kicker, one that could be used on an inflatable. Since we opted for a 15" shaft, better for the inflatable, its primary use, the Nissan had to be lowered to accomodate the 20" shaft requirement of the C Dory. The kicker will be used for emergencies only. I followed Les' advice, and bought the small outboard for its primary use. I think I have the best of both worlds for me. Nothing is perfect.
John
Swee Pea
John
Swee Pea
amy and karl
New member
Jack in Alaska, you're right. It is my boat and we bought it to use it, a lot. The reason for the kicker is twofold; to troll the Puget Sound for salmon when fishing and to use as a dinghy motor. It's difficult, to say the least, to find an open space at the dock at our State Parks in the Summer, and I have no interest in rowing to the beach. Not to mention the 340 hrs on both 40's on our 2007 22.
Karl on C-Daisy
Karl on C-Daisy
journey on
New member
Journey On has one of those Garlic motor mounts, on which we use a 10 hp Honda (110#.) Works great, easy to raise motor. It's what the factory put on.
However, I wouldn't ever trailer with the motor on. You can tie it down the motor, but there is enough slop in the mount/motor combination that it's going to rock. Short distances, OK; on the interstate, no.
One more thought. That motor mount is above the waterline. You don't need to seal it on. If there's no (or very little) sealant, it'll be easy to get off.
Boris
Swee Pea John,
Your set-up looks good. Have you tried it with a steering rod to the main?
Have you tried the 6hp on a rough day or against strong wind/current. I have thought about doing the same thing. With the davit for lifting the kicker you could even go with an 8hp but it would need to fit the dingy. What dingy do you use the 6hp with?
Thanks,
Steve
I have a Mercury 270 Air Deck PVC, got it from Busters Marine. In fact I do have the rod that connects the main to the kicker. It has the quick release attachments. Had to make a bracket so that it would attach at the correct angle so it wouldn't bind.
I am ashamed to say, but I have yet to test the motor for "push". The Mercury would accomodate up to a 10 HP I believe, but I wanted to keep the motor as light as possible. MY 55 lb 6 hp is about 26 pounds lighter and $350 less expensive than the 8 HP.
I realize that the 6HP is small to push a 22 CDory, but for the type of boating I do, it should be sufficient (to limp back in an emergency). It is not there for trolling; just a back up in case of an primary engine failure. And if I have it for the inflatable, why not hang it from the transom and have it "just in case", just for the cost of the bracket and mount.
I opted for the quick mount bracket because, in my opinion, the bracket is ugly without a motor attached. I simply remove the bracket by sliding it into the permanent mount.
Good luck.
John
Swee Pea
amy and karl
New member
Dave, we finally got out on the water today to test out our kicker and the Garelick mount. It works quite well. It's quite easy to move up and down and steering is a breeze while sitting on the starboard lazerette. I think that the position yours would be in would only make it more user friendly. Anyhow, best of luck with your decision.

karl on C-Daisy

karl on C-Daisy
colbysmith
Active member
Ressurecting this thread as I need help mounting a new kicker. Swee Pea looks to have the best setup I've seen so far looking through some of the past forums regarding this. Here's the deal. My main is a Merc 115 hp EFI 4-Stroke. I just bought a Tohatsu 6hp, 20" shaft. I have a swim step on the port side, and I have Lenco trim tabs that are 12" x 12". I just received a Mini Jacker I ordered, but I don't think it's going to work. First off, I need to raise it higher than I'd like to get it over the trim tab piston. Then it doesn't really provide the set back I need to get my kicker behind the tab. This is what the back of my boat looks like:
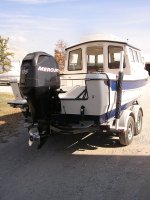
Any suggestions? Photos would be great. Thanks. Colby

Any suggestions? Photos would be great. Thanks. Colby
I just mounted trim tabs and a Mini-Jacker, so I had to figure out a similar set up. But... I can't quite visualize why the Mini Jacker won't go "high enough" to clear your trim tab actuator (piston). On mine the actuator top is "inside of" the Mini Jacker, but the "insideness" wouldn't change if I mounted the MJ higher or lower (I did have to make sure I had it set up athwartships to clear properly, but not height-wise). Is yours hitting at the bottom of the inverted U of the Mini Jacker? It does look like the Lenco actuator mounts fairly high on the transom, so maybe by the time it gets to the bottom of the Mini Jacker it's angled out too far on its way to the trim plane?
On mine the setback was close, but does clear the tab without any problem. I had asked a pro if "a miss was as good as a mile" and apparently it is (since the tabs cannot move aft).
Sunbeam
On mine the setback was close, but does clear the tab without any problem. I had asked a pro if "a miss was as good as a mile" and apparently it is (since the tabs cannot move aft).
Sunbeam
colbysmith
Active member
If I remove the wood pad from the mini jacker to get more clearance on the trim tab piston (since I can always trim the bottom of that pad), the transom side of the jacker still needs to sit about an inch and a half to two inches above the top of the transom, which really puts the kicker too high. As for a spacer, that might possibly work, but that's just more material I need to add then. If the Fulton unit would fit like it did on Swee Pee, I may need to go that route. I'll see if later today I can get a few more photos with the mini jacker held in place for a better visual of the problem.
colbysmith
Active member
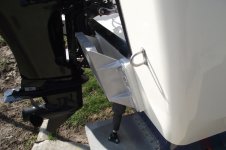
Ok, here is some photos. I have the Mini Jacker held in place with clamps. As you can see, it sits fairly high on the transom, and I'm just touching the trim tab piston in the lower right corner. I'm thinking this may work if I add some spacing material between the jacker and the transom. I think an inch would do it. Any recommendations on what to use? I'm thinking plywood possibly, or some hard acrylic plastic material. Have others needed to space the Jacker out some? Also, with it in this location, how do I access inside the transom to get to the bolts holding the jacker on? Have others found it necessary to remove the fuel tanks? The clearance between the main will be very tight in turns. Same with the clearance between the transom and the front gear selector on the Kicker. Colby
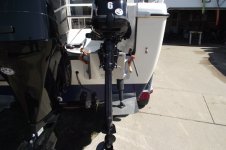
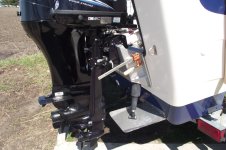
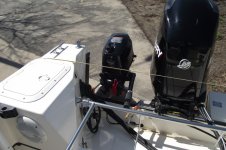


Okay, I see what you mean now. Couple of comments:
It looks like the Lenco arms are comparatively long and vertical (they attach to the transom higher up), so that's the source of the clearance problem. With the Bennetts, the top of the actuator arm enters the boat below the splashwell molding (and it does enter the boat because there is a hydraulic line), so at first I didn't get what you meant. Because of that, I didn't have any problems mounting the MJ as low as I wanted to - I only had to make sure to clear side-to-side with the actuator.
I mounted the MJ where I had seen others mount it, which was pretty much just snugged up against the underside of the black transom cap molding. This gives about a 3" rise over a direct transom (kicker) engine mounting (what I had before I added trim tabs). With this mounting, and a slight gap between the top of the MJ and the underside of the engine U section, all fit just fine (but I see why you may have to go higher or further aft or a combination of both.
So... it's not the plane you have to clear, but the actuator arm. Hmm, so a pad on the aft face of the Mini Jacker would not help (my first thought).
On the fasteners: I mounted the upper ones so they come in above the splashwell. The lower ones come below the fuel tanks. I have my fuel tanks out, so I was able to through bolt those no problem. However, I could also see using lag screws for those lower fasteners, since it seems the thrust on the lower part of the MJ should be inward... right?
My kicker was mounted (when directly transom mounted) closer to the main than to the side of the splashwell "wall" (the surface the motor cables come out of from the boat). I think the theory is that the main will be turned (or can be turned) when you are using the kicker but the splashwell wall cannot. Still, I moved the engine slightly towards the splashwell wall so as to work out best with the trim tabs. It's still closer to the main than the "wall" though.
I cut off the bottom half of that "quartered" plywood filler that comes with the MJ. Both my motor clamps and the motor attachment bolts fall well into the top section, so the lower section just seemed like dead weight. Since it was about 65% end grain, I then epoxy coated it and painted it (used grey bilgekote which I mixed to match the aluminum more-or-less).
Sunbeam
colbysmith
Active member
I think if I could get my MJ (mini jacker) flush against the top transom cap, it would be in the right position for height. I've got some hard white plastic acrylic that I'm going to cut to fit between the MJ and the transom. Two of those should be enuf to allow me to drop the MJ to the position I want it. I agree with you about cutting the bottom half of that plywood pad. When I'm not using the kicker, I'll leave it tilted all the way up. I need to move it far enuf starboard, to give me room for full turn on the Main. But I also need to clear the splash well like you said. I don't know about just using lag screws on the bottom attachment holes. They would probably suffice if I got some good bolts going through also. With where I'm placing the MJ, even the top right bolt may be above the fuel tanks but behind the spash well.
colbysmith":37fcs7pp said:I think if I could get my MJ (mini jacker) flush against the top transom cap, it would be in the right position for height. .... With where I'm placing the MJ, even the top right bolt may be above the fuel tanks but behind the spash well.
I have my MJ mounted about 1/8" down from where it would be if it were pushed tight up against the black transom cap, and the top two mounting bolts come out in the splashwell (not really even that close to the bottom of it). And, they are not even in the top two dimple/holes on the MJ, because that seemed a bit crowded. They are in the second set of dimples/holes down. Maybe they would come out like you say if you mounted it very far to starboard?
I have the lower two fasteners in the middle set of dimples/holes on the lower section, and they come out well under the splashwell, behind the fuel tanks.
colbysmith
Active member
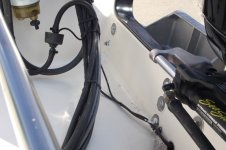
I finally got the Mini Jacker (MJ) installed. I ended up using some hard white acrylic material as spacers. The clearances will be tight between the kicker and the main, the kicker and the trim tab, and the kicker and the side of the splash well. I've also only got about 3/16" between the bottom inside corner of the MJ and the trim tab piston. But I think this will end up working out. I'll put some photos here of just the MJ installed. Also including a shot taken on the inside of the splash well to see where I ended up placing the bolts holding the MJ on. Those bolts are actually in the first, third and fifth dimples from the top on the MJ. The bottom right bolt is in the corner of the splash well. Next step, get the Kicker on.
