Fuel Tank Removal CD-25

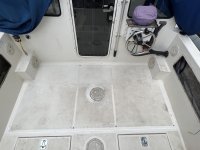
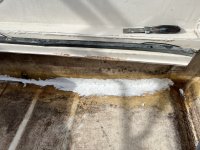
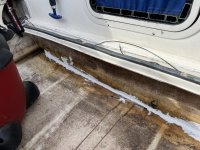
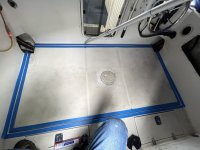
The job is mostly done. Tomorrow I'll clean up the caulking (some ridges left from pulling the tape), and finish installing the side boxes. In the first photo below you can see where I taped around the area that will get caulked. I used painters tape, and then used 4000UV to caulk around the entire floor and steps. I did not fill the entire void around the cockpit floor, but rather just put enough caulking to seal the floor. After caulking the floor, I pre-positioned the steps to insure I didn't need to sand or shape them anymore after repairing them with fiberglass. Everything looked good, so I reinstalled the metal brackets on the steps, that hold them in the boat. Then I placed them back in the boat and taped the floor and sides just outside of where I'd caulk the steps in. I also taped the steps before placing a bead of caulk around the edges of the step. Then carefully I placed the steps in position, attached the brackets to the sides of the cockpit, and finished caulking around the corners. Colby

IMG_3425.jpg


Mostly finished

IMG_3426.jpg
 
Heat gun on the hoses helps quite a bit. Don't want to use it if there are gas fumes about though.

Wish I would of thought of that then. :o (The tank was completely dry inside, and I had cleared all the vapors out...I had used my shop vac with the hose placed in the outflow, and then attached it to one of the two tank fill fittings. Ran it for a while until no more gas smell!) Colby
 
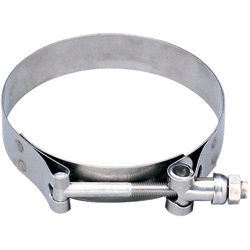
Great job. Posting the photos really helps other folks. Also note that Colby has double clamped the fuel hoses properly. Although most of use the spiral perforated band hose clamps, there are better ones. Although the bands are 316 stainless steel, the worm gear or worm gear case may not be. Also the "T" bar type are better:

hose-clamp-T-bolt.jpg


All hose clamps should be 316 SS, not 304 (which many are). There is also a Pinch type of hose clamp with ears. I have not used those on boats, because they are not reusable and can be difficult to remove. A fitting which may need to be changed, such as a water pump, is often has quick release fittings, so that the hose does not need to be reclamped with each change of the pump. I also use quick connect electrical fittings on the fresh water pump. (they always seem to go out when the wife is in the shower!).


A couple of other tricks in getting tight fitting hoses on a hose barb or other fitting is to heat a container of water and dip the end of the hose into the water to heat it evenly. Put a small amount of liquid soap around the lip of the fitting the hose is being clamped to before pushing the warmed hose over it.

In fittings which seem to leak or pull off no matter what you do, is to coat the outside of the fitting with Permatex "Form-A_Gasket #2, non hardening". (If dealing with gasoline hoses, the #3 Aviation is even better.) This will remain pliable, but seal the hose to the fitting. (Wear gloves, the Permagasket takes a lot of solvents and scrubbing to get all off your skin.)

One point, however in case someone does not know the risks:
..I had used my shop vac with the hose placed in the outflow, and then attached it to one of the two tank fill fittings. Ran it for a while until no more gas smell!) Colby

If there any residual fumes, a shop vac is not ignition protected. There a few cases where a shop vac ignited "fumes", with disastrous results.
 
If there any residual fumes, a shop vac is not ignition protected. There a few cases where a shop vac ignited "fumes", with disastrous results.

I thought about that later. However I did have the shop vac a good distance from the open fill connector on the other side of the tank, and while everything was in the garage, the big garage door was open. The tank was completely empty of fuel, but still had fumes, so I understand. Not making excuses or lite of gas fumes, but how many of us have our propane grills on our boats, near the fuel tank vents? (If they are on the cockpit of the boat somewhere, they are near the fuel vent...)

Regarding the hose clamps, I probably should have replaced them. Too late now, but except one, they all appeared in pretty good shape, and all were SS 316. I did replace one, that broke as I was (likely over) tightening it. I agree those T-bar type would have been an improved replacement. I learn as I accomplish feats. Learned quite a bit while doing this job, and still learning for next time, which hopefully won't need to happen! :) Colby
 
Yes, a shop vac is not ignition protected. However, if it is in "blow" mode and the motor is sufficiently removed from the source of potential fumes, I don't see this as a problem. Using the shop vac in "suck" mode is a different story.
 
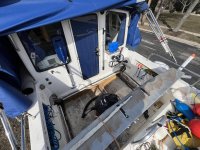
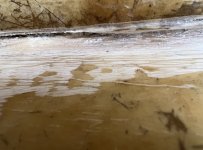
Well, hopefully this time will be a charm. I thought I had the water leakage stopped. And actually, for a good year I did. However, last October while cruising the Cumberland River we had a couple of days of downpour. Woke up the next morning, only to step into water as I crawled out of the V-Berth... :evil: Plan was to just keep towels under the step where it was apparently coming in. (Appeared to be coming in from under the shower stall again.) That and using a long stick to place a lot of caulk (3M 4000UV) in that area. However, I had done that before, and not really a cure since unable to really get in there to insure complete coverage! Anyway, mid 50's for temps here in Wisconsin in the middle of February, so decided to pull everything up again. Steps, floor, fuel tank... Looks like the area behind the head has some stress cracks, and a groove where my initial fiberglass ran out during cure.

IMG_0719.jpg

IMG_0714.jpg

IMG_0720.jpg

The rest of the fiberglass work seemed pretty solid. So this time I just put in a thick layer of 3M 4000UV along that seam and over the stress cracks.


IMG_0722.jpg

IMG_0723.jpg

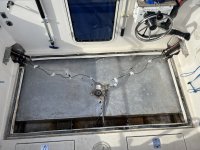
Replaced the fuel tank and finally the floor. Temps cooled off today, and we're heading out west for a few weeks, so I'll reseal it when we get home.

IMG_0732.jpg

Really hoping that's the last time I have to pull the steps, floor and tank. Colby
 
Thanks for bringing us up to date. I should have been more insistent when you did the first repair.

The only thing I would have done different would have been to use fiberglass tape and epoxy, mainly because this gives a better secondary bond. The boats all should have had mat, tape (cloth) mat/tape done before the gas tank was put in. Some do. All should have the mat/ tape on the cabin side. (I suspect that some don't all of the way around the hull part of this bulkhead,

The other item I did not mention, since you were past that point in the "repair"--is to run a fillet along the seam, so that the glass mat/cloth does not have to make a right angle turn--an item which often fails, and did so here. Also I like to make this type of repair with epoxy because of better bond adherence. Here is an article from "Epoxy Works" on fillets.

Mat has very little structural strength. It is used to smooth out rovings, and surfaces, plus filler giving strength to a repair where there is some form of "cloth"--either woven, or bundled fibers.

The article above treats fillets as a bond alone, but that is not adequate for a bond in a structural bulkhead--there traditionally it would be several layers of cloth and mat if an initial build with polyester. In this case I would try and find some fiberglass mat which is compatible with epoxy (the usual mat uses a binder which is soluble in styrene, and the polyester uses styrene, so the binder is dissolved. Not so with epoxy.)

I hate to say this Colby, but the "cure" you have done here will not be permanent--and has a very good chance of failing, since there is no structural strength here with a sealant. When you do the repair for the last time (who knows how long that will be), please use a grinder to give a good surface bond of at least 3" on each side of the fillet (bottom of boat and bulkhead) Put strips of at the very least 2 layers of at least 6 Oz cloth (one overlapping 2" on the bulkhead and boat bottom, and the second 3" overlapping on both bulkhead and bottom. We are going to be doing surgery on my Caracal Cat, and we will be using 1708 and epoxy for the fillets (I can no longer do the work--so a very good fiberglass technician will be doing the actual work). I will be documenting us of fillets, and proper bulkhead construction.

At the bottom of this photo album page is a series of photos from my album on making a fillet.

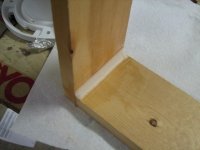
Here is the final demo fillet.

fillets_and_filler_036.sized.jpg
 
Time will tell. 4000 is flexible and I did grind some along that trouble spot. Odd that it’s just in that one area and not along the entire seam. If it doesn’t hold up it’s going to be a more major project that will need to be accomplished during the summer or in warmer climate…
 
Back
Top