journey on
New member
The C-Dory 25 has a couple of drainage issues. One of them is the 2 ea doors in the cockpit sole. They leak. Any time I wash the boat or it rains (something it rarely does in San Diego) I have a bunch of water in the bilge and it’s a bear to pump it out. So, when Bob/thataway mentioned that Innovative Products made a 12 x 26 which would cover the existing hatch, I ordered 2 ea, ASAP. They are $120 ea, but I’d suffered for more than a decade. The original post was Deck floor hatch seal 25 ft cruiser
The rest of this shows what it took to fit them. Note that this is a 2005, your boat may vary. If there are any questions, look at your C-Dory 25 and compare them to the pics. I didn’t take too many.
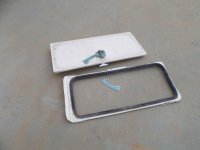
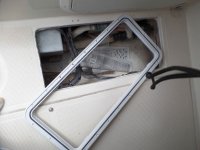
First, the easiest job was to remove the existing hatches, shown in Picture 1. Note that one wants to cover the old hinge holes, Picture 2. Also remove the metal latch, 2 screws removed from below, and un-clip the wire bundles running along the forward edge. Note that the deck may not be perfectly flat, mine wasn’t. Let us hope that doesn’t distort the new hatch so much it doesn’t seal.
Next, the cutout which was 10 1/2" x 24 1/4". That 10 ½ “ width fits inside the recess C-Dory made for their hatches and it will position the hatch so it covers the old screw holes. The 24 ½” dimension is longer that the recess, so I used the outboard end as a start and the inboard fell where it may, as shown in Picture 2. The rounded corners are 2 ¼ radius, neatly drawn by hand. The best way to cut the deck is a metal cutting blade in a jigsaw. However, Journey On has the corners of the holding tank just peeking out from the cutout edge. I used drywall cutting bits and a Dremel tool. After gouging the tank, I slipped a stainless sheet between the deck and tank to stop that nonsense. The Dremel also had a sanding tool which cleaned the edges up. Picture 1 shows the cutout material and Picture 2 shows the cutout itself. That was 75% of the job.
Then I removed some balsa (I tried for ¼ “ but got more,) filled the inboard end of the cutout with thickened epoxy. This wasn’t for sealing but to restore structural rigidity to the deck.
Laid the outer hatch in and marked the holes for #8 screws. Be careful, some holes fell right where the deck curved down for the old hatch. 22 holes for each hatch. That sucker will not come off or leak under the hatch with those screws and the 5200. Note that most holes are in resin, not balsa. Nevertheless, I’m going to seal the screws with 5200.
I checked with Innovative Product and they said that Saralon resin (a nylon, I think) was compatible with 5200, which I used.
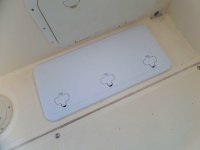
Finally, use masking tape around the hatch so the wet sealant doesn’t spread, lay the 5200 on the bottom of the lower piece and install all 44 screws. The finished product is shown in Picture 3.
Boris


