journey on
New member
This post is only intended to show how the instruments and autopilot were installed on Journey On. Hopefully it’ll give someone an idea on what they want to do (or not.) It's only an example, and I'd do it different next time ( I think.)
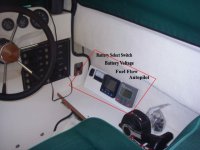
First is a view of a sub-panel I made up to hold additional instruments. The only real estate was on the outboard shelf as shown. Just enough room to hold the indicated instruments. I was too cheap to buy a $200 digital voltmeter with built in switch, so I used a cheap analog and separate switch for the two banks. All I need to know is if they’re charged, dead or somewhere in between.
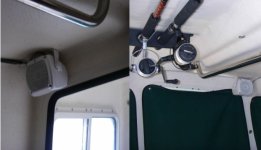
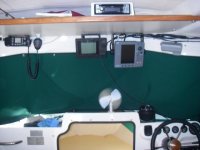
Next is where I added the BIG electronics: radar/chart plotter, radio, etc. They’re all overhead, so as to give a clear dash and view out of the forward windows, either underway or at anchor. The radar is only a 6.5”, which is what I could afford. Good thing, because it’s big enough to see and small enough to see around. The depth sounder and VHF radio is where the person in the port (commanders) seat can view/operate them. Judy is the radio operator because she’s the polite one, and also is great at telling me when the water isn’t deep enough. The music radio is overhead where it’s out of the way. You can also see (upper RH) where I’ve coiled the extra radar cable. Note the window covering is on the INSIDE of the window. Saves going out just to put the !@#$ cover on. That fan is a 12 VDC Calframo fan and can run all night for a couple of amp-hrs. I built a base for it so we can move it around. New blades available from West Marine. The magnetic compass is a nice one, but not used.
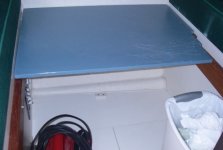
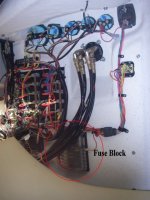
Last are 2 ea pictures of the autopilot installation. The first shows the plumbing manifold where the lines from the pump join the wheel pump. Note the circled fuse panel. After three years, just found out that this is a factory installed spare fuse panel, with plenty of spare space. It’s fed by a direct wire from the DC supply. Never claimed that I was the smartest guy to run a C-Dory. Also they forgot to put in a fuse for the aft cigarette lighter plug, which has now been fixed. This circuit also feeds the backlight for the AC panel. Did you know the AC panel has a backlight?
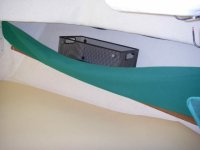
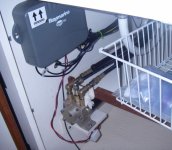
The second shows the pump installation. This is the best place as far as installing a pump goes, you can hear it working (just to check,) and the run from the controller is short. However, I’ve seen them installed next to the motor, which has a short plumbing run as well as in the v-berth, to minimize the bleeding effort. The lines from under the sink to the steering pump were a bear to bleed; now that it’s done I’m happy with the location.
The fluxgate is in the port footwell compartment, and I only put plastic in with it. Seems to work.
The Southern Boris
First is a view of a sub-panel I made up to hold additional instruments. The only real estate was on the outboard shelf as shown. Just enough room to hold the indicated instruments. I was too cheap to buy a $200 digital voltmeter with built in switch, so I used a cheap analog and separate switch for the two banks. All I need to know is if they’re charged, dead or somewhere in between.

Next is where I added the BIG electronics: radar/chart plotter, radio, etc. They’re all overhead, so as to give a clear dash and view out of the forward windows, either underway or at anchor. The radar is only a 6.5”, which is what I could afford. Good thing, because it’s big enough to see and small enough to see around. The depth sounder and VHF radio is where the person in the port (commanders) seat can view/operate them. Judy is the radio operator because she’s the polite one, and also is great at telling me when the water isn’t deep enough. The music radio is overhead where it’s out of the way. You can also see (upper RH) where I’ve coiled the extra radar cable. Note the window covering is on the INSIDE of the window. Saves going out just to put the !@#$ cover on. That fan is a 12 VDC Calframo fan and can run all night for a couple of amp-hrs. I built a base for it so we can move it around. New blades available from West Marine. The magnetic compass is a nice one, but not used.

Last are 2 ea pictures of the autopilot installation. The first shows the plumbing manifold where the lines from the pump join the wheel pump. Note the circled fuse panel. After three years, just found out that this is a factory installed spare fuse panel, with plenty of spare space. It’s fed by a direct wire from the DC supply. Never claimed that I was the smartest guy to run a C-Dory. Also they forgot to put in a fuse for the aft cigarette lighter plug, which has now been fixed. This circuit also feeds the backlight for the AC panel. Did you know the AC panel has a backlight?

The second shows the pump installation. This is the best place as far as installing a pump goes, you can hear it working (just to check,) and the run from the controller is short. However, I’ve seen them installed next to the motor, which has a short plumbing run as well as in the v-berth, to minimize the bleeding effort. The lines from under the sink to the steering pump were a bear to bleed; now that it’s done I’m happy with the location.

The fluxgate is in the port footwell compartment, and I only put plastic in with it. Seems to work.
The Southern Boris

