You are using an out of date browser. It may not display this or other websites correctly.
You should upgrade or use an alternative browser.
You should upgrade or use an alternative browser.
Best idea under $20
- Thread starter dogon dory
- Start date
dogon dory
New member
Sorry, Folks - Post Deleted By Author
Dan- Just responding to Don's comment about the "limitation" of using the hot water source when in salt water, and having some C-Brat style fun in doing so! Actually, the idea presented wouldn't cost a great deal, probably under $50, and maybe a lot less if you keep a "boat and home builders/experimenters supply" of fabricating materials like I do, to build things out of.
I save all kinds of usable stuff from which to make things without making a trip down to the local hardware store to see how little they have from which to build things. One of the things I miss the most about living in Redding instead of the S.F. Bay Area, is the lack of electronic and industrial surplus stores from which to shop and acquire useful fabrication goodies.
I'll bet you folks in Alaska intuitively understand and practice this "supply side" part the process of to keeping one's home, boat, car, motorhome, snowmobile, and whatever else repaired and working. Joe.
Problem is: Between my two big hounds runnin over my engine control cables, the southern sun's UV rays cookin'em and them black cables leavin nice black scuff marks in the well all the time.
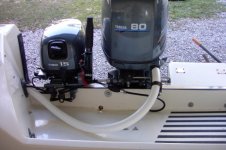
For a few dollars I got 4ft of way to heavy duty water jet tubing for a jacuzzi. This stuff is way too tuff. I had to use a sawzall to slit it open. Then it was all I could do to pry it open just enough to slip all inside with two big pry bars and not lose a finger. This stuff is crush proof. If I didn't use the same fuel line for the kicker I'd put it inside too.
To do over, I would recommend the nice blue stuff for swimming pool vacuumes. Much more flexable. If I did the photo right you might see it here. If not it's on page three.

Chris-
I've noticed the same problem and have had to have one side welded back up.
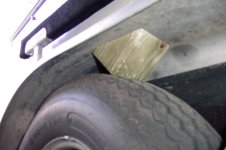
My solution was to run a 2" galvanized fence post accross the top of the fender and attach it with U-bolts to the fender in the middle (at three points) and on the ends to the vertical posts of the guide-ons. Use fence post end caps on the ends to dress it up and cover the sharp corners on the tubes. Then jump up and down on the fenders all you want. Bulletproof to over 300-400 lbs with galvanized steel fenders. Joe.
Hi Joe,
My rig came with a tweaked fender from previouse owners. I had to remove the fender and put a few wrestlin moves on it to twist/flex it way back past the normal shape. When let go it would relax back to normal. While not quite perfect it is hangin in there. It is only a matter of time before a heavy duty fix such as yours will be needed.
My rig came with a tweaked fender from previouse owners. I had to remove the fender and put a few wrestlin moves on it to twist/flex it way back past the normal shape. When let go it would relax back to normal. While not quite perfect it is hangin in there. It is only a matter of time before a heavy duty fix such as yours will be needed.
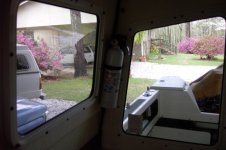
Sorry about the lighting: But if you remove the lower screw to the starboard outside grab rail, insert it thru the extinguisher center mount hole and re-install you have a very cheap mount with no new holes. I tried this on the port side but a slight curve in the cabin glass kept it from fitting. You might need to slightly enlarge the center hole.


(I'm adding this here as it came up in another discussion, but actually fits right into this thread.)
Getting into the boat from a dock with the stock set up ordinarily requires steping from the dock to the gunnel, then turning around and steping down backward onto the built-in step on the side of the hull, then onto the the hull floor, all the while holding onto the handrail at the side of the cabin and switching hands, very difficult to do while carrying things onboard.
I added a two-step plastic stool and a single horizontally mounted handle on either side of the rear facing lamp on the back of the cabin just below the roof and above the door to assist in getting in and out of the boat, as this set up allows you to step directly off the dock, over the gunnel, and onto the stool and directly into the cockpit. No hand switching or turning around required. The rails are about $15 each, and the stool about $8.
Those two handrails and the plastic Cosco two-step stool are more useful than some of the $500 additions I've made to the boat and save my knees and back a lot of grief and, at the same time, make boating more fun and allow for longer stays on the water. The stool also works as a make-shift seat once underway.
I also added a couple of smaller handholds (about $10 each) on the transom and in the engine well to assist in getting back into the boat when using the emergency fold down ladder at the port side of the transom. Sometimes the most valuable boat additions are the simplest and cheapest!!! Joe.
Just before we left on the Desolation Sound trip we added two small additions that really increased our sense of control and handling of our 25. I owe both of them to Shelley, as they were her idea. David on Anna Leigh has a level at the helm of his boat and Shelley thought that it would be a really good idea for getting the boat balanced out with the trim tabs. What a revelation it was to add the level. It became second nature to check it and level out the boat almost without thinking about it.
The second addition was a steering knob. It wasn't one of the fancy $100 boat accessories, but a tractor steering knob from the local John Deere dealer. I don't know how I lived without it on the boat when docking in close quarters. I was able to react so much faster that all dockings were made easier. Best small changes that I've made to the boat to date.
Lyle
Not For Hire
New member
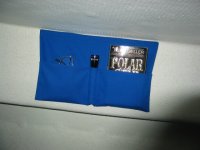
I wanted a shelf in the cuddy but figured I would clumsily kick anything installed in there. I added two fabric pockets, like in tents to hold eyeglasses. flashlight, paperback book, etc. I made an ugly prototype and then wife, Mary, took pity on me and helped make these pockets.

Well not sure how to insert the picture but it is on page 3 of Boat and Modifications in the Not For Hire album.
Edited by Da Nag - image fixed.

Well not sure how to insert the picture but it is on page 3 of Boat and Modifications in the Not For Hire album.
Edited by Da Nag - image fixed.
Rick from Maine
New member
Well Done, Mark,
How did you attach it to the hull?
Rick from Maine
How did you attach it to the hull?
Rick from Maine
Not For Hire
New member
Thanks Rick, -- Velcro.
Fold the material double to size you want. Then you stitch around edge leaving a gap in the stitching of 1 1/2 inches m/l. Turn inside out to hide the seams. Then fold one side up to make the pockets and top stitch in place. The flashlight pocket in the middle keeps it from being too floppy. I stitched a piece of velcro to the back top edge of the pocket, then I put a piece of the adhesive backed velcro onto the hull. I made one for each bunk.
Love to visit ME someday.
Mark
Rick from Maine
New member
Thanks, Mark.
Now if I can get Carol to sew some for us, we'll have some handy dandy holders in the V-Berth area, too.
It's a 2 day trailer trip to ME, and it's worth it. We have some wonderful shelterd river/ocean cruising grounds. If you ever are coming this way, let me know and I can help you with cruising guides and charts.
Or maybe Hunky Dory can cruise alongside you, if you'd like company.
Rick from Maine
Now this is well below $20.
I can never remember the voltages that indicate battery conditions, so one day while surfing "The 12 volt side of life" I happened upon this neat little gif file:

Printed it out (right click, then select "print picture"), took some clear packing tape and "laminated" it, then stuck it to the underside of the lazarette lid with a little silicon adhesive. Definitely a "quick and dirty" laminate/paste job, but it's lasted almost a year so far. Now, all I need to do is check with the voltmeter and this non-volatile memory and voila, instant battery condition. Version 2 will have it officially laminated and centered, but it'll still be a pretty cheap mod. Ended up like this:

Don
I can never remember the voltages that indicate battery conditions, so one day while surfing "The 12 volt side of life" I happened upon this neat little gif file:

Printed it out (right click, then select "print picture"), took some clear packing tape and "laminated" it, then stuck it to the underside of the lazarette lid with a little silicon adhesive. Definitely a "quick and dirty" laminate/paste job, but it's lasted almost a year so far. Now, all I need to do is check with the voltmeter and this non-volatile memory and voila, instant battery condition. Version 2 will have it officially laminated and centered, but it'll still be a pretty cheap mod. Ended up like this:

Don
I've become addicted to a simple product that most folks aren't aware of - velcro rolls. The stuff is sold like a big roll of tape...the hook is on one side of the material, the loop on the other so it sticks to itself. But being in a bulk roll, you aren't limited by size - cut it as big/small as you want.
We first started using it at work for LAN cabling a couple years ago, but I quickly started using it everywhere. Great for wire bundles, holding rods together, securing your bimini top, or anything else you want to wrap up tight and be able to undo later. With a couple exceptions, it's replaced tie wraps for most things I secure.
Here's a 1/2" x 75' roll for $18.
computer-rooter
New member
How about a free scrap of flat strap to lash down the kicker's tiller in a mostly forward direction? Then I drop the main motor and use it for a rudder to steer from the cabin without the tedium or expense of linking the two engines together. I do a lot of putting on the kicker at 8mpg/5.5mph rather than 2mpg/anyspeed on the main motor. So this solution puts $$ back in my pocket every time I use it, increasing my range and comfort as I go.
Situation:
I wanted to have a knife readily available. In an emergency situation I may have to cut my anchor rope in a hurry. I also had the need to have another knife and pliars available in the cockpit for bleeding fish and removing hooks.
Observation:
There are snaps located throughout the cabin and cockpit.
Solution:
I put reciprocating snaps on the sheaths of my knives and pliars. Why didn't I think of this before?
damn fine idea Larry.
I left $5 at the local home supply store today. I purchased a 1 1/8" utility cam lock and installed in the door just below the door holder open catch. It fits good and works good, I'll feel a little better about leaving things in the boat now. The factory lock just didn't instill much confidence
I left $5 at the local home supply store today. I purchased a 1 1/8" utility cam lock and installed in the door just below the door holder open catch. It fits good and works good, I'll feel a little better about leaving things in the boat now. The factory lock just didn't instill much confidence
B~C- and Larry:
The utility cam lock idea is a good one , as is Larry's reciprocating snap fittings on tool sheaths to allow them to be snapped onto snaps intended for canvas covers.
I'm going to follow your lead, Ken, with the utility lock.
I'll also convert over the wood screws and self tapping screws that came with the boat on the hinges to through bolted machine screwswith double nuts that can't be removed from the outside.
Otherwise, the door lock, whatever it is, is a moot issue, as a simple Phillips screwdriver can remove one side of the hinges, and the door simply lifted out.
Thanks,
Joe.

