Hi Dave,
Your boat is one of my favorites. I just love the red, the canvas color, the engines...all of it. If I could clone one existing 22 for my own boat, I think it would be Sea Shift :thup
My boat was made in Kent too, which is something I wanted, if possible. However, I realized that would be no guarantee of anything (it was more because there are some features on the "older" boats that I prefer), so I looked for one that had been used as little as possible and stored indoors. I knew in advance that I'd want to be improving the core protection, and I wanted a good chance of not having to do too much re-coring (BTDT on other boats :cry)
Anyway, I don't think your solution would have worked for me (unless I am misunderstanding it, which is entirely possible), and what I did was actually not very hard. Let me see if I can explain better than I did before:
1) The hole through the topsides of my boat was through solid fiberglass only, right from the inside of the boat to the outside. I could see the whole hole. So there was no chance for "interleakage" from what I could see.
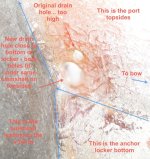
2) However, said hole was 1" above the bottom of the anchor locker. So while it would drain just fine to a point, it could also leave 1" of water/mud/salt in the bottom of the locker. My boat's anchor locker had never been used, from what I can see, and the boat was stored indoors, so this had not happened... yet. But I plan to anchor as often as I can, so if my anchor locker is going to have a drain, I want it to drain the whole locker, not just the top 7/8 of it.
I had considered a nice solution I had seen on C-Brats, which was to use a tank vent in the hole, which has a spigot to line the hole; but after looking more closely at my particular boat, I could see that wouldn't have helped since the problem was just that the hole was too high, not that there was an internal gap that needed bridging.
Thus I obtained a slightly larger clamshell (matches the old one but about 50% larger), and I mocked it up in place to see what it would "allow" me to do (without any extra cosmetic hassle). As it turned out, I could not only cover up the original hole, and two of the original clamshell fastener holes (I'm using the third one over again), but I could make a new hole at the bottom of the locker, and that hole would also be within the new clamshell.
So that's what I did. I am reusing the "apex" fastener hole on the new clamshell. One of the disused ones will be under the flange of the new clamshell, so I have filled that with thickened epoxy; and the third one was subsumed by the new drain hole.
The new drain hole also only goes through solid fiberglass. So I will chamfer the new hole, then coat the inside with neat epoxy just to "extra" seal it (although the fiberglass already looks well wetted out from the original construction, with no dry fibers or etc.). After that I will drill two new holes for the new clamshell fasteners, chamfer them slightly, and then bed and fasten the new clamshell in place.
Originally I had figured I'd be filling the original drain hole with thickened epoxy, but as it falls under the "dome" of the new clamshell, I realized there would be no need, as all it can really do is drain the locker faster if there is more water in it. Since they are both small, machined holes, there is no structural worry.
But I still wanted to understand what other people were experiencing with the "liner," to make sure I wasn't missing something.
I hope I explained more clearly this time. I sometimes worry about being too wordy, for fear of sending people running and screaming, so I cut back -- but then maybe it's not worth it as it makes things harder to understand. I think I will start a thread for my boat, and then I'll put in some photos which will probably be worth 1,000 words

Having just removed the transom drain tube (which was one of my #1 "I've got to dig into this" items), I'm extra-motivated.
Thanks for your input, and again, love your boat :thup
Sunbeam :hot


