
Search results
-
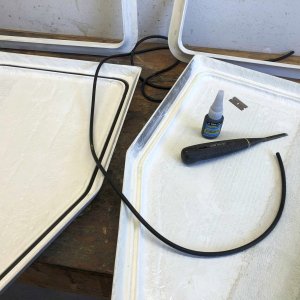
Here the o-ring material is being inserted (friction fit) into the channel. The o-ring material is .250" Buna-N 70 O-Ring Cord Stock, from theoringstore.com. The glue is Vibra-Tite 388 Super Glue (specifically for gluing rubber) from Amazon. I used the chisel to make clean out the channel and ensure it was fit to hold the o-ring. The reinforced area (extra later of fiberglass) alongside the long side of the lid is where two latches will be installed. Next up - build the lockers!
Here the o-ring material is being inserted (friction fit) into the channel. The o-ring material is .250" Buna-N 70 O-Ring Cord Stock, from theoringstore.com. The glue is Vibra-Tite 388 Super Glue (specifically for gluing rubber) from Amazon. I used the chisel to make clean out the channel and...- pcg
- Media item
- Comments: 0
- Album: Modification- Propane lockers
- Category: Propane lockers
-
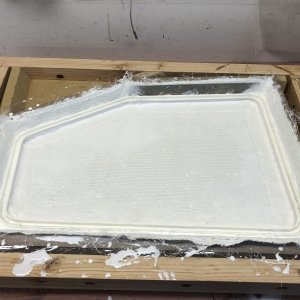
Here the mold has been layed up with fiberglass, the o-ring channel has been inserted, and a strip of stainless steel has been inserted as backing for hinges. Also note that the whole assembly is resting in a box. This was done so that a jig could be clamped to the top edges of the box. This jig has strips of MDF on it that were tied directly to the o-ring channel with monofilament line, to ensure the the o-ring channel was positioned exactly flat, with respect to the top of the lid. The monofilament line was then simply cut to remove the jig once the epoxy was cured. Sorry I neglected to photograph this step.
Here the mold has been layed up with fiberglass, the o-ring channel has been inserted, and a strip of stainless steel has been inserted as backing for hinges. Also note that the whole assembly is resting in a box. This was done so that a jig could be clamped to the top edges of the box. This jig...- pcg
- Media item
- Comments: 0
- Album: Modification- Propane lockers
- Category: Propane lockers
-
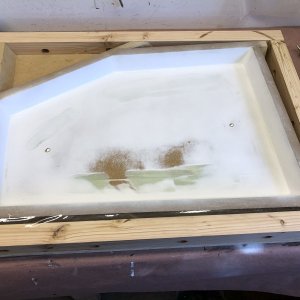
The mold for the port lid top is ready for laying up with 1708 and epoxy. There are several 1/2" holes in the bottom of this mold which are filled with wax. This gives a means to tap on the back of the mold with a 1/2" dowel to help pop the part free.
The mold for the port lid top is ready for laying up with 1708 and epoxy. There are several 1/2" holes in the bottom of this mold which are filled with wax. This gives a means to tap on the back of the mold with a 1/2" dowel to help pop the part free.- pcg
- Media item
- Comments: 0
- Album: Modification- Propane lockers
- Category: Propane lockers
-
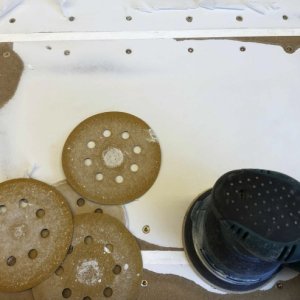
After three dyas of curing I sanded the top of the channel smooth. I had pre-drilled small holes under the edges of the channel, on on each of the five sides, and filled them with wax. This allowed me to insert the flat end of a drill bit and tap on theh channel to help pop it from the mold.
After three dyas of curing I sanded the top of the channel smooth. I had pre-drilled small holes under the edges of the channel, on on each of the five sides, and filled them with wax. This allowed me to insert the flat end of a drill bit and tap on theh channel to help pop it from the mold.- pcg
- Media item
- Comments: 0
- Album: Modification- Propane lockers
- Category: Propane lockers
-
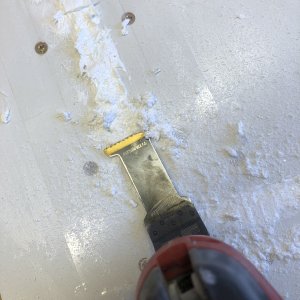
One day later I used a multitool to remove most of the excess epoxy.
One day later I used a multitool to remove most of the excess epoxy.- pcg
- Media item
- Comments: 0
- Album: Modification- Propane lockers
- Category: Propane lockers
-
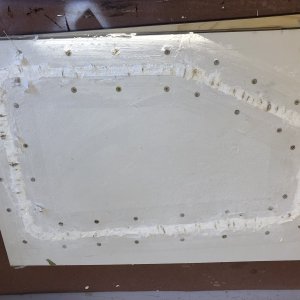
Epoxy is poured and curing.
Epoxy is poured and curing.- pcg
- Media item
- Comments: 0
- Album: Modification- Propane lockers
- Category: Propane lockers
-

Here the three molds for the port channel are in place and screwed down to the plywood base.
Here the three molds for the port channel are in place and screwed down to the plywood base.- pcg
- Media item
- Comments: 0
- Album: Modification- Propane lockers
- Category: Propane lockers
-
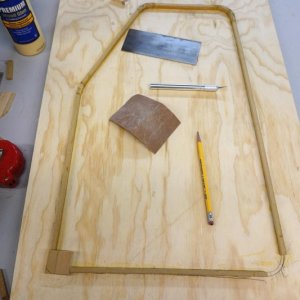
I then glued 1/4" wide MDF strips to a base of flat plywood. This will be the "opening" that holds the 1/4" o-ring.
I then glued 1/4" wide MDF strips to a base of flat plywood. This will be the "opening" that holds the 1/4" o-ring.- pcg
- Media item
- Comments: 0
- Album: Modification- Propane lockers
- Category: Propane lockers
-

Although I had a CAD design for the channel, I decided to not use it and trace off the rim of the lid base instead, to compensate for any way in which the finished base deviated from the CAD design, since proper fit would be critical.
Although I had a CAD design for the channel, I decided to not use it and trace off the rim of the lid base instead, to compensate for any way in which the finished base deviated from the CAD design, since proper fit would be critical.- pcg
- Media item
- Comments: 0
- Album: Modification- Propane lockers
- Category: Propane lockers
-
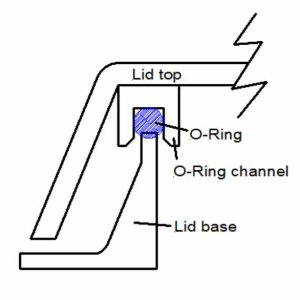
Once I knew space could be made to hold everything. I jumped ahead to the most difficult part of the project - building a gas-tight hatch closure. I wanted to do this first because if it proved not doable then I would go back to plan B which was to use smaller propane bottles and a smaller off-the-shelf sealed hatch, like the newer 22s have.I designed the locker lids on a CAD system. Each lid (port and starboard) was built as three separate components. The lid top and the o-ring channelwere then epoxied together. The lid base will be fiberglassed into the top of the hatch and the top will be secured with hinges and latches.
Once I knew space could be made to hold everything. I jumped ahead to the most difficult part of the project - building a gas-tight hatch closure. I wanted to do this first because if it proved not doable then I would go back to plan B which was to use smaller propane bottles and a smaller...- pcg
- Media item
- Comments: 0
- Album: Modification- Propane lockers
- Category: Propane lockers
-
P
horns and hailers
They're the FIAMM 72112 Freeway Blaster LOW Note Horn and the FIAMM 72102 Freeway Blaster HIGH Note Horn. You'll need to add a relay of course. Yes, they're plastic, but I'll mount them under the brow to shield from UV. My experience with these has been very favorable...- pcg
- Post #12
- Forum: Boating Safety
-
P
horns and hailers
Thanks all! Based on everyone's suggestions I ordered the ICOM 40W hailer/speaker ($67 on Amazon) so I can have the ability to hail should I feel the need, and hopefully the fog horn feature from the ICOM VHF wil be adequate when played though the speaker. I also want to be able to quickly hit...- pcg
- Post #11
- Forum: Boating Safety
-
P
Anyone on San Juan Island that can help me look at a boat?
Congratulations!- pcg
- Post #8
- Forum: General Chat
-
P
horns and hailers
My only experience with a boat horn is with one of those little handheld air horns which we carried in our 16' Skagit and never used. Now I'm in the process of restoring a 22' C-Dory and am trying to decide if I want a fog/hailer speaker or horn or both. I've purchased an ICOM IC-510BB VHF that...- pcg
- Thread
- Replies: 12
- Forum: Boating Safety
-
P
Enclosing Anchor Locker in 22 Cruiser
I'm in the process of enclosing my anchor locker with a hatch. See my album entitled Anchor Locker for the only photo I have so far. My boat work is on hold for another month while I tend to other projects, but the photo should give you a general idea of what I'm doing. I cut a frame out of 1/8"... -
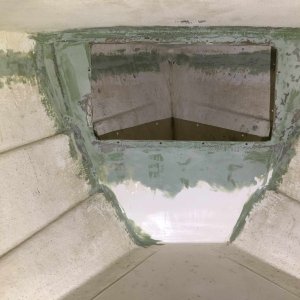
The green TotalBoat fairing compund looks ugly now, but it wil be fine when all is painted. This modification was made so that a Tempress 1323 cam latch hatch can be installed to close off the anchor locker.
The green TotalBoat fairing compund looks ugly now, but it wil be fine when all is painted. This modification was made so that a Tempress 1323 cam latch hatch can be installed to close off the anchor locker.- pcg
- Media item
- Comments: 0
- Album: Modification - anchor locker
- Category: Anchor locker hatch
-
P
CORE REPLACEMENT - RESIN PRODUCT RECOMMENDATIONS
I replaced some of the core in my cabin floor (see my album entitled Hull Repair). Prior to doing this I also spent hours poring over the Boatworks Today videos and eventually hired Andy to advise me as my project involves structural and cosmetic repairs, as well as modifications including...- pcg
- Post #2
- Forum: General Chat
-
P
how high is "hightop"
Hom much higher is the center section of the roof on a 22' Cruiser with the high top option?- pcg
- Thread
- Replies: 2
- Forum: Cabin, Interior
