
Search results
-
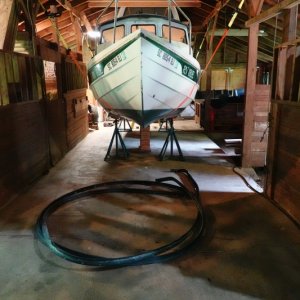
Rub rail removal. That big coil on the ground is the old rub rail. It was still functional, but ugly. It went to the landfill.
Rub rail removal. That big coil on the ground is the old rub rail. It was still functional, but ugly. It went to the landfill.- pcg
- Media item
- Comments: 0
- Album: Repair - Rub rail replacement
- Category: Exterior cosmetic repair
-
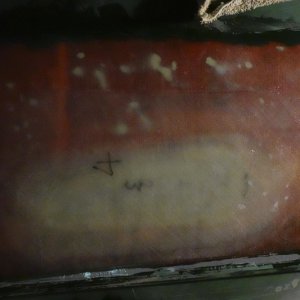
Removing the flat spot
I sanded the paint off the patch and surrounding area and built up the area with epoxy resin and four layers of 1708 until the contour of the patch matched the surrounding area of the hull.- pcg
- Media item
- Comments: 0
- Album: Repair - Hull damage
- Category: Hull repair and bottom paint
-
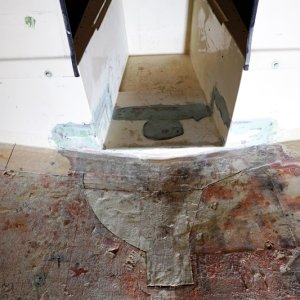
Section of bulkhead has been replaced. The light green substance is fairing compound that was laid over the fiberglass. Next up, lay down a new fiberglass top skin on the cabin floor!
Section of bulkhead has been replaced. The light green substance is fairing compound that was laid over the fiberglass. Next up, lay down a new fiberglass top skin on the cabin floor!- pcg
- Media item
- Comments: 0
- Album: Repair - Hull damage
- Category: Hull repair and bottom paint
-
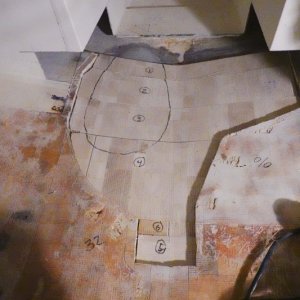
First layer of new balsa core in place.
I used two layers of 3/4" balsa core to match the original 1-1/2" core.- pcg
- Media item
- Comments: 0
- Album: Repair - Hull damage
- Category: Hull repair and bottom paint
-
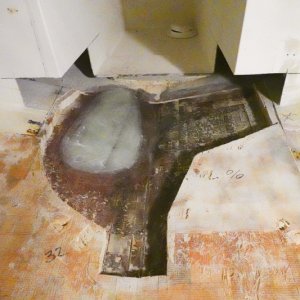
Five more layers of 1708 and epoxy resin and fiberglass repair is finished.
Five more layers of 1708 and epoxy resin and fiberglass repair is finished.- pcg
- Media item
- Comments: 0
- Album: Repair - Hull damage
- Category: Hull repair and bottom paint
-
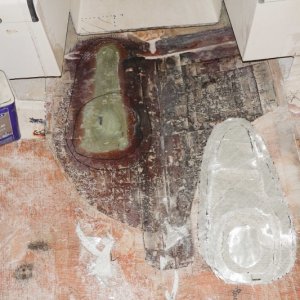
Here I've removed the original fiberglass patch and sanded down to the epoxy layers I laid from the bottom. The area has been painted with epoxy resin in preparation for new layers of fiberglass to go on top. Also note at this point I pulled the entire floor up because I found unacceptably high moisture readings everywhere. The remainder of the balsa core appeared sound and didn't feel wet. After just 24 hours the moisture meter read 0% moisture everywhere.
Here I've removed the original fiberglass patch and sanded down to the epoxy layers I laid from the bottom. The area has been painted with epoxy resin in preparation for new layers of fiberglass to go on top. Also note at this point I pulled the entire floor up because I found unacceptably high...- pcg
- Media item
- Comments: 0
- Album: Repair - Hull damage
- Category: Hull repair and bottom paint
-
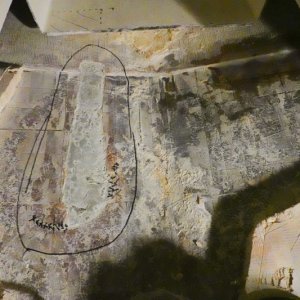
More core and old foam repair have been removed, exposing the original shoddy fiberglass repair, which now has four new layers of fiberglass underneath it.
More core and old foam repair have been removed, exposing the original shoddy fiberglass repair, which now has four new layers of fiberglass underneath it.- pcg
- Media item
- Comments: 0
- Album: Repair - Hull damage
- Category: Hull repair and bottom paint
-
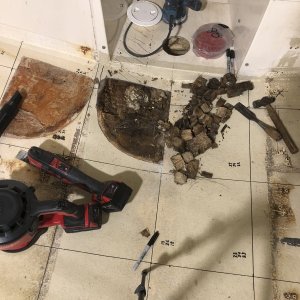
Sure enough I found wet rotted core directly above the patch on the hull. Whoever did the repair just fiberglassed over core damage and called it good!
Sure enough I found wet rotted core directly above the patch on the hull. Whoever did the repair just fiberglassed over core damage and called it good!- pcg
- Media item
- Comments: 0
- Album: Repair - Hull damage
- Category: Hull repair and bottom paint
-
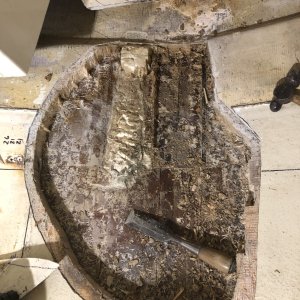
After I removed some wet rotted balsa core I discovered they had actually removed some of the damaged core and squirted in some of that expanding foam insulation to "repair" the damage! (Note that I had to remove some of the cabin bulwark to give access to the repair area.)
After I removed some wet rotted balsa core I discovered they had actually removed some of the damaged core and squirted in some of that expanding foam insulation to "repair" the damage! (Note that I had to remove some of the cabin bulwark to give access to the repair area.)- pcg
- Media item
- Comments: 0
- Album: Repair - Hull damage
- Category: Hull repair and bottom paint
-
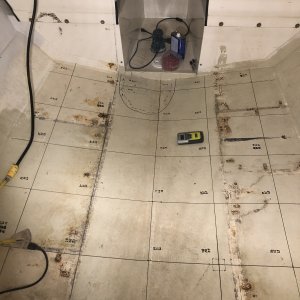
I wasn't comfortable with what might be on the other side of that patch in the hull so that area will be opened up and removed. I also went over the floor with a moisture meter.
I wasn't comfortable with what might be on the other side of that patch in the hull so that area will be opened up and removed. I also went over the floor with a moisture meter.- pcg
- Media item
- Comments: 0
- Album: Repair - Hull damage
- Category: Hull repair and bottom paint
-
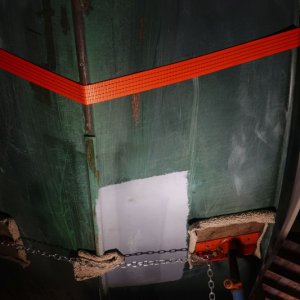
There was a painted section on the bottom of the hull that appeared "flat" - meaning it didn't follow the contour of the surrounding fiberglass. It just looked like a shoddy repair to me and I couldn't live with that.
There was a painted section on the bottom of the hull that appeared "flat" - meaning it didn't follow the contour of the surrounding fiberglass. It just looked like a shoddy repair to me and I couldn't live with that.- pcg
- Media item
- Comments: 0
- Album: Repair - Hull damage
- Category: Hull repair and bottom paint
-
P
Ideal wiper setup
I’m looking for your opinions on what the ideal window wiper setup on a 22’ Cruiser would be. The new 22 I saw at the Portland Boat Show today has electric pantograph wiper blades mounted at the top of the windows. My ‘99 came with manual wipers mounted at the bottom of the windows. As part of...- pcg
- Thread
- Replies: 9
- Forum: Hull, Deck and Fittings
-
P
Looking for negative feedback on my helm design
Yes, and cameras too. We get lots of cold rainy days in the PNW and when camera lenses get cold they fog up. Lots of uses for a little 800W hair dryer. Yes, laptops, and also chargers for cordless tool batteries.- pcg
- Post #17
- Forum: Electronics
-
P
Looking for negative feedback on my helm design
Thank you for the kind words Bob. I still have my trusty K&E slide rule (kids today don't know what they're missing), but it never saw work anywhere near like what you father did with his. That's impressive! You should be able to zoom in for better detail. If viewing on a desktop, there should...- pcg
- Post #16
- Forum: Electronics
-
P
Looking for negative feedback on my helm design
Well I thought it would be helpful to post a schematic of my power circuitry, but there are a couple problems with this. The jpeg my CAD system creates gets re-sized by this website, making it too blurry to read. My workaround was to make a pdf file, which is much smaller, but this website...- pcg
- Post #13
- Forum: Electronics
-
P
Looking for negative feedback on my helm design
The small 1000W inverter is located under the starboard berth. Nothing critical will be powered by the inverter. It’s there primarily as a convenience for any portable battery chargers that require 120VAC, as well as a small hair dryer that can be used to dry things out. Thus it is not switched...- pcg
- Post #12
- Forum: Electronics
-
P
Looking for negative feedback on my helm design
Here's a link to a pdf (jpeg was too large) of my power schematic. It shows all proposed electrical wiring on the boat except individual fused DC circuits. If you're on a desktop you can use the little "+" icon in the upper right to zoom in. If you're on a cell phone just zoom with your...- pcg
- Post #11
- Forum: Electronics
-
P
Looking for negative feedback on my helm design
This switch needs to be at the helm in the event of a LiFePO4 house battery shutdown. It switches the house loads between the house battery and the start battery. The cables coming from the batteries to this switch are AWG 2 and fused for 60A. This is far more capacity than is typically needed...- pcg
- Post #8
- Forum: Electronics
-
P
Looking for negative feedback on my helm design
What are you referring to as crucial controls. Isn’t the switch panel in the photo the standard location used for all C-Dory Cruisers? I will be redesigning (fiberglass work) the helm area, but I’m planning on putting critical switches (horn, wipers) in the same general area. Yes, I apologize...- pcg
- Post #6
- Forum: Electronics
-
P
Looking for negative feedback on my helm design
Here's a link to a hi-res jpeg drawing of my helm design. If you're on a desktop you can use the little "+" icon in the upper right to zoom in. If you're on a cell phone just zoom with your fingers... https://www.dropbox.com/scl/fi/o1qdsn4h ... zb3to&dl=0- pcg
- Post #5
- Forum: Electronics