| View previous topic :: View next topic |
| Author |
Message |
clayhubler
Joined: 03 Aug 2019
Posts: 382
City/Region: La Center
State or Province: WA
C-Dory Year: 2003
C-Dory Model: 22 Cruiser
Vessel Name: Hammerhead
Photos: Merlin and Hammerhead
|
 Posted: Mon May 12, 2025 9:11 pm Post subject: Posted: Mon May 12, 2025 9:11 pm Post subject: |
 |
|
One thing to keep in mind if you repair only the transom first is that there is no resin or epoxy barrier between the hull coring and the transom coring. So if you repair the transom, but the hull is still soggy and wet, its going to get the new transom coring wet unless youre careful to seal it with epoxy when you are working on it. And unfortunately that probably means the hull coring is wet also.
I would probably do the repair from the inside because you dont have to worry about making a perfect aesthetic repair and thats how I did mine. But I didnt have to repair mine above the splash well so Im not sure the best way to go about that. Might actually be easier to do it on the outside. It is not easy working under the splash well. You could cut the entire back skin off and grind the backside of it and glue it back on with the new coring behind. I think I saw Andy on Boatworks Today do that.
Ive not worked with Coosa board before, but I would consider it.
_________________
Clay
Hammerhead
2003 22 Cruiser
Merlin
1986 26 Cruiser
 |
|
| Back to top |
|
 |
thataway
Joined: 02 Nov 2003
Posts: 21549
City/Region: Pensacola
State or Province: FL
C-Dory Year: 2007
C-Dory Model: 25 Cruiser
Vessel Name: thataway
Photos: Thataway
|
| Posted: Mon May 12, 2025 11:45 pm Post subject: |
|
|
There is "Sea Cast" pourable material. Nida pour used to be available--not sure if it still is. Coosa, or Penske board (Baltek AIREX PXc foam board today) I like to rebuild with epoxy resin if not in the open--even if the back of the transom is pulled and core replaced from outside, I use Epoxy on the inside, and "glueing the old transom to the new core. But on the outside, when making the hull to transom (3" shelf is left around the transom when the aft outer surface is removed, and the old transom is also taper ground to get the strength back to the outer layer I use vinyl Ester or polyester resin. That is then sounded flush, and gelcoated to match the rest of the transom.
Although a chain saw is traditionally used to remove all of the core when outside and inside of the transom is retained, recently we used a 1 1/2" spade bit on a 25" extension (started with 14" shank and when that was done, went to a 25" extension.). Don't pour epoxy or polyester resins with fillers. They will get way too hot as they catalyze.
_________________
Bob Austin
Thataway
Thataway (Ex Seaweed) 2007 25 C Dory May 2018 to Oct. 2021
Thisaway 2006 22' CDory November 2011 to May 2018
Caracal 18 140 Suzuki 2007 to present
Thataway TomCat 255 150 Suzukis June 2006 thru August 2011
C Pelican; 1992, 22 Cruiser, 2002 thru 2006
Frequent Sea; 2003 C D 25, 2007 thru 2009
KA6PKB
Home port: Pensacola FL |
|
| Back to top |
|
|
Ctarmigan
Joined: 14 Nov 2019
Posts: 54
City/Region: Whitehorse
State or Province: YT
C-Dory Year: 2004
C-Dory Model: 22 Cruiser
Vessel Name: Ptarmigan
Photos: Ptarmigan
|
| Posted: Tue May 13, 2025 2:02 pm Post subject: |
|
|
I've followed up with a call to SeaCast, to examine this option more thoroughly also. They're somewhat incredulous that the entire transom is not cored.
Perhaps I'm wrong; my understanding (before drilling any holes) is that the transom core in my boat is a 60" wide, 20" deep rectangle, which more or less corresponds with the transom cutout. The volume of the core is visible as the thicker area below the splashwell. The transom behind and below the lazarettes is not cored.

Before I start making confirmatory test holes, I'll check with the group. |
|
| Back to top |
|
|
thataway
Joined: 02 Nov 2003
Posts: 21549
City/Region: Pensacola
State or Province: FL
C-Dory Year: 2007
C-Dory Model: 25 Cruiser
Vessel Name: thataway
Photos: Thataway
|
| Posted: Tue May 13, 2025 2:27 pm Post subject: |
|
|
I cannot speak to the various years of C Dory 22's. But the my C 2003 C Dory 25, had about what you described. As I recollect it did go down further. However I was amazed that it did not go all of the way to the sides of the transom. The core in the 25 was OK, but we had some issues as documented in my Album. I added several layers if 1708 with epoxy to take more of the load distributed out into the spashwell and down onto the bottom.
On the 2007 25 there was a space between the lamination of the spashwell, and the hull/transom. The bolts and even a plate on the inside had crushed the splashwell. This was discovered at the time of sale of the boat. I had not noted any issue, but the new owner brought it to my attention after he had taken it on several trips. (The boat was left at my home for over a year after purchase, and the buyer flew to Pensacola and used the Boat along the Gulf Coast and Eastern Sea Board.
I cleaned out the old bolt holes, then over drilled them, and put in glass and epoxy plugs into the transom. I also filled the space and about 3" in diameter around where the boat holes were, with solid 1708 circles. Then I made larger plates and used them under the motor bolts. |
|
| Back to top |
|
|
clayhubler
Joined: 03 Aug 2019
Posts: 382
City/Region: La Center
State or Province: WA
C-Dory Year: 2003
C-Dory Model: 22 Cruiser
Vessel Name: Hammerhead
Photos: Merlin and Hammerhead
|
| Posted: Tue May 13, 2025 2:34 pm Post subject: |
|
|
| My 2003 had exactly what your illustration shows |
|
| Back to top |
|
|
Ctarmigan
Joined: 14 Nov 2019
Posts: 54
City/Region: Whitehorse
State or Province: YT
C-Dory Year: 2004
C-Dory Model: 22 Cruiser
Vessel Name: Ptarmigan
Photos: Ptarmigan
|
| Posted: Thu May 29, 2025 7:30 pm Post subject: |
|
|
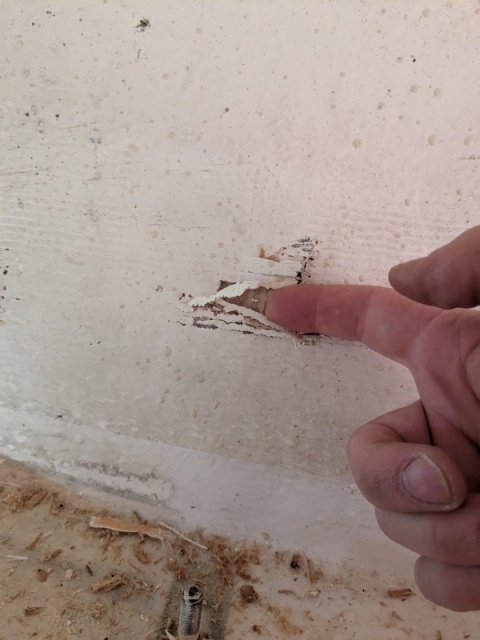
Work is progressing. I'm removing balsa core via the open top of the transom, and while its tedious it's not impossible. The advice on a spade bit was good; that's been a helpful tool. A few DIY pry-bar/chisel tools have also been helpful.
The sole setback; I managed in a couple of cases to punch through the inner transom skin below the splashwell with the spade bit. The skin here is surprisingly thin - I'd estimate 2-3mm - and therefore more delicate than I'd anticipated.
I'm forming a plan for recoring, based on my forecast abilities and accessible materials. I'm looking to remove all transom core, and replace with CarbonBond pourable transom compound (formerly NidaBond).
A discussion with one of their techs suggested that moderate prep of the transom skins would lead to a solid bond between CarbonBond and transom fiberglass (recommended sand and wash with alcohol, with a few remaining balsa fibers acceptable). The tech didn't have undue concern about the meeting of CarbonBond and any damp balsa 'around the corner' at the transom/hull junction, other than it would be unlikely to make a solid bond to that balsa.
Given I've already put a couple of (admittedly small) holes in the inner transom skin, I'm considering going a step farther, and removing the majority of the inner skin, leaving a ~2" margin around the edges for ease of replacement. This would allow easier access to remove the remaining balsa, and give that otherwise-inaccessible lower transom area a better sand/clean prep for CarbonBond adhesion. I'd either replace the skin with a new panel before pouring, or make a temporary dam to seal the gap where the panel was removed, pour CarbonBond within the temporarily sealed transom, then apply fiberglass on the cured CarbonBond surface once I'd removed the dam. I'd need a bit more thought before landing on how exactly to pull this off - it's certainly the more involved option (for my level of fiberglass experience). |
|
| Back to top |
|
|
Donald Tyson
Joined: 24 Jul 2023
Posts: 588
Photos: Thistle
|
| Posted: Fri May 30, 2025 2:07 pm Post subject: |
|
|
| This was a scary post. Ill be checking my transom. |
|
| Back to top |
|
|
Ctarmigan
Joined: 14 Nov 2019
Posts: 54
City/Region: Whitehorse
State or Province: YT
C-Dory Year: 2004
C-Dory Model: 22 Cruiser
Vessel Name: Ptarmigan
Photos: Ptarmigan
|
| Posted: Fri May 30, 2025 2:34 pm Post subject: |
|
|
| Donald - before doing any digging, I'd think about Clay's advice: consider what you can legitimately defer until after this boating season is complete (keeping in mind your own appetite for risk tolerance). My transom core did need replacing, but I suspect I would have been fine for another season if I hadn't dug into it so comprehensively already. |
|
| Back to top |
|
|
thataway
Joined: 02 Nov 2003
Posts: 21549
City/Region: Pensacola
State or Province: FL
C-Dory Year: 2007
C-Dory Model: 25 Cruiser
Vessel Name: thataway
Photos: Thataway
|
| Posted: Sat May 31, 2025 4:48 pm Post subject: |
|
|
| When we beefed up the (non bad core) transom on the 2003 25 I felt it was prudent to put a couple of more layers of epoxy resin and 1708 on the inner surface of the transom, and spread it out over the splash well and to the corners of the transom inside. |
|
| Back to top |
|
|
Reelin2
Joined: 18 Oct 2022
Posts: 32
City/Region: Ferndale
State or Province: WA
C-Dory Year: 1990
C-Dory Model: 22 Cruiser
Vessel Name: Go Fish
Photos: Reelin2
|
| Posted: Wed Jun 04, 2025 12:55 am Post subject: Carbon Core |
|
|
| I did a transom on a classic with Carbon Core. The work is the prep, cleaning the old core. I added a couple layers of glass to the outer skin, this served two functions, added a bit of strength but mainly wanted to fill all the holes 😀. You can view some photos under the Hunky Dory album. |
|
| Back to top |
|
|
Donald Tyson
Joined: 24 Jul 2023
Posts: 588
Photos: Thistle
|
| Posted: Wed Jun 04, 2025 10:43 am Post subject: |
|
|
I'm an amateur but am resilient and mostly successful with my projects largely because I ask too many questions or read too much ahead of time. Groups like this are very enabling and accountable. We're blessed. 35 years ago there wasn't yet a reliable internet but Don Casey and many, many others wrote books that even I could understand and follow. In addition to repairing and replacing all the decking/flooring/fairing on a 28' sailboat I have also repaired others and have built a number of dinghy sized craft for various uses.
I used some System 111 and some West System but most on my 40-50 gallons came from RAKA marine in Ft Pierce FL. They are a smaller business and are careful with your orders. I also used their fillers and tools and fiberglass. Seem to be really good people. www.raka.com. But there are many out there and I'm sure that they all have their good points. Rake an always sold 2" Natural bristle brushes and I liked them a lot. If indeed you are going to repair a transom you'll need tongue depressors, two or three sizes of mixing cups and a smallish electric drill bit thingy for mixing the larger batches.
If I were stuck with replacing the transom core it would likely be done from the outside. My handsome bulbous build would not perform well with an inside repair.
Before doing anything I'd get lots of advice, filter that advice and compare it to what you find on forums and internet sources.
When ready, if it were me, with my bad back and all, I'd remove all the engines and gear and jack the boat up to mid-thigh hight so that the top is a hair less than shoulder high. Have a couple of various height stools and devise some way to reinforce or clamp as needed. People that have done this exact boat will have the know-how you need.
Cousa will be way better than balsa in my opinion. |
|
| Back to top |
|
|
Donald Tyson
Joined: 24 Jul 2023
Posts: 588
Photos: Thistle
|
| Posted: Wed Jun 04, 2025 11:19 am Post subject: Re: Carbon Core |
|
|
Do you regret the removal of the center cleat on the foredeck when you installed the anchor. I'd like to know if the chain rubs on the deck and if the deck has shown any wear. May I PM you? Getting ready to instal the new lodestar drum winch on my 22.
| Reelin2 wrote: | | I did a transom on a classic with Carbon Core. The work is the prep, cleaning the old core. I added a couple layers of glass to the outer skin, this served two functions, added a bit of strength but mainly wanted to fill all the holes 😀. You can view some photos under the Hunky Dory album. |
|
|
| Back to top |
|
|
Ctarmigan
Joined: 14 Nov 2019
Posts: 54
City/Region: Whitehorse
State or Province: YT
C-Dory Year: 2004
C-Dory Model: 22 Cruiser
Vessel Name: Ptarmigan
Photos: Ptarmigan
|
| Posted: Mon Jun 09, 2025 6:22 pm Post subject: |
|
|
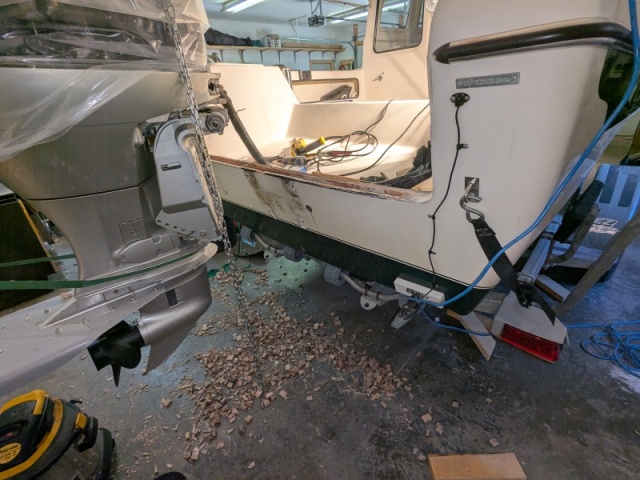
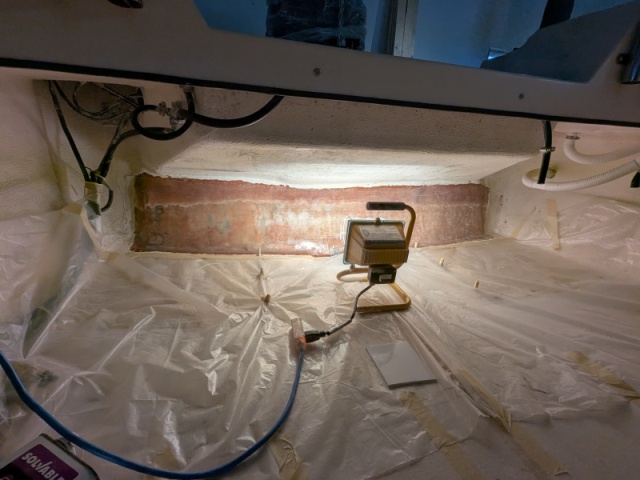
Considerable onward progress over the past week or so.
I removed all of the balsa core in the transom, all the way down to the hull. This was pretty tedious. I completed most removal with a 1" spade bit on extensions, busting up balsa into bits that could be removed with a shopvac. As I got closer to the bottom, I modified the spade bit by grinding off the central threaded point, so as not to bore through the fiberglass. From there, I removed the rest with a piece of metal pipe that I'd fashioned a little 90-degree sharpened prong into the end of - I could use this to hook under remaining balsa chunks (whacking it with a rubber mallet to gain purchase) then pulling upward to free them from the fiberglass. Finally, I removed the remaining morsels at the very bottom and edges of the cored area with a wire brush on drill extensions.
Once all the balsa was removed, I went over both skins thoroughly with an aggressive 1" flap wheel, and thoroughly wiped down with acetone (rag-on-stick method).
 |
|
| Back to top |
|
|
Ctarmigan
Joined: 14 Nov 2019
Posts: 54
City/Region: Whitehorse
State or Province: YT
C-Dory Year: 2004
C-Dory Model: 22 Cruiser
Vessel Name: Ptarmigan
Photos: Ptarmigan
|
| Posted: Mon Jun 09, 2025 7:13 pm Post subject: |
|
|
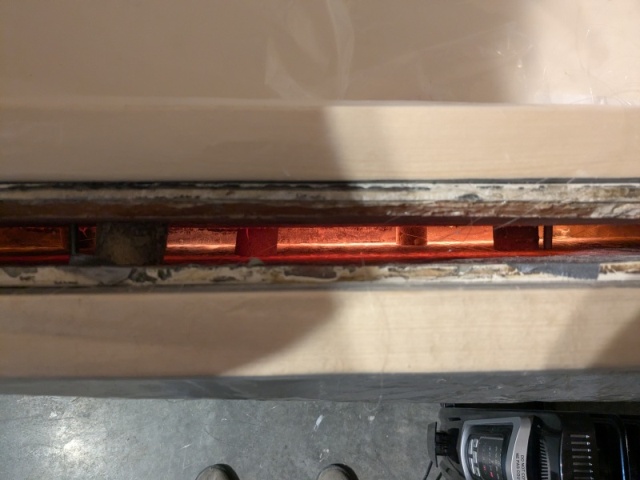
Removing the core made apparent how thin the inner fiberglass skin below the splashwell really was. Much of it appeared to be 1-2 thin layers of glass, with gelcoat/paint forming the majority of its thickness. Not a surprise that I'd made a few holes with the spade bit. Grinding away the gelcoat/paint, it took careful work not to wear more holes in the underlying fiberglass layer.
Seeing this, and keeping Dr. Bob's advice in mind on reinforcing this area, I chose to add a couple layers of fiberglass to this whole surface, using epoxy. The thin expanse extended down to the floor, so I tabbed down onto that. An area of thicker glass extended down ~6" from the top of the area under the splashwell (visible in the second photo below). I overlapped that area by ~5".
Two layers of woven glass mat, and three subsequent coats of neat epoxy.
 |
|
| Back to top |
|
|
Ctarmigan
Joined: 14 Nov 2019
Posts: 54
City/Region: Whitehorse
State or Province: YT
C-Dory Year: 2004
C-Dory Model: 22 Cruiser
Vessel Name: Ptarmigan
Photos: Ptarmigan
|
| Posted: Mon Jun 09, 2025 7:31 pm Post subject: |
|
|
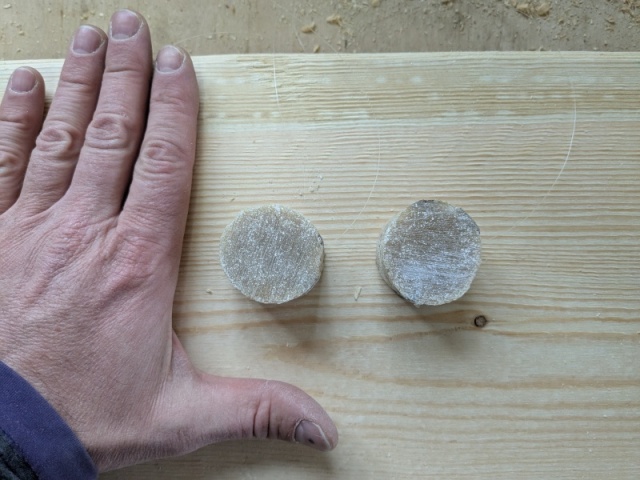
Inner transom skin dealt with, it was time to prep for replacing the removed balsa core with CarbonBond.
This job was 95% preparation. Pouring was going to be easy, but also non-replicable - very important to get everything right before actually doing it.
My first step began concurrently with re-glassing the inner transom. I'd take the remnant epoxy from each application cycle, mix it with wood dust and pour it into toilet paper roll molds. From the resultant cylinders of hardened epoxy, I cut a series of 1" thick pucks, to use as spacers within the transom void to maintain the same uniform 1" thickness the balsa core had. I puzzled over how to keep them in place while I applied clamping pressure from the outside, and in the end drilled a hole through each one and strung them on a loop of fishing line. I used this to dangle them down within the void to where I wanted them, and then taped off the loop of line to keep them in place. Once I had external clamping pressure holding them in place, I could snip the fishing line and pull it out.
Epoxy spacer pucks on strings
Spacer pucks dangled in place
 |
|
| Back to top |
|
|
|
 Search
 Private Messages
 Profile
 Log in
 Register
 Help
Help
