| View previous topic :: View next topic |
| Author |
Message |
clayhubler
Joined: 03 Aug 2019
Posts: 374
City/Region: La Center
State or Province: WA
C-Dory Year: 2003
C-Dory Model: 22 Cruiser
Vessel Name: Hammerhead
Photos: Merlin and Hammerhead
|
 Posted: Sun Aug 15, 2021 1:38 am Post subject: Cavitation plate repair Posted: Sun Aug 15, 2021 1:38 am Post subject: Cavitation plate repair |
 |
|
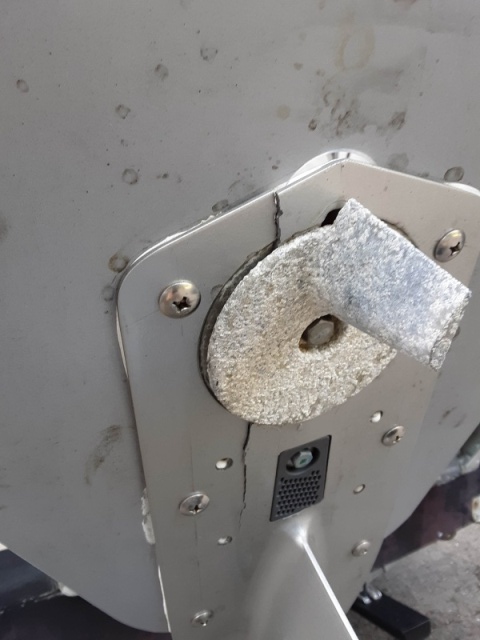
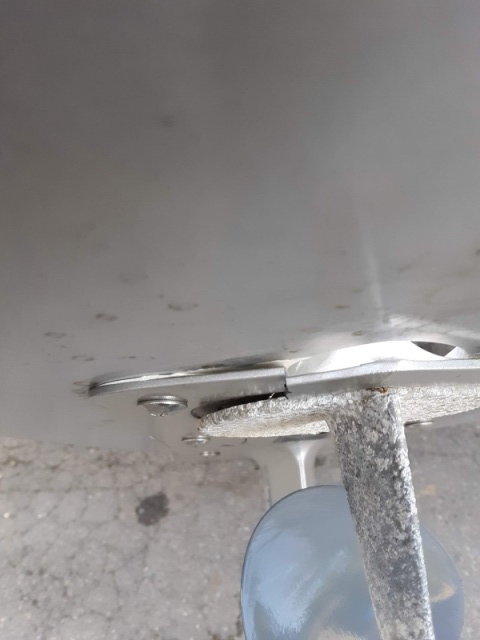
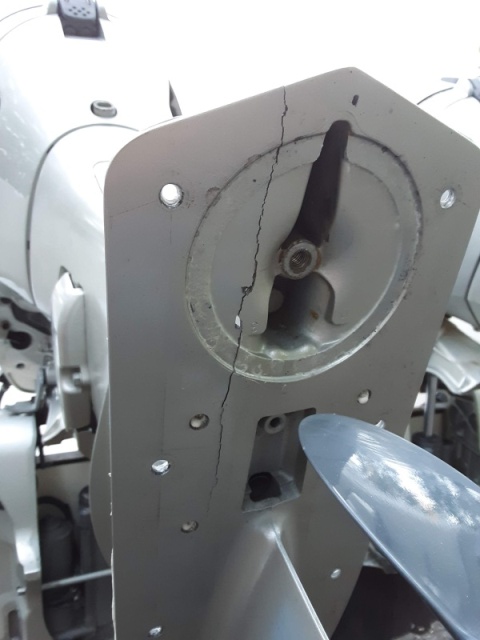
This happened last summer, before I took Hammerhead apart for repairs. The boat had permatrims on each engine. After pulling her out of the water at Bellingham, my wife says "is that crack supposed to be there?" I do recall hitting a small log on the return run from the islands. It wasn't big enough that I even thought about checking for damage. I do not know for sure what caused this. Both of the lower units were replaced by the previous owner and were less that a year old when this happened. I installed the permatrims after reading about them on this site. I had previously installed the doel-fin hydrofoil, as I had good results with them on the last boat. Perhaps having extra holes from the doelfin caused this?
Anyways, I made an attempt to repair it at the time. I can weld aluminum but not really well. The repair held for a while, but was starting to crack when I removed the motors for the repairs. I think in this case the weld was contaminated because I didn't clean the back (underside) and also I was worried about melting seals in the lower unit, so I didn't weld very much at a time.
I'm going to try and repair this using epoxy and fiberglass. I know there is an etching compound that west system makes for adhesion to aluminum. But I read about some articles by west system and they now recommend g/flex 650 for aluminum. I happen to have some that I bought for another project that I haven't used yet, so I am going to give this a try. Supposedly you can wet out glass cloth with the gflex just like 105. I'm going to grind and clean the area, top and bottom, and then put build up the area with glass. Hopefully I can sand this down and paint to match the rest of the motor. I do not plan to put the permatrims back on, because I am concerned about another failure.
If anybody has any thoughts on this I would love to hear about it.
Thanks all
_________________
Clay
Hammerhead
2003 22í Cruiser
Merlin
1986 26í Cruiser |
|
| Back to top |
|
 |
ssobol
Joined: 27 Oct 2012
Posts: 3589
City/Region: SW Michigan
State or Province: MI
C-Dory Year: 2008
C-Dory Model: 22 Cruiser
Vessel Name: SoBELLE
Photos: SoBelle
|
 Posted: Sun Aug 15, 2021 12:09 pm Post subject: Posted: Sun Aug 15, 2021 12:09 pm Post subject: |
 |
|
I think that the amount of fiberglass required to make this repair suitably strong is going to be excessive. You're going to have to grind away most of the FG where the trim tab fits.
IMO this needs to be stop drilled and welded. Right now the crack is about 2/3 the length of the cavitation plate. It could either propagate further along the current line until that part of the plate comes off completely or it could propgate such that the lower unit gear area is cracked and water enters and lubricant leaks out.
I would question whether the lower units were new or used. Also, whether the permatrims were installed correctly. One of the images shows that the permatrim is not flat on the cavitation plate (or the permatrim got bent). The lower units are cast aluminum which is more brittle than AL sheet or machined material. Permatrims are sheet AL and can tolerate more bending without compromise than the cast lower unit. |
|
| Back to top |
|
 |
T.R. Bauer
Joined: 17 Nov 2007
Posts: 1808
City/Region: Wasilla
State or Province: AK
C-Dory Year: 1993
C-Dory Model: 22 Cruiser
Vessel Name: C-Whisperer
|
 Posted: Sun Aug 15, 2021 12:33 pm Post subject: Posted: Sun Aug 15, 2021 12:33 pm Post subject: |
 |
|
I've TIG welded on lower units before and they came out fine (actually really well) but never a big crack like that. Holy smokes! If it were mine, I'd probably try to go that route. And I'd probably make another plate out of aluminum with a similar shape as the cavitation plate and weld it on too just to be sure there was strength there. With this, I would feel good about putting the foil back on. You're right about going slow and giving it a chance to rest - thin alloy stuff warps like crazy. And in the back of my mind, I'd know there is a chance that I may be buying a lower unit.....
I do not think any of your bolt holes caused it to do this - no cracks seem to originate from them. And I don't think foils directly caused it either - the log probably did. It started as a small little crack most likely and then the forces at play caused the crack to get larger and larger. The foil was probably actually holding it together. It's also very possible the casting wasn't that good either and contributed. I've seen tons of cracked cast aluminum casings over the years on cars, trucks, bikes, mowers - you name it. Sometimes they just fatigue and crack. Or, they are porous, leak, and then crack. It's the nature of aluminum.
As far as your plan to fix it - no idea if that will work. It doesn't sound to me like it would be all that structural and I suspect glue and glass will not stop the cracks you have from running even more. There is a ton of vibration and stress on a lower unit while underway. I don't know everything and you may very well prove me wrong - actually hoping you do  |
|
| Back to top |
|
 |
san juanderer
Joined: 12 Aug 2014
Posts: 235
City/Region: Stanwood
State or Province: WA
C-Dory Year: 1990
C-Dory Model: 22 Angler
|
 Posted: Sun Aug 15, 2021 2:29 pm Post subject: Posted: Sun Aug 15, 2021 2:29 pm Post subject: |
 |
|
That is a big crack.
I do not think epoxy or fiberglass will fix that.
For a chance, take it to someone that is skilled at aluminum welding.
But you may be having to be looking for a new lower unit.
I think the impact, exerted stresses greater than you might have thought.
Dang debris! |
|
| Back to top |
|
 |
ssobol
Joined: 27 Oct 2012
Posts: 3589
City/Region: SW Michigan
State or Province: MI
C-Dory Year: 2008
C-Dory Model: 22 Cruiser
Vessel Name: SoBELLE
Photos: SoBelle
|
 Posted: Sun Aug 15, 2021 3:17 pm Post subject: Posted: Sun Aug 15, 2021 3:17 pm Post subject: |
 |
|
| Possible that the prop drove the debris into the cavitation plate with more force than just the impact of driving into something. |
|
| Back to top |
|
 |
clayhubler
Joined: 03 Aug 2019
Posts: 374
City/Region: La Center
State or Province: WA
C-Dory Year: 2003
C-Dory Model: 22 Cruiser
Vessel Name: Hammerhead
Photos: Merlin and Hammerhead
|
 Posted: Fri Aug 27, 2021 1:03 am Post subject: Posted: Fri Aug 27, 2021 1:03 am Post subject: |
 |
|
Okay, I guess I am one of those guys that asks for advice, and then just does whatever he wants anyways...
I decided the try the epoxy and fiberglass route to repair this. I was temped to try the weld repair again. But I felt that I should probably take it apart to make sure I didn't melt any seals, and I didn't feel like doing that. I also didn't feel like taking it to a pro, because that takes time and money...
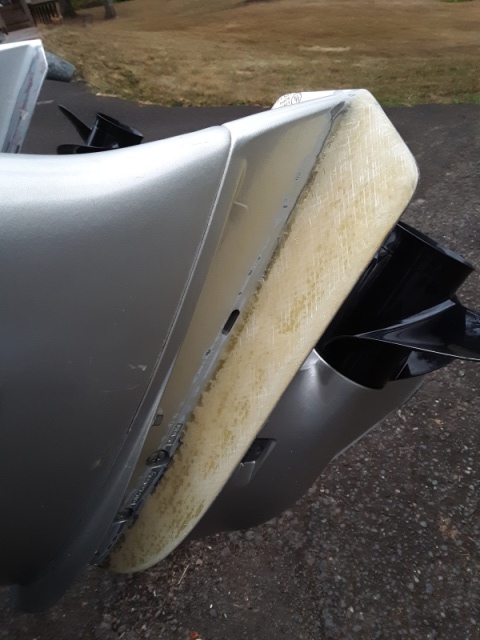
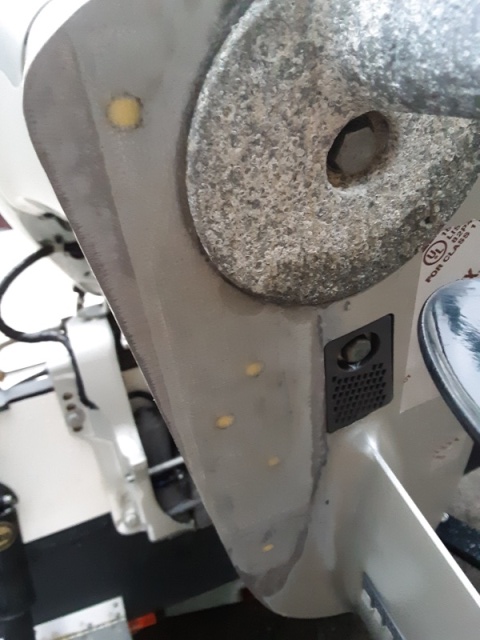
First time I have used the g/flex epoxy, and it does not behave like the 105. I ground the repair area with a coarse sanding disc. I taped the bottom of the cav plate so I could fill the bolt holes with epoxy. Then I cut two layers of 1708, one slightly larger than the other, and wetted them out on a piece of plastic. I put some g/flex that had been thickened and filled in the bolt holes and the crack. Then laid the 1708 over that. The g/flex is really thick and gooey, but it is supposed to adhere to aluminum really well (according to manufacturer). The next day I ground some of the excess off, and then decided to use 105 epoxy to wet out the single piece of 6oz cloth I put over the bottom of the crack. I would have like to use more glass there, but the trim anode needs to bolt on over the top of the repair, so it couldn't be real thick. The topside is thicker than the original cav plate, but I don't think it matters. After everything cured I ground it down a little to smooth everything out. I will sand it to a better finish and paint later if this continues to hold.
The good news is that the g/flex does appear to adhere very well. It is also supposed to be a little flexible and vibration resistant. The repair seems extremely strong so far. I ran the boat for a couple hours in the river today, and I am pleased with the results. If this works, then I will have only spent about 25 bucks to repair this.
 |
|
| Back to top |
|
 |
ssobol
Joined: 27 Oct 2012
Posts: 3589
City/Region: SW Michigan
State or Province: MI
C-Dory Year: 2008
C-Dory Model: 22 Cruiser
Vessel Name: SoBELLE
Photos: SoBelle
|
 Posted: Fri Aug 27, 2021 11:47 am Post subject: Posted: Fri Aug 27, 2021 11:47 am Post subject: |
 |
|
| Did you stop drill the crack? |
|
| Back to top |
|
 |
clayhubler
Joined: 03 Aug 2019
Posts: 374
City/Region: La Center
State or Province: WA
C-Dory Year: 2003
C-Dory Model: 22 Cruiser
Vessel Name: Hammerhead
Photos: Merlin and Hammerhead
|
 Posted: Fri Aug 27, 2021 11:51 am Post subject: Posted: Fri Aug 27, 2021 11:51 am Post subject: |
 |
|
| Yes, 1/8" |
|
| Back to top |
|
 |
localboy
Joined: 30 Sep 2006
Posts: 4673
City/Region: Lake Stevens via Honolulu
State or Province: WA
C-Dory Year: 2007
C-Dory Model: 25 Cruiser
Vessel Name: 'Au Kai (Ocean Traveler)
Photos: 'AU KAI
|
 Posted: Fri Aug 27, 2021 1:31 pm Post subject: Posted: Fri Aug 27, 2021 1:31 pm Post subject: |
 |
|
| Quote: | | Okay, I guess I am one of those guys that asks for advice, and then just does whatever he wants anyways... |
 
Iíll be curious if this holds. Looks good though.
_________________
"We can go over there...behind the 'little one'....."
Wife to her husband pointing @ us...from the bow of their 50-footer; Prideaux Haven 2013 |
|
| Back to top |
|
 |
|

 Search
 Private Messages
 Profile
 Log in
 Register
 Help
Help


