| View previous topic :: View next topic |
| Author |
Message |
homerjack
Joined: 12 Mar 2011
Posts: 186
City/Region: Homer
State or Province: AK
C-Dory Year: 1988
C-Dory Model: 22 Cruiser
Vessel Name: 49er
Photos: 49er
|
 Posted: Tue Aug 22, 2017 9:53 pm Post subject: Bomar Berth Hatch Posted: Tue Aug 22, 2017 9:53 pm Post subject: Bomar Berth Hatch |
 |
|
| Inspected my hatch today and found the seal (gasket?) That seats the hatch to the hull is disintegrating and is very likely source of my rainwater intrusion (though the cushions are never wet). Would appreciate a walkthrough of removing hatch. Is this in fact a gasket? Available? Or just 4200? It seems substantial, like 1/2" thick or so. |
|
| Back to top |
|
 |
tsturm
Joined: 01 Nov 2003
Posts: 1172
City/Region: Soldotna
State or Province: AK
C-Dory Year: 2003
C-Dory Model: 25 Cruiser
Vessel Name: JMR TOO
Photos: JMR-TOO
|
| Posted: Wed Aug 23, 2017 12:12 am Post subject: Re: Bomar Berth Hatch |
|
|
| homerjack wrote: | | Inspected my hatch today and found the seal (gasket?) That seats the hatch to the hull is disintegrating and is very likely source of my rainwater intrusion (though the cushions are never wet). Would appreciate a walkthrough of removing hatch. Is this in fact a gasket? Available? Or just 4200? It seems substantial, like 1/2" thick or so. |
Get the model / serial # off the inside of the hatch, wander down to the Gear Shed, if they don't have one they can order a replacement.  |
|
| Back to top |
|
|
homerjack
Joined: 12 Mar 2011
Posts: 186
City/Region: Homer
State or Province: AK
C-Dory Year: 1988
C-Dory Model: 22 Cruiser
Vessel Name: 49er
Photos: 49er
|
| Posted: Wed Aug 23, 2017 12:19 am Post subject: |
|
|
| Cool. Thanks. So just screw off hatch, scrape off old gasket, put new gasket and replace hatch? Any additional sealant? |
|
| Back to top |
|
|
thataway
Joined: 02 Nov 2003
Posts: 21497
City/Region: Pensacola
State or Province: FL
C-Dory Year: 2007
C-Dory Model: 25 Cruiser
Vessel Name: thataway
Photos: Thataway
|
| Posted: Wed Aug 23, 2017 11:25 am Post subject: |
|
|
If I interrupt the original post, There is an issue where the hatch frame screws to the deck--not the gasket between the clear opening aluminum frame and the fixed frame. If this is the problem, see below.
There is no gasket between the hatch and deck. This is a sealant. The factory used some Bostec compound in the past--don't know what is used now.
I have removed the forward hatch on every one of my C Dorys, In each boat the cutout was too large. I undercut the wet/damaged core, as well as the screw holes. I filled these with thickened epoxy and then drilled new pilot holes for the screws. In two of the boats, Put a couple layers of glass around the periphery of the cut out, to assure a snugger fit. Then I put the hatch back in using 3M 4000, and tightened the screws back down.
_________________
Bob Austin
Thataway
Thataway (Ex Seaweed) 2007 25 C Dory May 2018 to Oct. 2021
Thisaway 2006 22' CDory November 2011 to May 2018
Caracal 18 140 Suzuki 2007 to present
Thataway TomCat 255 150 Suzukis June 2006 thru August 2011
C Pelican; 1992, 22 Cruiser, 2002 thru 2006
Frequent Sea; 2003 C D 25, 2007 thru 2009
KA6PKB
Home port: Pensacola FL |
|
| Back to top |
|
|
homerjack
Joined: 12 Mar 2011
Posts: 186
City/Region: Homer
State or Province: AK
C-Dory Year: 1988
C-Dory Model: 22 Cruiser
Vessel Name: 49er
Photos: 49er
|
| Posted: Wed Aug 23, 2017 11:53 am Post subject: |
|
|
| Thanks Bob for clarifying gasket issue. Yes I was speaking of seal between hatch and deck. |
|
| Back to top |
|
|
tsturm
Joined: 01 Nov 2003
Posts: 1172
City/Region: Soldotna
State or Province: AK
C-Dory Year: 2003
C-Dory Model: 25 Cruiser
Vessel Name: JMR TOO
Photos: JMR-TOO
|
| Posted: Wed Aug 23, 2017 7:33 pm Post subject: Re: Bomar Berth Hatch |
|
|
| tsturm wrote: | | homerjack wrote: | | Inspected my hatch today and found the seal (gasket?) That seats the hatch to the hull is disintegrating and is very likely source of my rainwater intrusion (though the cushions are never wet). Would appreciate a walkthrough of removing hatch. Is this in fact a gasket? Available? Or just 4200? It seems substantial, like 1/2" thick or so. |
Get the model / serial # off the inside of the hatch, wander down to the Gear Shed, if they don't have one they can order a replacement. |
The 1/2 inch thick, must have confused me. I assumed Hatch lid to base seal.
 |
|
| Back to top |
|
|
homerjack
Joined: 12 Mar 2011
Posts: 186
City/Region: Homer
State or Province: AK
C-Dory Year: 1988
C-Dory Model: 22 Cruiser
Vessel Name: 49er
Photos: 49er
|
| Posted: Wed Aug 23, 2017 7:48 pm Post subject: |
|
|
| No problem. It is a pretty thick bead was put there once upon a time. |
|
| Back to top |
|
|
Phil Barnes
Joined: 20 Jul 2010
Posts: 126
City/Region: Colorado /San Juan Islands
State or Province: CO
C-Dory Year: 1991
C-Dory Model: 22 Cruiser
Vessel Name: Swan-C
|
| Posted: Thu Aug 24, 2017 11:30 am Post subject: Bowmar Berth Hatch |
|
|
Another question on the Bowmar Hatch is whether they still make a screen that fits over the opening.
Mine is an older model (1991) and the Bowmar Hatch is a 90006390, probably about 20 inches by 20 inches.
I don't find it in Bowmar online literature but haven't called them yet.
Has anyone else found a screen for this model?
Thanks! |
|
| Back to top |
|
|
thataway
Joined: 02 Nov 2003
Posts: 21497
City/Region: Pensacola
State or Province: FL
C-Dory Year: 2007
C-Dory Model: 25 Cruiser
Vessel Name: thataway
Photos: Thataway
|
| Posted: Thu Aug 24, 2017 3:00 pm Post subject: |
|
|
You don't need to buy a screen. I had given some away a couple of years ago. I use "Army no see-um netting"--had to buy a full tent sized piece. Fiberglass window screen works very well, Put velcro on the around the hatch on the overhead--we used the sticky back white velcro, and it has been on about 5 years. We secure the velcro on the on the net with hot glue.
We use the same technique for the front opening window. These screens are much easier to stow than the fixed aluminum framed screen.
Here is a photo of our front window "no see-um net" Cut outs for arms and latch cams.
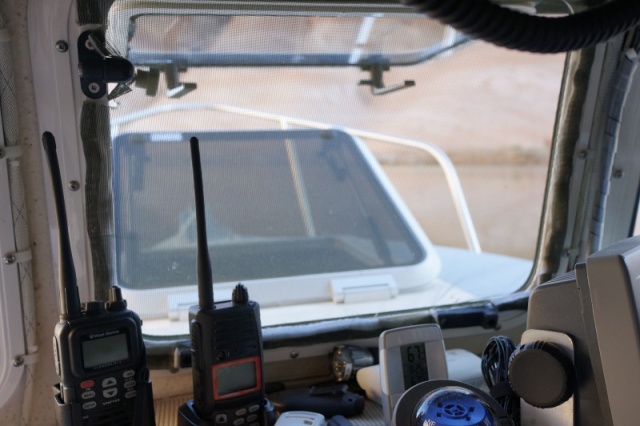
Close up of Velcro on the screen:
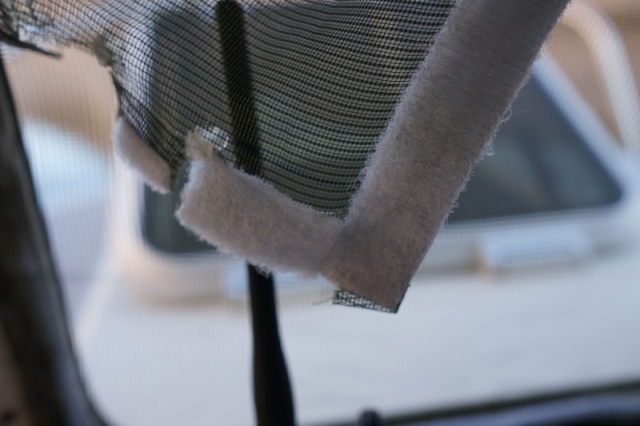
The factory screens work best with a frame designed for them. |
|
| Back to top |
|
|
tsturm
Joined: 01 Nov 2003
Posts: 1172
City/Region: Soldotna
State or Province: AK
C-Dory Year: 2003
C-Dory Model: 25 Cruiser
Vessel Name: JMR TOO
Photos: JMR-TOO
|
| Posted: Thu Aug 24, 2017 10:56 pm Post subject: Re: Bowmar Berth Hatch |
|
|
| Phil Barnes wrote: | Another question on the Bowmar Hatch is whether they still make a screen that fits over the opening.
Mine is an older model (1991) and the Bowmar Hatch is a 90006390, probably about 20 inches by 20 inches.
I don't find it in Bowmar online literature but haven't called them yet.
Has anyone else found a screen for this model?
Thanks! |
Bomar will have them, but they are like $80.00 buckos  |
|
| Back to top |
|
|
gstraub
Joined: 02 Aug 2017
Posts: 129
City/Region: Callao
State or Province: VA
C-Dory Year: 1998
C-Dory Model: 22 Cruiser
Vessel Name: EnDoryFun
Photos: EnDoryFun
|
| Posted: Wed Aug 30, 2017 7:53 pm Post subject: |
|
|
I've done the exact same velcro thing on our sailboat and it works excellent.
Gerhard |
|
| Back to top |
|
|
Phil Barnes
Joined: 20 Jul 2010
Posts: 126
City/Region: Colorado /San Juan Islands
State or Province: CO
C-Dory Year: 1991
C-Dory Model: 22 Cruiser
Vessel Name: Swan-C
|
| Posted: Thu Aug 31, 2017 4:44 pm Post subject: Bowmar Berth Hatch |
|
|
| Thanks for the ideas! $80 Buckos buys a lot of screen and velcro! |
|
| Back to top |
|
|
Deeplake
Joined: 06 Jun 2020
Posts: 21
City/Region: Sandpoint
State or Province: ID
C-Dory Year: 2006
C-Dory Model: 22 Cruiser
Photos: Deeplake
|
| Posted: Sat Sep 05, 2020 4:09 pm Post subject: Bomar Hatch Leaking |
|
|
Homerjack, here is what I did recently on my 1989 22.
1. Removed hatch, 12 screws plus 6 more at hinges
2. Scraped all old sealant off cabin roof, didnt seem like enough?
3. Cleared underside of hatch of old sealant
4. Injected gitrot into balsa surrounding the Full opening, some soft spots, didnt want to pull it all out and re-do with new balsa as soft spots were only in one corner. Also brushed gitrot around complete opening to seal balsa.
5 When gitrot dried, sealed opening with 5200 to keep water out since cutout was larger than hatch.
6. Over drilled the 12 holes and filled with epoxy.
7. Re-drilled the holes down through bottom layer of glass to use bolts vs screws. Used hatch as guide.
8. Placed a layer of butyl tape on under side of hatch
9. Inserted screws through hatch/butyl and wrapped the protruding part with small amount of butyl.
10. Filled pre-drilled holes with 4200
11. Placed hatch in position and pushed bolts through
12. Tightened bolts/nuts to firm, waited 24 hours then re tightened, butyl squeezed out slightly, so I knew I had good seal. Used stainless nuts and bolts , with medium sized washer.
Now I need to tackle the leaking wood handrail screws, winter project. Never ending, the joys of an older boat!
Curt |
|
| Back to top |
|
|
Deeplake
Joined: 06 Jun 2020
Posts: 21
City/Region: Sandpoint
State or Province: ID
C-Dory Year: 2006
C-Dory Model: 22 Cruiser
Photos: Deeplake
|
| Posted: Sat Sep 05, 2020 4:15 pm Post subject: Bomar Hatch Leaking |
|
|
Homerjack, here is what I did recently on my 1989 22.
1. Removed hatch, 12 screws plus 6 more at hinge
2. Scraped all old sealant off cabin room, didnt seem like enough?
3. Cleared underside of hatch of old sealant
4. Injected gitrot into balsa surrounding the Full opening, some soft spots, didnt want to pull it all out and re-do with new balsa as soft spots were only in one corner. Also brushed gitrot around complete opening to seal balsa.
5 when gitrot dried, sealed opening with 5200 to keep water out since cutout was larger than hatch.
6. Over drilled the 12 holes and filled with epoxy.
7. Re-drilled the holes through bottom layer of glass to use bolts vs screws.
8. Placed a layer of butyl tape on under side of hatch
9. Inserted screws through hatch/butyl and wrapped the protruding part with small amount of butyl.
10. Filled pre-drilled holes with 4200
11. Placed hatch in position and pushed bolts through
12. Tightened bolts/nuts to firm, waited 24 hours then re tightened, butyl squeezed out slightly, so I knew I had good seal. Used stainless nuts and bolts , with medium sized washer.
Now I need to tackle the leaking wood handrail screws, winter project. Never ending, the joys of an older boat!
Curt |
|
| Back to top |
|
|
|
 Search
 Private Messages
 Profile
 Log in
 Register
 Help
Help
