| View previous topic :: View next topic |
| Author |
Message |
bmacpiper
Joined: 03 Jun 2007
Posts: 211
City/Region: Bainbridge Island
State or Province: WA
C-Dory Year: 2007
C-Dory Model: 22 Cruiser
Vessel Name: Big Blue
|
 Posted: Wed Apr 30, 2014 3:34 pm Post subject: Fixed my slow starter on etec 50 Posted: Wed Apr 30, 2014 3:34 pm Post subject: Fixed my slow starter on etec 50 |
 |
|
Hey all,
I have had a problem with one of my 2007 etec 50s since late last year, where it would turn over very slowly, almost not turning at all, and then start. I tore into things yesterday to see what I could find, and wanted to document it for the list.
Obviously disconnect the battery ground first.
To remove the starter, there are three bolts--two can be reached immediately, but the third is hidden. It is actually easier to leave these three bolts in place until the following is done. Since it can never be easy, you need to remove the left cowling of the motor (7x 8mm bolts), the shroud over the flywheel (four screws to expose the wiring, take a picture, unplug everything, then the shroud has three grommets that slip up and off the allen head studs they are on), then one screw on the front of the airbox and the airbox has to be kind of squeaked through a tight spot to remove it. Now you can get to the third bolt holding the starter, from the front. Before you take out the three mounting bolts, remove the power wire (red) and ground wire (black) from the starter as well. Starter now comes out easily.
There are then two long bolts that hold the starter housing together. Remove those (they squeak), and you can now take the top and bottom off the starter. The top has a bushing for the motor shaft to ride in (add a little bearing grease) and the snap gear is above. The bottom has four brushes, two positive and two negative--the positive ones are attached to where you disconnected the positive power wire, and they are shielded. The negative ones are bare copper. There is also a bushing for the bottom of the motor shaft, add a bit of grease there too.
In my case, one of the negative brushes was totally loose, i.e. the screw to hold it in was never tightened at the factory. I tightened that, and then used a brass brush on the four brushes and the surface they contact on the motor (rotor? stator? can't remember the name of that part). I also added a very light coating of dielectric grease to the brushes and the surface where they rub.
Going back together is a little tricky, because the brushes are spring-loaded and you have to hold four of them in place while getting the lower shaft into the bushing in the bottom cap.
So first, insert the shaft and then add the top cap--note that there is a line and a dot and/or a notch so the parts can only go together one way. Same with the bottom cap. Next, use some tool to hold the four springs in place as you carefully line up the notch and tab in the bottom cap, and slide the cap into place. At this point, gently slide your tool back out. If you let the bottom cap come away too far, the brushes will spring out of their slots and you'll have to try again. In my picture below, I had a u-shaped tool that is made to hold back the shroud on a gas pump, i.e. the kind where the pump won't work if the shroud isn't pushed back a certain distance. The tool is useful if you ride a motorcycle--so you don't have to bury the nozzle in the tank to dispense gas. Anyway, the spacing on it was perfect, and it was thin enough. I imagine a couple of tongue depressors might work also.
Critical step: after you have the tail cap in place, crack it open maybe 1/8"--enough to get a clear view of the brushes, but not enough to let them spring out of their slots. Be SURE to visualize each brush and ensure it is in it's slot; else you will have a mess the first time you turn the motor over after all the time and effort of reassembly.
Tighten the two long bolts to hold the starter together, and be sure everything turns and moves easily--and note that when the snap gear is down (not engaged), if you turn counter-clockwise it will seem to bind. This is not important because it never needs to turn in that position under normal operation.
When all was done and said, my starter turned over like a brand new one--fast and free and started right up. Not sure if it was the loose brush, or cleaning the brushes, or more than likely some of both. But I'll take out the other one somewhere down the road and do the same service. New starters are $200, so call it two Franklins saved, not to mention the labor of the dealer.
Best to all, photos below,
Ben
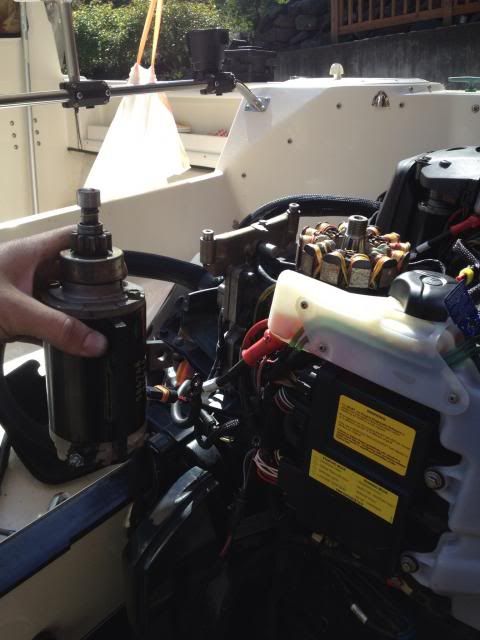
Motor torn down, starter out (flywheel was also removed in this pic).
A look at the bottom cap, with four brushes out of their slots. Negative ones are right and left; positive are top and bottom.

Holding the brushes back with the gas nozzle tool.

The cigarette butt that fell out of the cowling when I removed it. Who is ballsy enough to smoke while working on a gasoline engine, but sissy enough to smoke menthol???

_________________
bmc
"Do it today, you may not pass this way again!"
2005 16 Cruiser, "Natural Blue", sold 2009
2004 19 Angler, "Crush", sold 2012
2007 22 Cruiser, "Big Blue", purchased 2012 |
|
| Back to top |
|
 |
BrentB
Joined: 15 Jul 2006
Posts: 4420
City/Region: Greenwood
State or Province: IN
Photos: BrentB
|
| Posted: Wed Apr 30, 2014 7:30 pm Post subject: |
|
|
Great job and informative
Thanks
_________________
Brent Barrett |
|
| Back to top |
|
|
journey on
Joined: 03 Mar 2005
Posts: 3598
City/Region: Valley Centre
State or Province: CA
C-Dory Year: 2005
C-Dory Model: 25 Cruiser
Vessel Name: journey on
Photos: Journey On
|
| Posted: Wed Apr 30, 2014 9:44 pm Post subject: |
|
|
Ben,
Enjoyed your writeup. It really feels good to solve a problem by working on it, instead of spending money.
Two comments. First, dielectric grease is non-conductive as it's name implies. If you spread it over the brushes and commutator, I'm glad it worked.
And next, I really enjoyed that shot of the tool that "holds back the shroud on a gas pump, i.e. the kind where the pump won't work if the shroud isn't pushed back a certain distance." And it looks like you bought it. I had to make mine for the Ford truck, otherwise I'd never fill the 32 gal tank. Since Ford says they never heard of the problem, I assumed I was one of a few. Good to know that others lift the shroud.
Boris |
|
| Back to top |
|
|
|
|
You cannot post new topics in this forum
You cannot reply to topics in this forum
You cannot edit your posts in this forum
You cannot delete your posts in this forum
You cannot vote in polls in this forum
You cannot attach files in this forum
You cannot download files in this forum
|
|
 Search
 Private Messages
 Profile
 Log in
 Register
 Help
Help
