| View previous topic :: View next topic |
| Author |
Message |
wanna-be
Joined: 14 Feb 2012
Posts: 29
City/Region: crescent city
State or Province: CA
C-Dory Model: 22 Angler
Vessel Name: none
|
 Posted: Wed Feb 13, 2013 11:49 am Post subject: repairing holes Posted: Wed Feb 13, 2013 11:49 am Post subject: repairing holes |
 |
|
| Hi guys have 3/8 hole in transom came with boat after removing transducer along with 5 screw holes what is best method to seal them up for carefree future? thanx |
|
| Back to top |
|
 |
Sunbeam
Joined: 23 Feb 2012
Posts: 3990
City/Region: Out 'n' About
State or Province: Other
C-Dory Year: 2002
C-Dory Model: 22 Cruiser
Photos: Sunbeam
|
| Posted: Wed Feb 13, 2013 12:37 pm Post subject: Re: repairing holes |
|
|
| wanna-be wrote: | | Hi guys have 3/8 hole in transom came with boat after removing transducer along with 5 screw holes what is best method to seal them up for carefree future? thanx |
Hi there, wann-be (sounds like you ARE now  ) )
Good on you for being interested in doing a good job vs. just globbing on some silicone (my nemesis  ) The short story is to fill them with thickened epoxy, and then paint or gelcoat over. More detail: ) The short story is to fill them with thickened epoxy, and then paint or gelcoat over. More detail:
Here is how I would handle those holes (presuming you are not re-using them).
1) Remove all traces of caulking.
2) Slightly over-drill holes, and then either look at the "shavings" on the drill bit or pick out some additional material with a dental pick or the like. I look this over carefully to determine if it is wet or damp. If it's wet it will be fairly obvious; damp can be a little sneakier. I like to take a bit of the core and squeeze it between two fingers, then see if it leaves any moisture on them. When drilling, running the drill bit backwards first will help to avoid gelcoat chip out. Or I chamfer it a bit first with a chamfering bit. (You can tape over the area when making new holes; I don't find this works as well on existing holes.)
3) I remove any wet or damp core, back to dry, (usually light-colored and almost "crisp") core. If this gets extensive, post back in the thread and we can go from there. Presuming things are basically dry, we can move forward. I also pick out a bit of additional material to make it so the fill is larger in diameter than the hole. This adds an element of "keying" the epoxy in place (although it already makes very good secondary bonds).
4) Vacuum and then wash the hole with solvent (I use denatured alcohol, you can also use acetone)
5) Cover the hole and out around it with blue tape, then take an Exacto knife and cut out hole again. If there is a place where epoxy even might consider droozling down, cover that too. Put some spare pieces of tape around the area, just stuck up so you can grab them with sticky gloves without getting it on anything.
6) Now I get my epoxy gear together. Suit, gloves, respirator (if using colloidal silica filler), more gloves, mixing stick, filler, small tubes, syringe, acid brush, pipe cleaner, toothpick or sliver of water jug, etc. You want to keep epoxy off your skin.
7) Filling a "blind" hole is always tricky. Blind meaning that there is no second hole for air to come out of. If you just fill from the opening you'll trap air in there and that's not good. So the objective is to fill from the back to the front of the hole, which will push the air out ahead of the epoxy. Depending on the depth, I either use just a syringe or I take some electrical shrink tubing that I can fit on the end of the syringe (or a straw). I have used a baggie with the corner clipped, but that's hard to get into the back of a small hole.
8 ) Back to the repair. I mix up a bit of neat (just resin and hardener) epoxy. Then I soak the "walls" of the hole with it. I use a pipe cleaner on a small hole, or an acid brush (sometimes trimmed with scissors). Next I thicken the rest of it (in the cup) with colloidal silica or some other structural filler. If it's a hole with a horizontal top, I keep it somewhat soupy, maybe like thin catsup; on a hole with a vertical wall, I will mix it a bit thicker, like mayonnaise. But not as thick as peanut butter. Then I load the syringe (with thinner stuff you can suck it up; with thicker you have to load it in with a small spatula of some type or a stick, then put the plunger in. I tip it up like in the doctor shows and purge the air as well as I can. Then I get the tip (or tube that I have on the tip) at the back of the hole and slowly start filling it. The air should come out ahead of the syringe tip. I pull the syringe slowly out as I go, so epoxy fills the hole left by the syringe. Then I spatula in a bit for good measure if I need to, and slap a piece of tape over it all (making it flattish, not too humped).
9) If I possibly can, I get back to the hole during the "green" stage of the epoxy (still rubbery) and then I can "slice" it off nice and flat with a chisel.
Notes on finishing:
1) Epoxy does not resist UV well, so it needs to be covered by something on the surface.
2) If your boat is bottom painted, you can just paint over the flat repair with bottom paint (and barrier coat if you have that already).
3) If it is gelcoated, you may want to re-gelcoat. There are a couple of schools of thought on this: One is that (polyester) gelcoat will never stick to epoxy. Another (see WEST article) is that gelcoat will stick to well-cured epoxy. In speaking with WEST on the phone they advised to make sure not to mix the batch hardener rich if you are going to gelcoat it (that said, it still needs to be properly measured; they are talking hairs of difference here). "Free" hardener is apparently what causes the problems. A third option (which I just learned about and am doing test panels with at the moment) is to use System Three's SB-112 epoxy, and then gelcoat over it within 48 hours. That can just be a topcoat; you don't have to do the repair with it. I guess let's see what you have on your boat currently before going further on these lines?
Sunbeam  |
|
| Back to top |
|
|
wanna-be
Joined: 14 Feb 2012
Posts: 29
City/Region: crescent city
State or Province: CA
C-Dory Model: 22 Angler
Vessel Name: none
|
| Posted: Thu Feb 14, 2013 10:40 am Post subject: |
|
|
| Sunbeam you are definitely a bright shining ray thanks |
|
| Back to top |
|
|
nimrod
Joined: 15 Jul 2008
Posts: 268
City/Region: Mount Vernon
State or Province: WA
C-Dory Year: 1996
C-Dory Model: 22 Cruiser
Vessel Name: 'Berta's Boy
Photos: 'Berta's Boy
|
| Posted: Wed Apr 03, 2013 2:51 am Post subject: |
|
|
OK, so what if I have "extensive" damp core?
I'm tackling the "improperly prepared trim tab screw holes" job and there is more damp core than I can get at with enlarged holes.
jd |
|
| Back to top |
|
|
Sunbeam
Joined: 23 Feb 2012
Posts: 3990
City/Region: Out 'n' About
State or Province: Other
C-Dory Year: 2002
C-Dory Model: 22 Cruiser
Photos: Sunbeam
|
| Posted: Wed Apr 03, 2013 11:35 am Post subject: |
|
|
| nimrod wrote: | | I'm tackling the "improperly prepared trim tab screw holes" job and there is more damp core than I can get at with enlarged holes. |
Ugh, I'm sorry to hear that, but it's good you are going to get it taken care of (bad that you have to though  ) )
I'm going to preface this by saying that core repair is one of those subjects that has different "right" answers and methods for different people. I'm one that likes to make sure it is ALL GONE, but I'll admit that that can make a project get bigger, and also that there is probably a case to be made that some (not tons, but some) damp core can probably be left in, as long as there is no de-bonding (where skins and core are no longer stuck together). Bonding is what provides the strength in a cored layup.
So anyway, back to your trim tab plane mounting holes. Let me first ask how you are doing it when you say you have reached the limit of digging out the core and it's still not dry. I ask just in case you may be able to go farther with a different method. The way I used to "wallow out" the holes for mine was to drill the initial holes with a .... I think it was a 9/16" drill bit, but it might have been 17/32". At any rate, it was just over half, and the size was chosen so I could fit a #115 Dremel bit in the hole, with room to move it around a bit. I was able to get quite a bit of core removed beyond the sides of the holes (in other words, back cut). I then used a dental pick to "reach in" further and claw out more. The pick will sort of snag chunks of core and pull it out from further in than you would think.
If you've already got a wide hole such as I describe above, and the core is still damp, then you have a decision point. If you want/need to remove more core, you have to cut some of the fiberglass skin off, and then "put it back" in the form of new cloth. However you then need to make a large bevel (like a scarph in wood) where the new and old fiberglass meet, so it can get to be larger in terms of disturbed surface. There is no problem in replacing lost strength (repair may be stronger than original), but just it's more labor and materials. If you have bottom paint it's less of a "thing" to deal with as you only need to fair the repair reasonably well and then re-paint (plus barrier coat if you have it on). You don't technically need to re-gelcoat in that situation.
On the decision part: IF you are comfortable with it, and IF there is no de-bonding (skins and core are still firmly stuck together), then there is a case to be made for just re-filling the enlarged hole with thickened epoxy and moving on from there. It probably won't bond to the damp core, but it will bond to the insides of the inner and outer skin, and should in that way prevent more water from getting in at that location. I'm anal and have to dig it all out back to dry, no matter what, but I think that some damp, but well-bonded core left in will probably not hurt anything if it does not bother you. So it's possible to not have perfection (shocker).
If you have more details about exactly what you have done and are faced with, I/we could probably think of more things to suggest. Even after re-coring whole decks ( ), I'm still coming up with new ideas and techniques for making it go better (and for preventing any "whole re-cores" on this boat!) ), I'm still coming up with new ideas and techniques for making it go better (and for preventing any "whole re-cores" on this boat!)
Sunbeam |
|
| Back to top |
|
|
localboy
Joined: 30 Sep 2006
Posts: 4673
City/Region: Lake Stevens via Honolulu
State or Province: WA
C-Dory Year: 2007
C-Dory Model: 25 Cruiser
Vessel Name: 'Au Kai (Ocean Traveler)
Photos: 'AU KAI
|
|
| Back to top |
|
|
rogerar
Joined: 10 May 2008
Posts: 146
City/Region: SW FL
State or Province: FL
C-Dory Year: 1999
C-Dory Model: 22 Cruiser
Vessel Name: Duck
Photos: Duck
|
|
| Back to top |
|
|
thataway
Joined: 02 Nov 2003
Posts: 21385
City/Region: Pensacola
State or Province: FL
C-Dory Year: 2007
C-Dory Model: 25 Cruiser
Vessel Name: thataway
Photos: Thataway
|
| Posted: Thu Apr 04, 2013 6:21 pm Post subject: |
|
|
If this is a 1996 boat transom--is it balsa or plywood? As I recollect my 1993 22 was plywood. The 2003 C Dory 25 transom was plywood. My 2006 C Dory 22 is foam core.
_________________
Bob Austin
Thataway
Thataway (Ex Seaweed) 2007 25 C Dory May 2018 to Oct. 2021
Thisaway 2006 22' CDory November 2011 to May 2018
Caracal 18 140 Suzuki 2007 to present
Thataway TomCat 255 150 Suzukis June 2006 thru August 2011
C Pelican; 1992, 22 Cruiser, 2002 thru 2006
Frequent Sea; 2003 C D 25, 2007 thru 2009
KA6PKB
Home port: Pensacola FL |
|
| Back to top |
|
|
nimrod
Joined: 15 Jul 2008
Posts: 268
City/Region: Mount Vernon
State or Province: WA
C-Dory Year: 1996
C-Dory Model: 22 Cruiser
Vessel Name: 'Berta's Boy
Photos: 'Berta's Boy
|
| Posted: Thu Apr 04, 2013 6:57 pm Post subject: |
|
|
Well, I'm not absolutely sure. But in looking at the stuff I dug out of the holes I think it's balsa.
jd |
|
| Back to top |
|
|
Sunbeam
Joined: 23 Feb 2012
Posts: 3990
City/Region: Out 'n' About
State or Province: Other
C-Dory Year: 2002
C-Dory Model: 22 Cruiser
Photos: Sunbeam
|
| Posted: Thu Apr 04, 2013 7:48 pm Post subject: |
|
|
Just to round out the collection of transom core materials, my 2002 is balsa. I've now drilled into it pretty much all over and have not found anything else (what I mean is that in the course of trim tabs, Mini-Jacker mounts, transducers, and swim platform, I've covered the map pretty well; not that I'm just drilling willy-nilly  ) )
Here are a few photos of (dry) balsa core - does yours look like this?
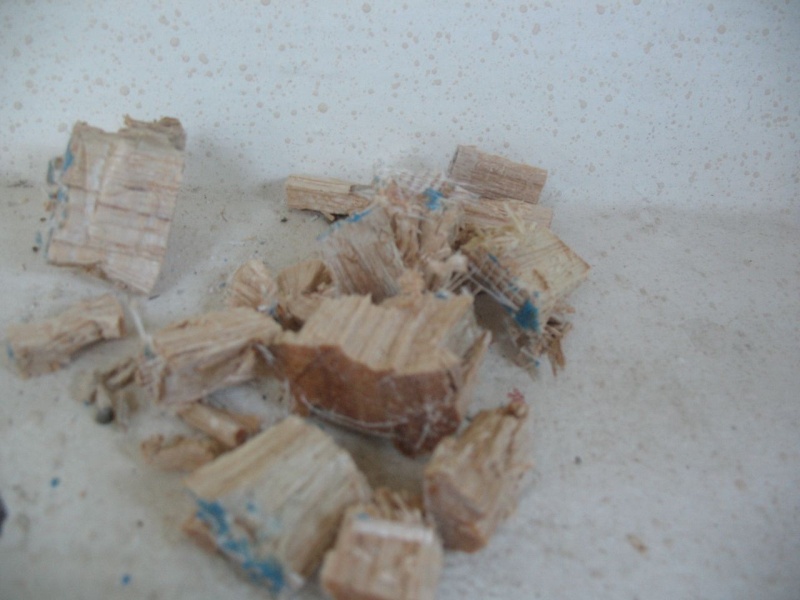
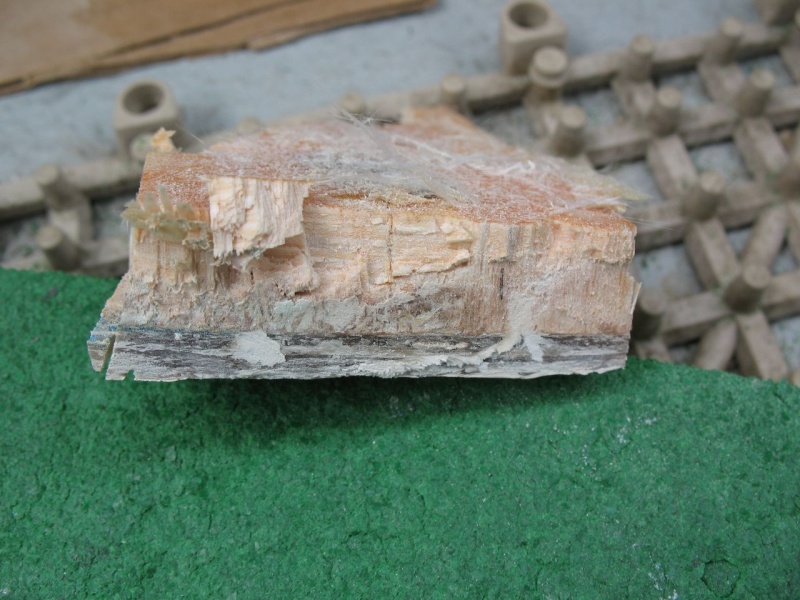
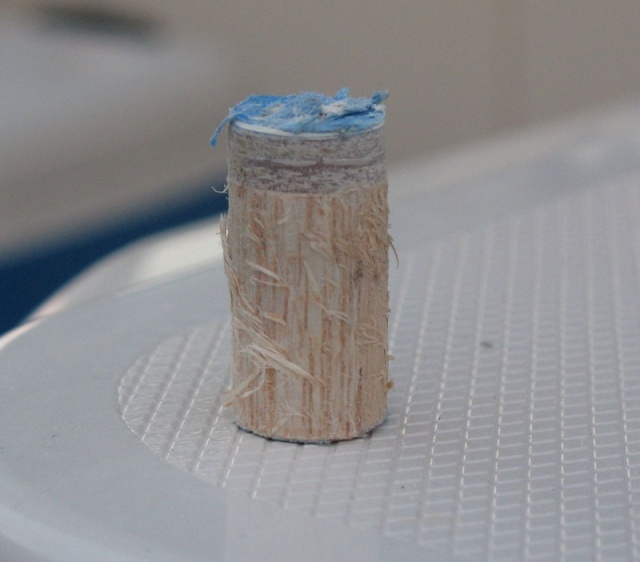
Damp balsa will look similar, but darker; and rotten balsa can become really tobacco-juicy looking or even black and soupy (of course by then rotten plywood might look similar).
When I mentioned pulling out "tufts" of core with a dental pick - that applies to balsa, but probably not plywood (I've never worked with plywood core though).
Sunbeam |
|
| Back to top |
|
|
|
|
You cannot post new topics in this forum
You cannot reply to topics in this forum
You cannot edit your posts in this forum
You cannot delete your posts in this forum
You cannot vote in polls in this forum
You cannot attach files in this forum
You cannot download files in this forum
|
|
 Search
 Private Messages
 Profile
 Log in
 Register
 Help
Help
