| View previous topic :: View next topic |
| Author |
Message |
Jake B
Joined: 06 Jun 2012
Posts: 521
City/Region: Sequim
State or Province: WA
C-Dory Year: 1989
C-Dory Model: 22 Cruiser
Vessel Name: PLUS 3
Photos: PLUS 3
|
 Posted: Sat Jun 16, 2012 7:55 pm Post subject: cuddy hach leak Posted: Sat Jun 16, 2012 7:55 pm Post subject: cuddy hach leak |
 |
|
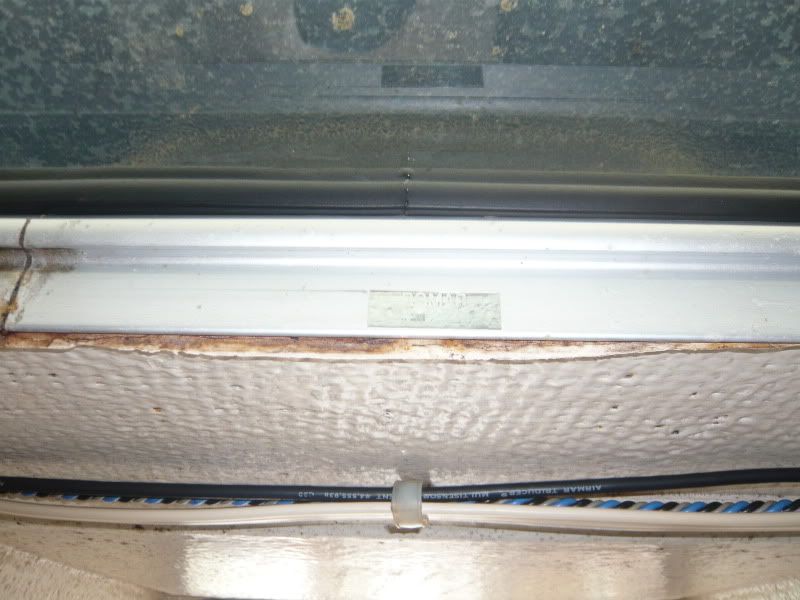
so spent about 4 hours pressure washing off 14 years of grime today on the boat. When I was done I went inside and seen that there was a few water spots on the cuddy cusions. wich confirmed what I thought and that was I had a leaking hatch door. I have checked it before after a rain and not seen any full penetration.
It seems to be worse on one side and the others don't seem so bad. so my question is has anyone dealt with a leak like this and what would be the best way to go about fixing it? I took one picture of the worse spot attached below. thanks for any help. I am hoping someone has done one of those step by step write ups i have seen on other fixes
 |
|
| Back to top |
|
 |
Mike-CD22
Joined: 30 Oct 2011
Posts: 24
City/Region: Manassas
State or Province: VA
C-Dory Year: 2004
C-Dory Model: 22 Cruiser
Vessel Name: Brook C
Photos: Mike-CD22
|
| Posted: Sat Jun 16, 2012 8:53 pm Post subject: |
|
|
Jake,
Do a search for "leaky hatch". I had the same problem. I found that after slicing the previous bonding material with a sharp utility knife, when I removed the hatch trim, I noticed the factory did not apply enough sealant. I removed all of the wet core material and filled with epoxy filler. This time I put a bunch of 5200 to make sure no more leaks.
Mike |
|
| Back to top |
|
|
Rock-C
Joined: 01 Nov 2003
Posts: 521
City/Region: Salem
State or Province: OR
C-Dory Year: 1988
C-Dory Model: 22 Cruiser
Vessel Name: Rock-C
Photos: Rock-C
|
| Posted: Sat Jun 16, 2012 10:40 pm Post subject: |
|
|
Jake
I also had a leaking front hatch. When I removed the hatch I found the core was soaked. I dug out all the wet balsa, let it dry out really well, and filled with thickened epoxy. Sealed the hatch real well when I reinstalled.
Good luck.
Terry
ps: I would be carefull using 5200. You may never get the hatch out again.
_________________
Terry, Ann & Chloe
Rock-C
C-Brat # 26 |
|
| Back to top |
|
|
thataway
Joined: 02 Nov 2003
Posts: 21387
City/Region: Pensacola
State or Province: FL
C-Dory Year: 2007
C-Dory Model: 25 Cruiser
Vessel Name: thataway
Photos: Thataway
|
| Posted: Sat Jun 16, 2012 11:40 pm Post subject: |
|
|
Many times the cutout is not exact, and this necessitates more caulking that is desirable (the fit should be snug around the frame). Two C Dories I had to actually add a little glass, after I removed core and filled with epoxy.
I would suggest 3M 4000, It is about the same as 4200, but not affected by UV light.
Removed the hatch and all caulking--then remove any wet core, and fill with thickened epoxy, then rebed with the 4000.
_________________
Bob Austin
Thataway
Thataway (Ex Seaweed) 2007 25 C Dory May 2018 to Oct. 2021
Thisaway 2006 22' CDory November 2011 to May 2018
Caracal 18 140 Suzuki 2007 to present
Thataway TomCat 255 150 Suzukis June 2006 thru August 2011
C Pelican; 1992, 22 Cruiser, 2002 thru 2006
Frequent Sea; 2003 C D 25, 2007 thru 2009
KA6PKB
Home port: Pensacola FL |
|
| Back to top |
|
|
Mike-CD22
Joined: 30 Oct 2011
Posts: 24
City/Region: Manassas
State or Province: VA
C-Dory Year: 2004
C-Dory Model: 22 Cruiser
Vessel Name: Brook C
Photos: Mike-CD22
|
| Posted: Sun Jun 17, 2012 3:26 am Post subject: |
|
|
Thanks Bob, you are right,
I actually did go to West Marine and bought and used a tube of 3M 4000 because it read on the package for sealing hatches.
Sometimes I get my sealants confused 
Mike |
|
| Back to top |
|
|
Jake B
Joined: 06 Jun 2012
Posts: 521
City/Region: Sequim
State or Province: WA
C-Dory Year: 1989
C-Dory Model: 22 Cruiser
Vessel Name: PLUS 3
Photos: PLUS 3
|
| Posted: Mon Jun 18, 2012 12:26 pm Post subject: |
|
|
thanks guys and sounds like a pretty simple fix and will move it to the top end of the list to get taken care of.
also i did not know 4200 was uv effected and thats good to know. i will get some 4000.
is there any epoxy that is better than the next? never really worked with it before.
again thanks for the replys on how to fix. |
|
| Back to top |
|
|
Sunbeam
Joined: 23 Feb 2012
Posts: 3990
City/Region: Out 'n' About
State or Province: Other
C-Dory Year: 2002
C-Dory Model: 22 Cruiser
Photos: Sunbeam
|
| Posted: Mon Jun 18, 2012 2:01 pm Post subject: |
|
|
I've used a few different brands of "real" marine epoxy and found them all to be satisfactory (System 3, WEST System, etc.). For home mixing, I find I like the ones with a 1:2 ratio as I can use my own cups vs. using (and store) pumps, which one typically uses with 1:5 ratio product, such as WEST System. The latter is a fine epoxy, though, and they have great tech support.
Speaking of which, if you haven't worked with epoxy much (or for a refresher), I recommend checking out WEST and/or Sytem 3's free booklets (available online, but I can't get to the links just now - should be easily found). The advice will apply to most brands.
There are now some special epoxies that come in convenient 1:1 bottles too (G/flex, etc.) Those or the WEST "catsup packet" repair kits are handy to carry along, with a bit of thickener, for projects that may crop up.
I wouldn't use "hardware store"/5-minute type epoxy for your boat/core projects. |
|
| Back to top |
|
|
Jake B
Joined: 06 Jun 2012
Posts: 521
City/Region: Sequim
State or Province: WA
C-Dory Year: 1989
C-Dory Model: 22 Cruiser
Vessel Name: PLUS 3
Photos: PLUS 3
|
| Posted: Mon Jun 18, 2012 10:46 pm Post subject: |
|
|
sunbeam, thanks for the info i will look up the booklets online and read up before I try and tackle it. seeing that the rain season is about over here I will probably wait until august to do as we will have better weather windows at that time.
again thanks everyone for the how to its much appreciated. |
|
| Back to top |
|
|
Jake B
Joined: 06 Jun 2012
Posts: 521
City/Region: Sequim
State or Province: WA
C-Dory Year: 1989
C-Dory Model: 22 Cruiser
Vessel Name: PLUS 3
Photos: PLUS 3
|
| Posted: Tue May 07, 2013 1:09 am Post subject: |
|
|
| so after fixing this almost a year ago i noticed it is starting to leak again. due to replacing all the balsa with epoxy My main guess is that the bed of 4200 failed. so I will remove and re bed. Is there anything better than 4200 to use? kind of surprised it failed so soon |
|
| Back to top |
|
|
Ray
Joined: 13 Dec 2011
Posts: 271
City/Region: Pamlico River
State or Province: NC
C-Dory Year: 2007
C-Dory Model: 25 Cruiser
Vessel Name: Seaweed
Photos: Seaweed
|
| Posted: Tue May 07, 2013 12:51 pm Post subject: |
|
|
It is likely not the sealant/adhesive, especially 4200.
I have had "professionals" do sealing work that was horrendous and leaking just days later due to improper cleaning prior to adhesion/assembly. I have since not allowed "professionals" to work on my boat.
Cleanliness is EVERYTHING when you are dealing with this kind of work. EVERY seal will fail with even a small amount of dirt/grit or grease/oil/silicone present at the assembly junction.
Second to cleanliness is making sure that there is sufficient sealant remaining at the joint when it is assembled. Many times folks clamp down on a freshly-bedded assembly so hard that all of the sealant is squeezed out at the joint, leaving only the mating surfaces to provide a watertight seal.
A good general procedure is to do the following:
1) Bevel all through-holes that screws/bolts use with a V-shaped countersink (various web links for this available)
2) Clean all surfaces, clean them a second time, and then clean them once more
3) Apply sealant and snug down, but not too tight
4) After sealant dries, tighten the final amount
JM (non-professional) HO.... |
|
| Back to top |
|
|
thataway
Joined: 02 Nov 2003
Posts: 21387
City/Region: Pensacola
State or Province: FL
C-Dory Year: 2007
C-Dory Model: 25 Cruiser
Vessel Name: thataway
Photos: Thataway
|
| Posted: Tue May 07, 2013 1:35 pm Post subject: |
|
|
First I would want to know exactly where the leak was occurring? Is it around the flange of the hatch, or is it actually the hatch plastic as it is embeded in the frame? None of the hatches I have fixed have had recurrence of leakage. (3 C Dories)
In the hatches I repaired, I had to add glass in most of them, because the cutout was too larger. Made it snug, (of course filled the balsa round the cutout with epoxy. Made sure that the screws only went into epoxy--not into the balsa.
I have not found it necessary to tighten further on the urethane sealants. If you have some reason to use silicone sealants, then a further slight tightening might be of value. Remember when you turn the screws, you will break the seal on the screws, and perhaps increase the chance of a leak there. |
|
| Back to top |
|
|
Sunbeam
Joined: 23 Feb 2012
Posts: 3990
City/Region: Out 'n' About
State or Province: Other
C-Dory Year: 2002
C-Dory Model: 22 Cruiser
Photos: Sunbeam
|
| Posted: Tue May 07, 2013 8:25 pm Post subject: |
|
|
I agree with Ray's advice on cleanliness and preparation, and also chamfering fastener holes. I don't follow the tighten/let cure/re-tighten philosophy; rather I like to bed generously, tighten fully, and clean up (if possible only moving the inside fasteners and not the outside heads). I don't disturb the caulk after that. This would be with a "gushy" compound such as polyurethane, polysulfide, etc.
On something like the hatch I would probably use a good (i.e. very stretchy) butyl tape, but I would also expect success with polyurethane, polysulfide or polyether.
Were you really generous with the caulking? I mean, did lots smoosh out everywhere? Or were you more parsimonious and "tidy" with it? Just a small gap or hole will cause a leak. Without being able to see it, or knowing exactly what you did, that would be my first guess (but for all I know you used a whole tube).
Sunbeam |
|
| Back to top |
|
|
Jake B
Joined: 06 Jun 2012
Posts: 521
City/Region: Sequim
State or Province: WA
C-Dory Year: 1989
C-Dory Model: 22 Cruiser
Vessel Name: PLUS 3
Photos: PLUS 3
|
| Posted: Tue May 07, 2013 9:00 pm Post subject: |
|
|
I used a liberal amount of seal when I did it. i did tighten all the way the first time and although I never had a problem with doing it that way it makes sense that there would be little left. it looks to be leaking from the starboard side right near the corner closest to the bow. all i saw was where water had leaked onto cuddy and seen a faint line from there to a rain drop on the ceiling. I don't believe its the hatch itself leaking but more the seal( i will confirm this tomorrow when cleaning boat). I also do know that it is a new leak when i first fixed it i soaked the hatch for a good while to see if i could get it to leak.
the only thing that may have done it too. is my mother in law and wife were hanging out up there when we were out shrimping on sat? |
|
| Back to top |
|
|
Sunbeam
Joined: 23 Feb 2012
Posts: 3990
City/Region: Out 'n' About
State or Province: Other
C-Dory Year: 2002
C-Dory Model: 22 Cruiser
Photos: Sunbeam
|
| Posted: Tue May 07, 2013 10:37 pm Post subject: |
|
|
If it's the glass in the frame leaking, I think I posted links to new glass/seal parts (if you have the same hatch) in an earlier thread. Maybe if you searched on "Pompanette," as I think I mentioned them in my post (I have limited Internet at the moment so can't search it).
So maybe your bedding job was already just fine. I've never had an issue with "oversqueezout" when tightening down in one step, myself. I mean, there has always been enough caulking left to do the job.
Vexing when you did it all "right," isn't it? *cry
Sunbeam |
|
| Back to top |
|
|
thataway
Joined: 02 Nov 2003
Posts: 21387
City/Region: Pensacola
State or Province: FL
C-Dory Year: 2007
C-Dory Model: 25 Cruiser
Vessel Name: thataway
Photos: Thataway
|
| Posted: Tue May 07, 2013 10:52 pm Post subject: |
|
|
I am very reluctant to use butyl tape, unless thru bolted, especially on hatches which are on the deck.
I do avoid stepping or sitting on the hatch, but they do seem to be up to it. I have been using this type of hatch since 1971, and yet to have one fail.
I do have to emphaisze that you want the cut out to be snug around the hatch bevel. If it is not, then fill the areas where it is not with glass tape and epoxy, epoxy with filler.
The aluminum has to be very clean--especially if someone by mistake used silicone on it at one time. (there are some structural silicones, but these are not what you find at West Marine or Home Depot). The urethane adhesives remain the best to use, but adhesion to aluminum is less in shear than it is to fiberglass. (See the brochures by 3 M for details). before you fit the hatch with sealant, put masking tape around the edges to make clean up of extra sealant easier. When you put the sealant in, use plenty, and especially at the "L" of the frame from the horizontal to the vertical bevel. You want this entire area full of sealant. It will squeeze out--so you need to have plastic taped under the hatch. |
|
| Back to top |
|
|
|
 Search
 Private Messages
 Profile
 Log in
 Register
 Help
Help
